
Android ConstraintLayout约束布局使用详解
基本属性
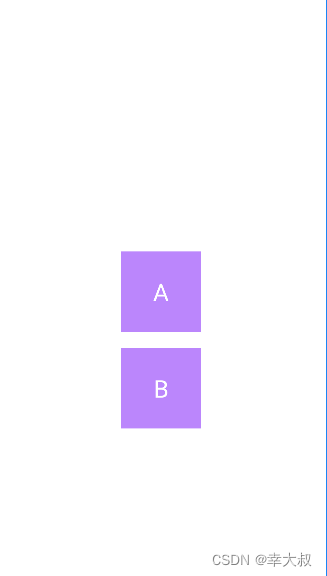
可以让本View的一个方向置于目标View的一个方向,比如
layout_constraintBottom_toBottomOf:本View的下面置于目标View的下面,与此类似的还有 layout_constraintEnd_toEndOf,
layout_constraintStart_toStartOf,layout_constraintTop_toTopOf,layout_constraintBottom_toTopOf 等等。
例如,B放在A的上面,就可以让B的下面置于A的上面
<?xml version="1.0" encoding="utf-8"?>
<androidx.constraintlayout.widget.ConstraintLayout xmlns:android="http://schemas.android.com/apk/res/android"
    xmlns:app="http://schemas.android.com/apk/res-auto"
    xmlns:tools="http://schemas.android.com/tools"
    android:layout_width="match_parent"
    android:layout_height="match_parent"
    tools:context=".MainActivity">
    <TextView
        android:id="@+id/a"
        android:layout_width="100dp"
        android:layout_height="100dp"
        android:background="@color/purple_200"
        android:gravity="center"
        android:text="@string/a"
        android:textColor="@color/white"
        android:textSize="30sp"
        app:layout_constraintBottom_toBottomOf="parent"
        app:layout_constraintEnd_toEndOf="parent"
        app:layout_constraintStart_toStartOf="parent"
        app:layout_constraintTop_toTopOf="parent" />
    <TextView
        android:id="@+id/b"
        android:layout_width="100dp"
        android:layout_height="100dp"
        android:background="@color/purple_200"
        android:gravity="center"
        android:text="@string/b"
        android:textColor="@color/white"
        android:textSize="30sp"
        app:layout_constraintBottom_toTopOf="@id/a"
        app:layout_constraintEnd_toEndOf="parent"
        app:layout_constraintStart_toStartOf="parent"
        app:layout_constraintTop_toTopOf="parent" />
</androidx.constraintlayout.widget.ConstraintLayout>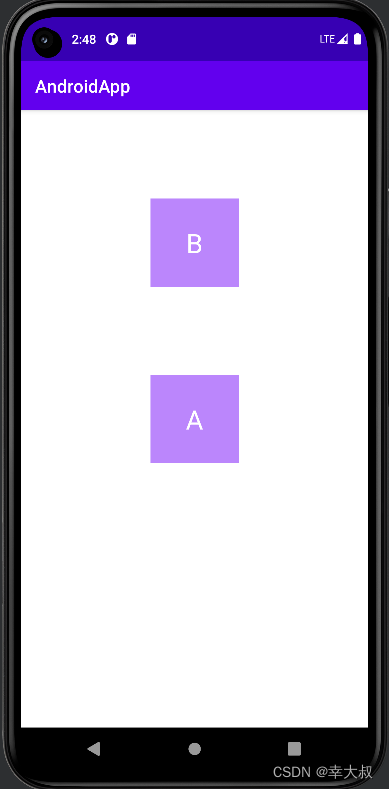
还有一个属性就是 layout_constraintBaseline_toBaselineOf,这个可以让其内部文字对齐。
约束强度
利用 layout_constraintHorizontal_bias 和 layout_constraintVertical_bias,可以设置控件在水平和垂直方向上的偏移量,值为0-1
比如,让一个控件居中显示,我们会这样写
<?xml version="1.0" encoding="utf-8"?>
<androidx.constraintlayout.widget.ConstraintLayout xmlns:android="http://schemas.android.com/apk/res/android"
    xmlns:app="http://schemas.android.com/apk/res-auto"
    xmlns:tools="http://schemas.android.com/tools"
    android:layout_width="match_parent"
    android:layout_height="match_parent"
    tools:context=".MainActivity">
    <TextView
        android:id="@+id/a"
        android:layout_width="100dp"
        android:layout_height="100dp"
        android:background="@color/purple_200"
        android:gravity="center"
        android:text="@string/a"
        android:textColor="@color/white"
        android:textSize="30sp"
        app:layout_constraintBottom_toBottomOf="parent"
        app:layout_constraintEnd_toEndOf="parent"
        app:layout_constraintStart_toStartOf="parent"
        app:layout_constraintTop_toTopOf="parent" />
</androidx.constraintlayout.widget.ConstraintLayout>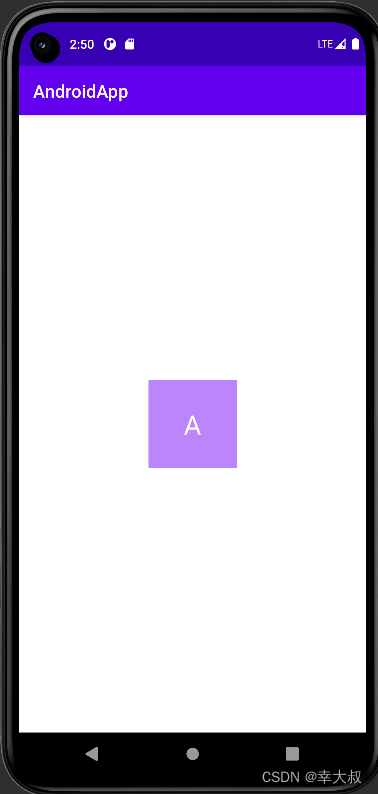
现在,它的上下左右的剩余空间都占50%,现在我想让它的左侧剩余空间从50%变成10%,上面的剩余空间从50%变成100%,可以这么干
<?xml version="1.0" encoding="utf-8"?>
<androidx.constraintlayout.widget.ConstraintLayout xmlns:android="http://schemas.android.com/apk/res/android"
    xmlns:app="http://schemas.android.com/apk/res-auto"
    xmlns:tools="http://schemas.android.com/tools"
    android:layout_width="match_parent"
    android:layout_height="match_parent"
    tools:context=".MainActivity">
    <TextView
        android:id="@+id/a"
        android:layout_width="100dp"
        android:layout_height="100dp"
        android:background="@color/purple_200"
        android:gravity="center"
        android:text="@string/a"
        android:textColor="@color/white"
        android:textSize="30sp"
        app:layout_constraintBottom_toBottomOf="parent"
        app:layout_constraintEnd_toEndOf="parent"
        app:layout_constraintHorizontal_bias="0.1"
        app:layout_constraintStart_toStartOf="parent"
        app:layout_constraintTop_toTopOf="parent"
        app:layout_constraintVertical_bias="1" />
</androidx.constraintlayout.widget.ConstraintLayout>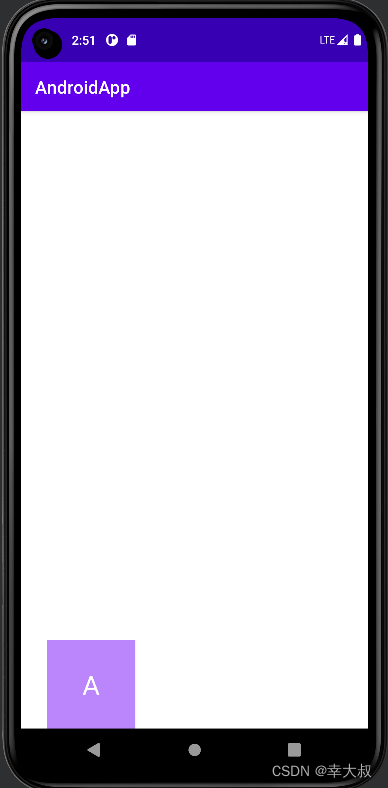
Visibility属性
在 ConstraintLayout 布局,visibility 属性设置为 gone 的话,可以理解为该View被缩小成一个不可见的小点,而其他对其有约束的View依照该点来进行定位。
比如,现在有两个TextView
如果这时,将A设置成不可见,那B的位置会有些改变

这时,我们可以通过layout_goneMarginTop,layout_goneMarginBottom,layout_goneMarginStart,layout_goneMarginEnd属性来设置与之的距离,这类属性只有在A的visibility属性为gone时才会生效。
<?xml version="1.0" encoding="utf-8"?>
<androidx.constraintlayout.widget.ConstraintLayout xmlns:android="http://schemas.android.com/apk/res/android"
    xmlns:app="http://schemas.android.com/apk/res-auto"
    xmlns:tools="http://schemas.android.com/tools"
    android:layout_width="match_parent"
    android:layout_height="match_parent"
    tools:context=".MainActivity">
    <TextView
        android:id="@+id/a"
        android:layout_width="100dp"
        android:layout_height="100dp"
        android:background="@color/purple_200"
        android:gravity="center"
        android:text="@string/a"
        android:textColor="@color/white"
        android:textSize="30sp"
        android:visibility="gone"
        app:layout_constraintBottom_toBottomOf="parent"
        app:layout_constraintEnd_toEndOf="parent"
        app:layout_constraintStart_toStartOf="parent"
        app:layout_constraintTop_toTopOf="parent" />
    <TextView
        android:id="@+id/b"
        android:layout_width="100dp"
        android:layout_height="100dp"
        android:layout_marginTop="20dp"
        android:background="@color/purple_200"
        android:gravity="center"
        android:text="@string/b"
        android:textColor="@color/white"
        android:textSize="30sp"
        app:layout_constraintEnd_toEndOf="parent"
        app:layout_constraintStart_toStartOf="parent"
        app:layout_constraintTop_toBottomOf="@+id/a"
        app:layout_goneMarginTop="70dp" />
</androidx.constraintlayout.widget.ConstraintLayout>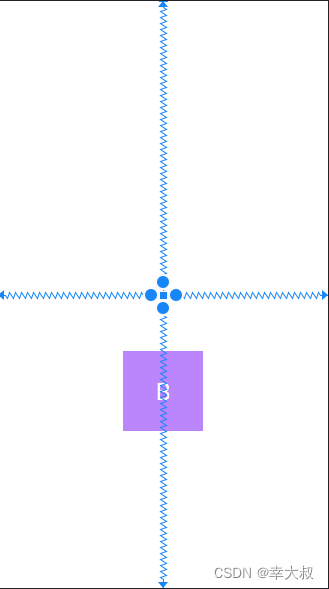
控件宽高比
如果想实现固定宽高比的话,可以使用 layout_constraintDimensionRatio 属性,至少设置 layout_width 或 layout_height 为0
<?xml version="1.0" encoding="utf-8"?>
<androidx.constraintlayout.widget.ConstraintLayout xmlns:android="http://schemas.android.com/apk/res/android"
    xmlns:app="http://schemas.android.com/apk/res-auto"
    xmlns:tools="http://schemas.android.com/tools"
    android:layout_width="match_parent"
    android:layout_height="match_parent"
    tools:context=".MainActivity">
    <TextView
        android:id="@+id/a"
        android:layout_width="0dp"
        android:layout_height="0dp"
        android:background="@color/purple_200"
        android:gravity="center"
        android:text="@string/a"
        android:textColor="@color/white"
        android:textSize="30sp"
        app:layout_constraintBottom_toBottomOf="parent"
        app:layout_constraintDimensionRatio="4:2"
        app:layout_constraintEnd_toEndOf="parent"
        app:layout_constraintStart_toStartOf="parent"
        app:layout_constraintTop_toTopOf="parent" />
</androidx.constraintlayout.widget.ConstraintLayout>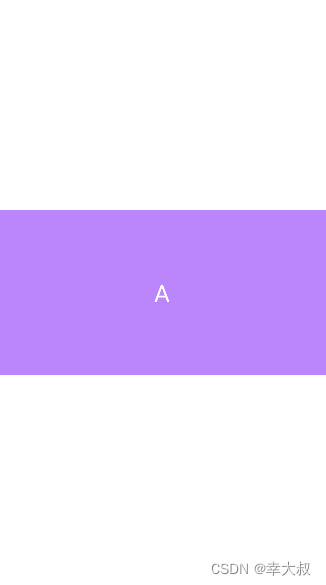
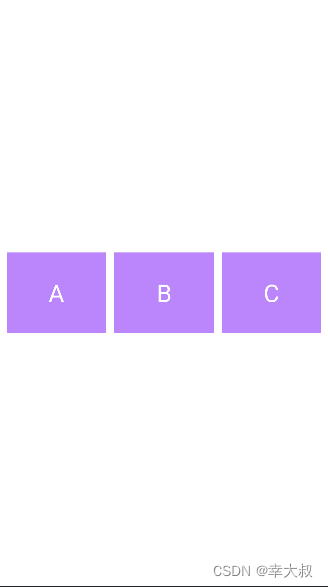
子控件之间的宽高占比
我们知道,LinearLayout 可以为子控件设置 layout_weight 属性,控制子控件之间的宽高占比,ConstraintLayout也可以,对应的属性是 layout_constraintHorizontal_weight,layout_constraintVertical_weight
<?xml version="1.0" encoding="utf-8"?>
<androidx.constraintlayout.widget.ConstraintLayout xmlns:android="http://schemas.android.com/apk/res/android"
    xmlns:app="http://schemas.android.com/apk/res-auto"
    xmlns:tools="http://schemas.android.com/tools"
    android:layout_width="match_parent"
    android:layout_height="match_parent"
    tools:context=".MainActivity">
    <TextView
        android:id="@+id/a"
        android:layout_width="0dp"
        android:layout_height="100dp"
        android:layout_marginStart="10dp"
        android:background="@color/purple_200"
        android:gravity="center"
        android:text="@string/a"
        android:textColor="@color/white"
        android:textSize="30sp"
        app:layout_constraintBottom_toBottomOf="parent"
        app:layout_constraintEnd_toStartOf="@+id/b"
        app:layout_constraintHorizontal_weight="1"
        app:layout_constraintStart_toStartOf="parent"
        app:layout_constraintTop_toTopOf="parent" />
    <TextView
        android:id="@+id/b"
        android:layout_width="0dp"
        android:layout_height="100dp"
        android:layout_marginStart="10dp"
        android:background="@color/purple_200"
        android:gravity="center"
        android:text="@string/b"
        android:textColor="@color/white"
        android:textSize="30sp"
        app:layout_constraintBottom_toBottomOf="parent"
        app:layout_constraintEnd_toStartOf="@+id/c"
        app:layout_constraintHorizontal_weight="1"
        app:layout_constraintStart_toEndOf="@+id/a"
        app:layout_constraintTop_toTopOf="parent" />
    <TextView
        android:id="@+id/c"
        android:layout_width="0dp"
        android:layout_height="100dp"
        android:layout_marginStart="10dp"
        android:layout_marginEnd="10dp"
        android:background="@color/purple_200"
        android:gravity="center"
        android:text="@string/c"
        android:textColor="@color/white"
        android:textSize="30sp"
        app:layout_constraintBottom_toBottomOf="parent"
        app:layout_constraintEnd_toEndOf="parent"
        app:layout_constraintHorizontal_weight="1"
        app:layout_constraintStart_toEndOf="@+id/b"
        app:layout_constraintTop_toTopOf="parent" />
</androidx.constraintlayout.widget.ConstraintLayout>
锚向指示线
当我们需要任意位置的锚点时,可以使用Guideline来帮助定位,它的宽度和高度均为0,可见性也为GONE,它是为了帮助其他View定位而存在的,并不会出现在实际页面上。
    <androidx.constraintlayout.widget.Guideline
        android:id="@+id/guideline_horizontal"
        android:layout_width="wrap_content"
        android:layout_height="wrap_content"
        android:orientation="horizontal"
        app:layout_constraintGuide_percent="0.2" />
    <androidx.constraintlayout.widget.Guideline
        android:id="@+id/guideline_vertical"
        android:layout_width="wrap_content"
        android:layout_height="wrap_content"
        android:orientation="vertical"
        app:layout_constraintGuide_begin="100dp" />
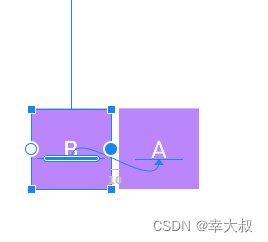
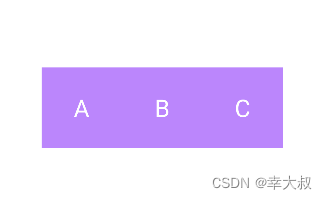
Chains链
Chain 链是一种特殊的约束,是用来分发链条剩余空间位置的。几个View之间通过双向连接而互相约束对方的位置的,就叫链条,像这种
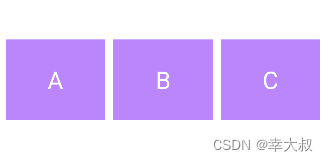
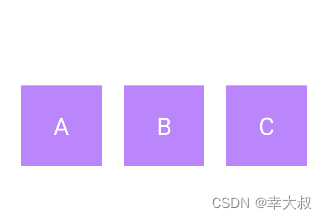
链条分为水平链条和竖直链条,分别用 layout_constraintHorizontal_chainStyle 和 layout_constraintVertical_chainStyle 两个属性来设置。 属性值有三种:spread,spread_inside,packed
layout_constraintHorizontal_chainStyle=“spread”
layout_constraintHorizontal_chainStyle=“spread_inside”
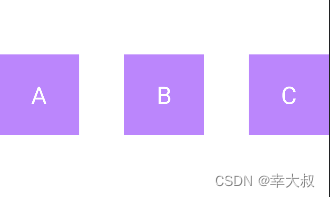
layout_constraintHorizontal_chainStyle=“packed”
<?xml version="1.0" encoding="utf-8"?>
<androidx.constraintlayout.widget.ConstraintLayout xmlns:android="http://schemas.android.com/apk/res/android"
    xmlns:app="http://schemas.android.com/apk/res-auto"
    xmlns:tools="http://schemas.android.com/tools"
    android:layout_width="match_parent"
    android:layout_height="match_parent"
    tools:context=".MainActivity">
    <TextView
        android:id="@+id/a"
        android:layout_width="100dp"
        android:layout_height="100dp"
        android:background="@color/purple_200"
        android:gravity="center"
        android:text="@string/a"
        android:textColor="@color/white"
        android:textSize="30sp"
        app:layout_constraintBottom_toBottomOf="parent"
        app:layout_constraintEnd_toStartOf="@+id/b"
        app:layout_constraintHorizontal_chainStyle="packed"
        app:layout_constraintStart_toStartOf="parent"
        app:layout_constraintTop_toTopOf="parent" />
    <TextView
        android:id="@+id/b"
        android:layout_width="100dp"
        android:layout_height="100dp"
        android:background="@color/purple_200"
        android:gravity="center"
        android:text="@string/b"
        android:textColor="@color/white"
        android:textSize="30sp"
        app:layout_constraintBottom_toBottomOf="parent"
        app:layout_constraintEnd_toStartOf="@+id/c"
        app:layout_constraintHorizontal_chainStyle="packed"
        app:layout_constraintStart_toEndOf="@+id/a"
        app:layout_constraintTop_toTopOf="parent" />
    <TextView
        android:id="@+id/c"
        android:layout_width="100dp"
        android:layout_height="100dp"
        android:background="@color/purple_200"
        android:gravity="center"
        android:text="@string/c"
        android:textColor="@color/white"
        android:textSize="30sp"
        app:layout_constraintBottom_toBottomOf="parent"
        app:layout_constraintEnd_toEndOf="parent"
        app:layout_constraintHorizontal_chainStyle="packed"
        app:layout_constraintStart_toEndOf="@+id/b"
        app:layout_constraintTop_toTopOf="parent" />
</androidx.constraintlayout.widget.ConstraintLayout>
到此这篇关于Android ConstraintLayout约束布局使用详解的文章就介绍到这了,更多相关Android ConstraintLayout内容请搜索脚本之家以前的文章或继续浏览下面的相关文章希望大家以后多多支持脚本之家!
相关文章
 这篇文章主要介绍了Android开发中Button组件的使用,文中通过示例代码介绍的非常详细,对大家的学习或者工作具有一定的参考学习价值,需要的朋友们下面随着小编来一起学习学习吧2020-07-07
 这篇文章主要为大家详细介绍了Android TabWidget底部显示效果的三种方式,具有一定的参考价值,感兴趣的小伙伴们可以参考一下2017-03-03
 这篇文章主要介绍了Android编程之Button控件用法,较为详细的分析了Button控件的功能、定义及相关使用注意事项,具有一定参考借鉴价值,需要的朋友可以参考下2015-10-10
Android查看电池电量的方法(基于BroadcastReceiver)
这篇文章主要介绍了Android查看电池电量的方法,结合实例分析了Android使用BroadcastReceiver实现针对电池电量的查询技巧,需要的朋友可以参考下2016-01-01 这篇文章主要为大家详细介绍了Android自定义控件实现下拉刷新效果,具有一定的参考价值,感兴趣的小伙伴们可以参考一下2017-08-08
 在Android应用开发中,有时候我们需要对ImageView中的图片进行镜像旋转,以展示不同的效果,本文将介绍如何使用代码实现ImageView的镜像旋转效果,这篇文章主要介绍了Android imageVIew如何做镜像旋转,需要的朋友可以参考下2024-06-06
Android实现倒计时CountDownTimer使用详解
这篇文章主要为大家详细介绍了Android实现倒计时CountDownTimer的使用方法,具有一定的参考价值,感兴趣的小伙伴们可以参考一下2017-12-12 这篇文章主要为大家详细介绍了Android自定义SeekBar实现视频播放进度条的相关资料,文中示例代码介绍的非常详细,具有一定的参考价值,感兴趣的小伙伴们可以参考一下2017-03-03
 Android 程序的生命周期是由系统控制而非程序自身直接控制。这和我们编写桌面应用程序时的思维有一些不同,本文将详细介绍,需要了解的朋友可以参考下2012-12-12
Android使用自定义alertdialog实现确认退出按钮
本文通过实例代码给大家详解Android使用自定义alertdialog实现确认退出按钮,对alertdialog退出按钮相关知识感兴趣的朋友一起学习吧2016-01-01


最新评论