
vue+Ant Design进度条滑块与input联动效果实现
更新时间:2022年12月07日 15:16:19 作者:周家大小姐.
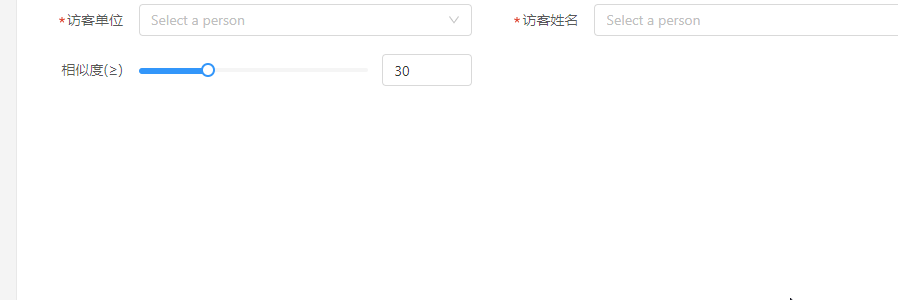
最近接到这样一个需求滑块进度与输入框为一致,默认值为80,最小不能小于30,最大为100,怎么实现这个联动效果呢,下面小编给大家分享下基于vue+Ant Design进度条滑块与input联动效果的实现,感兴趣的朋友跟随小编一起看看吧
需求:滑块进度与输入框为一致,默认值为80,最小不能小于30,最大为100
子组件:
<template>
  <div class="progress-box">
    <div
      ref="slider"
      class="slider"
    >
      <div
        class="process"
        :style="{ width }"
      ></div>
      <div
        ref="trunk"
        class="thunk"
        :style="{ left }"
      >
        <div class="block"></div>
      </div>
    </div>
    <div>
      <a-input-number
        v-model="per"
        class="input-num"
        :min="inputMin"
        :max="inputMax"
        @change="handleChangeNum"
      />
    </div>
  </div>
</template>
<script>
export default {
  props: {
    sliderMin: { // 最小值
      type: Number,
      default: 0
    },
    sliderMax: { // 进度条最大值
      type: Number,
      default: 0
    },
    value: { // 对当前值进行双向绑定实时显示拖拽进度
      type: Number,
      default: 0
    },
    inputMin: {
      type: Number,
      default: 0
    },
    inputMax: {
      type: Number,
      default: 100
    }
  },
  data() {
    return {
      slider: null, // 滚动条DOM元素
      thunk: null, // 拖拽DOM元素
      per: Math.max(this.sliderMin, this.value) // 当前值
    }
  },
  computed: {
    // 设置一个百分比,提供计算slider进度宽度和trunk的left值
    scale() { // 百分比
      return this.per / this.sliderMax
    },
    width() {
      if (this.slider) { // 设置进度激活的宽度
        return (this.slider.offsetWidth * this.scale) + 'px'
      } else {
        return 0 + 'px'
      }
    },
    left() { // trunk left = slider进度width + trunk宽度/2
      if (this.slider) { // 设置圆点所在的位置
        return (this.slider.offsetWidth * this.scale) - this.thunk.offsetWidth / 2 + 'px'
      } else {
        return 0 + 'px'
      }
    }
  },
  // 渲染到页面的时候
  mounted() {
    this.slider = this.$refs.slider
    this.thunk = this.$refs.trunk
    const _this = this
    this.thunk.onmousedown = function(e) {
      const width = parseInt(_this.width)
      const disX = e.clientX
      document.onmousemove = function(e) {
        // 拖拽的时候获取的新width
        const newWidth = (e.clientX - disX + width)
        // 拖拽的时候得到新的百分比
        const scale = newWidth / _this.slider.offsetWidth
        _this.per = Math.ceil((_this.sliderMax) * scale)// 对一个数进行上取整把小数转为整数(0.3=>30)
        _this.per = Math.max(_this.per, _this.sliderMin)
        _this.per = Math.min(_this.per, _this.sliderMax)
        _this.$emit('input', _this.per)
      }
      document.onmouseup = function() {
        document.onmousemove = document.onmouseup = null
      }
      return false
    }
  },
  methods: {
    handleChangeNum(e) {
      this.per = e
    }
  }
}
</script>
<style lang="scss" scoped>
.progress-box {
  display: flex;
  align-items: center;
  justify-content: space-between;
  -webkit-user-select: none;
  -moz-user-select: none;
  -ms-user-select: none;
  user-select: none;
}
.clear:after {
  content: '';
  display: block;
  clear: both;
}
.slider {
  user-select: none;
  position: relative;
  width: calc(100% - 104px);
  height: 4px;
  background: #f5f5f5;
  border-radius: 5px;
  cursor: pointer;
  .process {
    position: absolute;
    left: 0;
    top: 0;
    width: 112px;
    height: 6px;
    border-radius: 5px;
    background: #3296fa;
  }
  .thunk {
    position: absolute;
    left: 100px;
    top: -5px;
    width: 14px;
    height: 14px;
  }
  .block {
    width: 14px;
    height: 14px;
    border-radius: 50%;
    border: 2px solid #3296fa;
    background: rgba(255, 255, 255, 1);
    transition: 0.2s all;
  }
}
</style>
父组件使用
  <div class="xk-control-item">
      <div class="xk-item-title">
          <span>相似度(≥)</span>
       </div>
       <div class="xk-item-value">
           <c-progress
            v-model="per"
            :sliderMin="30"
            :sliderMax="100"
            :inputMin='30'
              />
        </div>
   </div>

<script>
import CProgress from '@/components/CProgress'
export default {
  name: 'VisitorTrack',
  components: {
    CProgress
  },
  data() {
    return {
    }
  },
  computed: {
    per: {
      get() {
        return 80
      },
      set(val) {
        // console.log(val)
      }
    }
  },
  watch: {

  },
  methods: {


  }

}
</script>
补充知识
ant-design-vue 动态添加input行及动态校验
这里涉及到动态input表单校验 我仅给自己记录一下
<!-- 动态添加行 -->
   <a-form-model-item
       :wrapper-col="newWrapper"
       style="padding-left:63px;padding-right:40px;"
       v-for="(item, index) in form.information"
       :key="item.key"
       >
       <a-form-model-item class="fl" :prop="'information.' + index + '.name'"
       :rules="{
           required: true,
           message: '店铺名不能为空',
           trigger: ['blur','change'],
       }">
           <a-input
               v-model.trim="form.information[index].name"
               placeholder="请输入店铺名称"
               style="margin-right: 1%"
           />
       </a-form-model-item>
       <a-form-model-item class="fl" :prop="'information.' + index + '.address'"
       :rules="{
           required: true,
           message: '店铺地址不能为空',
           trigger: ['blur','change'],
       }">
           <a-input
               v-model.trim="form.information[index].address"
               placeholder="请输入店铺地址"
               style="margin-right: 1%"
           />
       </a-form-model-item>
       <a-form-model-item class="fl" :prop="'information.' + index + '.storeManagerName'"
       :rules="{
           required: true,
           message: '店长姓名不能为空',
           trigger: ['blur','change'],
       }">
           <a-input
               v-model.trim="form.information[index].storeManagerName"
               placeholder="请输入店长姓名"
               style="margin-right: 1%"
           />
       </a-form-model-item>
       <a-form-model-item class="fl" style="margin-right: 3%;" :prop="'information.' + index + '.storeManagerPhone'"
       :rules="[{required: true,message: '店长手机不能为空',trigger: ['blur','change']},
               {validator: mobilephoneValidate,trigger: ['blur','change'] }]"
       >
           <a-input
               v-model.trim="form.information[index].storeManagerPhone"
               placeholder="请输入店长手机号"
           />
       </a-form-model-item>
       <a
       v-if="form.information.length > 1"
       :disabled="form.information.length === 1"
       @click="removeRows(item)"
       >删除</a>
   </a-form-model-item>
添加 删除的方法
// 动态删除添加输入行
        removeRows(item) {
            let index = this.form.information.indexOf(item);
            if (index !== -1) {
                this.form.information.splice(index, 1);
            }
        },
        addRows() {
            this.form.information.push({
                name: '',
                address: '',
                storeManagerName: '',
                storeManagerPhone: '',
                key: Date.now(),
            });
        },
手机号或者其他单独的表单校验写在methods里
// 动态添加行 店长手机号验证
        testMobilephone: function (str) {
            const regex = /^1[3456789]\d{9}$/
            if (!regex.test(str)) {
            return false
            } else {
            return true
            }
        },
        mobilephoneValidate (rule, value, callback) {
        // 主要就是添加一个对undefined和空串的判断
        if (typeof (value) === 'undefined' || value === '') {
            callback()
            } else {
                if (!this.testMobilephone(value)) {
                callback(new Error('请输入正确手机格式'))
                }
                callback()
            }
        },
这里information数组 在data里写上一组空对象 是为了保证有一组input行显示出来 不写input行则会隐藏掉

到此这篇关于vue+Ant Design进度条滑块与input联动的文章就介绍到这了,更多相关vue+Ant Design进度条滑块内容请搜索脚本之家以前的文章或继续浏览下面的相关文章希望大家以后多多支持脚本之家!
相关文章
 这篇文章主要介绍了遇到vue前端npm i报错多个版本不一致问题及解决,具有很好的参考价值,希望对大家有所帮助,如有错误或未考虑完全的地方,望不吝赐教2024-03-03
 这篇文章主要介绍了Nuxt的路由动画效果案例,具有很好的参考价值,希望对大家有所帮助。一起跟随小编过来看看吧2020-11-11
 这篇文章主要介绍了vue 对象添加或删除成员时无法实时更新的解决方法,小编觉得挺不错的,现在分享给大家,也给大家做个参考。一起跟随小编过来看看吧2019-05-05
 本文主要介绍了vue3中element-plus表格搜索过滤数据,文中通过示例代码介绍的非常详细,对大家的学习或者工作具有一定的参考学习价值,需要的朋友们下面随着小编来一起学习学习吧2025-03-03
Vue.js实现双向数据绑定方法(表单自动赋值、表单自动取值)
今天小编就为大家分享一篇Vue.js实现双向数据绑定方法(表单自动赋值、表单自动取值),具有很好的参考价值,希望对大家有所帮助。一起跟随小编过来看看吧2018-08-08 要学习vue-router就要先知道这里的路由是什么?为什么我们不能像原来一样直接用标签编写链接哪?vue-router如何使用?常见路由操作有哪些?等等这些问题,就是本篇要探讨的主要问题,感兴趣的朋友跟随脚本之家小编一起学习吧2018-05-05
 最近在用VUE写大屏页面,遇到屏幕自适应问题,下面这篇文章主要给大家介绍了关于vue项目的屏幕自适应多个方案的相关资料,文中通过实例代码介绍的非常详细,需要的朋友可以参考下2023-06-06
 Vue3中,双向数据绑定主要通过v-model指令实现,v-model是一个语法糖,结合了v-bind和v-on指令来实现数据的双向绑定,它在内部做了绑定数据和监听输入事件两件事,感兴趣的朋友跟随小编一起看看吧2024-12-12
 这篇文章主要分享可编写 Vue v-for 循环的 7 种方式,在Vue中,基本上每个项目都会用到v-for循环。它们允许你在模板代码中编写for循环,接下来一起看看下面文章的详细介绍吧2021-12-12
 这篇文章主要介绍了Vue动画之第三方类库实现动画方式,具有很好的参考价值,希望对大家有所帮助。如有错误或未考虑完全的地方,望不吝赐教2023-04-04


最新评论