
vue实现自定义颜色选择器
更新时间:2025年04月16日 09:45:47 作者:勘察加熊人
这篇文章主要为大家详细介绍了如何使用vue实现一个自定义颜色选择器,文中的示例代码讲解详细,感兴趣的小伙伴可以跟随小编一起学习一下
vue自定义颜色选择器
效果图:
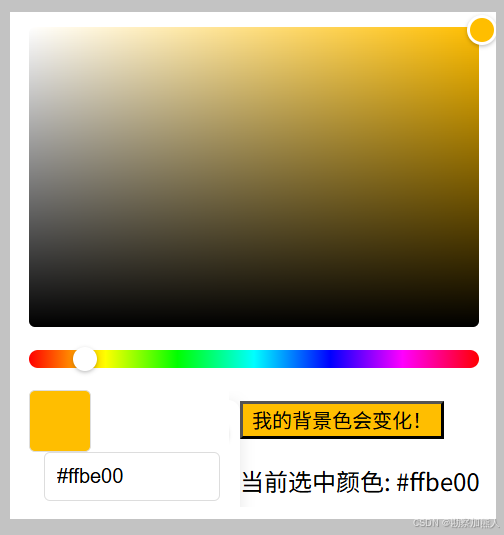
step0: 默认写法 调用系统自带的颜色选择器
<input type="color">
step1:C:\Users\wangrusheng\PycharmProjects\untitled18\src\views\Home.vue
<template>
  <div class="container">
    <!-- 颜色选择器组件 -->
    <ColorPicker v-model="selectedColor" />

    <!-- 新增的动态背景按钮 -->
    <div>

    <button
      class="dynamic-button"
      :style="{ backgroundColor: selectedColor }"
    >
      我的背景色会变化!
    </button>

       <input type="color">

    <p>当前选中颜色: {{ selectedColor }}</p>

    </div>
     </div>
</template>

<script>
import ColorPicker from './ColorPicker.vue'

export default {
  components: { ColorPicker },
  data() {
    return {
      selectedColor: '#ff0000' // 默认颜色
    }
  }
}
</script>
step2:C:\Users\wangrusheng\PycharmProjects\untitled18\src\views\ColorPicker.vue
<template>
  <div class="color-picker">
    <!-- 饱和度/明度选择区域 -->
    <div
      class="saturation"
      :style="{ backgroundColor: `hsl(${hsv.h}, 100%, 50%)` }"
      @mousedown="startDrag"
    >
      <div
        class="selector"
        :style="{
          left: `${hsv.s * 100}%`,
          top: `${(1 - hsv.v) * 100}%`,
          backgroundColor: currentColor
        }"
      ></div>
    </div>

    <!-- 色相滑块 -->
    <div class="hue-slider" @mousedown="startHueDrag">
      <div
        class="hue-pointer"
        :style="{ left: `${(hsv.h / 360) * 100}%` }"
      ></div>
    </div>

    <!-- 颜色显示和输入 -->
    <div class="color-preview" :style="{ backgroundColor: currentColor }"></div>
    <input
      v-model="hexColor"
      class="hex-input"
      placeholder="#FFFFFF"
      @input="handleHexInput"
    >
  </div>
</template>

<script>
export default {
  props: {
    modelValue: String
  },
  emits: ['update:modelValue'],
  data() {
    return {
      hsv: { h: 0, s: 1, v: 1 },
      hexColor: '#ff0000',
      isDragging: false,
      isHueDragging: false
    }
  },
  computed: {
    currentColor() {
      return this.hsvToHex(this.hsv)
    }
  },
  methods: {
    startDrag(e) {
      this.isDragging = true
      this.handleDrag(e)
      window.addEventListener('mousemove', this.handleDrag)
      window.addEventListener('mouseup', this.stopDrag)
    },
    startHueDrag(e) {
      this.isHueDragging = true
      this.handleHueDrag(e)
      window.addEventListener('mousemove', this.handleHueDrag)
      window.addEventListener('mouseup', this.stopHueDrag)
    },
    handleDrag(e) {
      if (!this.isDragging) return
      const rect = e.target.getBoundingClientRect()
      const x = Math.max(0, Math.min(1, (e.clientX - rect.left) / rect.width))
      const y = Math.max(0, Math.min(1, (e.clientY - rect.top) / rect.height))

      this.hsv.s = x
      this.hsv.v = 1 - y
      this.updateHex()
    },
    handleHueDrag(e) {
      if (!this.isHueDragging) return
      const rect = e.target.getBoundingClientRect()
      const x = Math.max(0, Math.min(1, (e.clientX - rect.left) / rect.width))
      this.hsv.h = x * 360
      this.updateHex()
    },
    stopDrag() {
      this.isDragging = false
      window.removeEventListener('mousemove', this.handleDrag)
      window.removeEventListener('mouseup', this.stopDrag)
    },
    stopHueDrag() {
      this.isHueDragging = false
      window.removeEventListener('mousemove', this.handleHueDrag)
      window.removeEventListener('mouseup', this.stopHueDrag)
    },
    updateHex() {
      this.hexColor = this.hsvToHex(this.hsv)
      this.$emit('update:modelValue', this.hexColor)
    },
    handleHexInput() {
      if (/^#([0-9A-F]{3}){1,2}$/i.test(this.hexColor)) {
        this.hsv = this.hexToHsv(this.hexColor)
      }
    },
    // 颜色转换函数
    hsvToHex(hsv) {
      const h = hsv.h / 360
      let r, g, b

      const i = Math.floor(h * 6)
      const f = h * 6 - i
      const p = hsv.v * (1 - hsv.s)
      const q = hsv.v * (1 - f * hsv.s)
      const t = hsv.v * (1 - (1 - f) * hsv.s)

      switch (i % 6) {
        case 0: r = hsv.v, g = t, b = p; break
        case 1: r = q, g = hsv.v, b = p; break
        case 2: r = p, g = hsv.v, b = t; break
        case 3: r = p, g = q, b = hsv.v; break
        case 4: r = t, g = p, b = hsv.v; break
        case 5: r = hsv.v, g = p, b = q; break
      }

      return `#${[r, g, b]
        .map(x => Math.round(x * 255)
        .toString(16)
        .padStart(2, '0'))
        .join('')}`
    },
    hexToHsv(hex) {
      // 转换逻辑(此处省略具体实现)
      // 返回类似 {h: 0, s: 1, v: 1} 的HSV对象
    }
  }
}
</script>

<style>
.color-picker {
  width: 300px;
  padding: 20px;
  background: #fff;
  border-radius: 8px;
  box-shadow: 0 2px 10px rgba(0,0,0,0.1);
}

.saturation {
  position: relative;
  width: 100%;
  height: 200px;
  border-radius: 4px;
  background: linear-gradient(to top, #000, transparent),
              linear-gradient(to right, #fff, transparent);
}

.selector {
  position: absolute;
  width: 16px;
  height: 16px;
  border: 2px solid white;
  border-radius: 50%;
  transform: translate(-8px, -8px);
  box-shadow: 0 1px 3px rgba(0,0,0,0.3);
}

.hue-slider {
  position: relative;
  height: 12px;
  margin: 15px 0;
  background: linear-gradient(to right,
    #ff0000 0%,
    #ffff00 17%,
    #00ff00 33%,
    #00ffff 50%,
    #0000ff 67%,
    #ff00ff 83%,
    #ff0000 100%);
  border-radius: 6px;
}

.hue-pointer {
  position: absolute;
  width: 16px;
  height: 16px;
  background: white;
  border-radius: 50%;
  transform: translate(-8px, -2px);
  box-shadow: 0 1px 3px rgba(0,0,0,0.3);
}

.color-preview {
  width: 40px;
  height: 40px;
  border-radius: 4px;
  border: 1px solid #ddd;
}

.hex-input {
  margin-left: 10px;
  padding: 8px;
  width: 100px;
  border: 1px solid #ddd;
  border-radius: 4px;
}
</style>
到此这篇关于vue实现自定义颜色选择器的文章就介绍到这了,更多相关vue颜色选择器内容请搜索脚本之家以前的文章或继续浏览下面的相关文章希望大家以后多多支持脚本之家!
相关文章
 本篇文章主要介绍了Vue 兄弟组件通信的方法(不使用Vuex),小编觉得挺不错的,现在分享给大家,也给大家做个参考。一起跟随小编过来看看吧2017-10-10
 本文介绍了三种使用Vue实现动态数字动画的方案:使用Vue的响应式数据与`setInterval`逐步更新数字,通过Vue的动画API和CSS动画效果为数字增加过渡效果,以及使用更高效的`requestAnimationFrame`来提供更加流畅的动画表现,每种方案都详细说明了原理、实现步骤和代码示例2025-02-02
 增删改查是我们写项目百分之七十会遇到的代码,下面这篇文章主要给大家介绍了关于vue前端实现表格数据增查改删功能的相关资料,文中通过代码介绍的非常详细,需要的朋友可以参考下2024-05-05
 这篇文章主要介绍了Vue页面跳转传递参数及接收方式,具有很好的参考价值,希望对大家有所帮助。一起跟随小编过来看看吧2020-09-09
 这篇文章主要介绍了vue性能优化之cdn引入vue-Router的问题及解决,具有很好的参考价值,希望对大家有所帮助。如有错误或未考虑完全的地方,望不吝赐教2022-08-08
 VueJs 提供了强大的过滤器API,能够对数据进行各种过滤处理,返回需要的结果。这篇文章主要给大家介绍vue 过滤器filter实例,感兴趣的朋友跟随脚本之家小编一起学习吧2018-03-03
 这篇文章主要介绍了Vue router的部分高级用法,主要是针对已经有初步了解Vue-router的人,通过本文主要给大家介绍路由元信息,滚动行为以及路由懒加载这几个的使用方法。感兴趣的朋友一起看看吧2018-08-08
详解vue2.0 使用动态组件实现 Tab 标签页切换效果(vue-cli)
本篇文章主要介绍了详解vue2.0 使用动态组件实现 Tab 标签页切换效果(vue-cli),具有一定的参考价值,有需要的可以了解下2017-08-08
vue3使用element-plus搭建后台管理系统之菜单管理功能
这篇文章主要介绍了vue3使用element-plus搭建后台管理系统之菜单管理,使用element-plus el-tree组件快速开发树形菜单结构,el-tree组件中filter-node-method事件便可以实现树形菜单筛选过滤功能,需要的朋友可以参考下2022-04-04
vue draggable resizable gorkys与v-chart使用与总结
这篇文章主要介绍了vue draggable resizable gorkys与v-chart使用与总结,本文给大家介绍的非常详细,具有一定的参考借鉴价值,需要的朋友可以参考下2019-09-09


最新评论