
Photoshop合成制作蝶蝎美人
发布时间:2012-12-21 15:24:11 作者:佚名  我要评论
我要评论
Photoshop合成制作蝶蝎美人
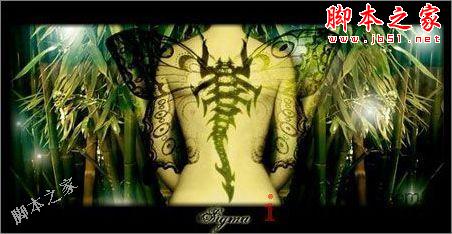
先看看效果图:
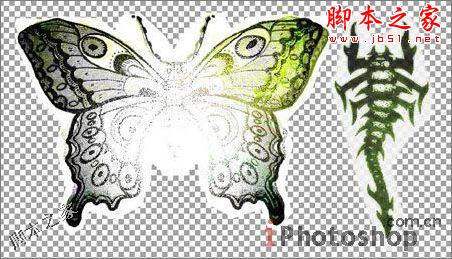
教程所用的图片素材:


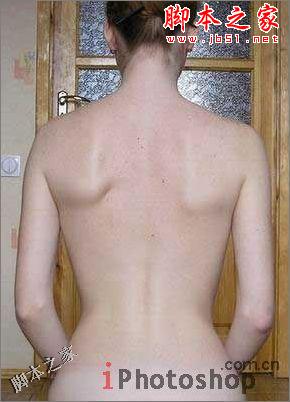
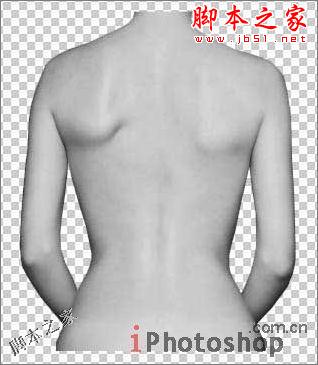
Open the girl skin photo: File -Open (ctrl+o)
打开一张女孩子的图片:点击文件-打开(ctrl+O)。
Outline it along the contour, using Polygonal Lasso Tool. Copy it:Edit ?Copy (ctrl+c) and insert it on a new layer, using the nextcommand Edit ?Paste (ctrl+v). Erase the previous layer, using thebutton of fast erasing on the Layers window.
使用多边形套索工具选出MM的轮廓,复制,粘贴到新的层中,将原始图层里的东西全部擦除掉,可以换个大大的橡皮擦来擦~
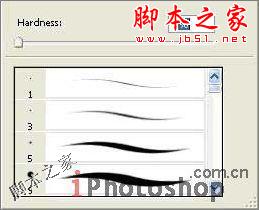
Take another instrument (Smudge Tool), preliminary setting brushhardness on 0% and paint the birthmarks and skin unevenness.
使用涂抹工具,将笔触的硬度设置为0%,将皮肤上的痣及其他与肤色不同的东西涂抹掉。
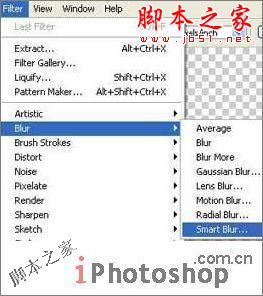
Apply Smart Blur filter.
使用特殊模糊。
Make the layer lighter using the command Image ?Adjustments?Desaturate (shift+ctrl+u).
点击图像-调整-饱和度(shift+ctrl+u)将图像调亮一点。
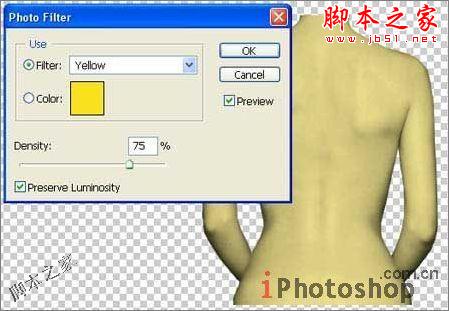
Give a tone to the skin, using a color filter: Image ?Adjustments?Photo Filter. Choose the yellow color.
点击图像-调整-照片滤镜,选择黄色,让背部的色调柔和一些~
Take two tattoo pictures and place each of them on a new layer.
找两张纹身的图样,我们找的当然是蝴蝶和蝎子~将它们各自放到新的图层中.

Put them over the girl, one above the other and change bothlayers?type on Linear Blum.
把这两个图样放到女孩的背上,如下,进行一次线性模糊。

Make the background now. Take a bamboo photo and place it on a newlayer. Open it like a new file, mark it out with RectangularMarquee Tool and copy it using the command Edit ?Copy (ctrl c). Getback to the photo under processing and insert the background on anew layer with the next command: Edit ?Paste (ctrl v).
下面我们来制作背景。找一幅竹子的图片,放置到一个新的层中。做法是找一幅竹子的大图,使用矩形选区工具选出合适大小,复制并粘贴到新的图层内。
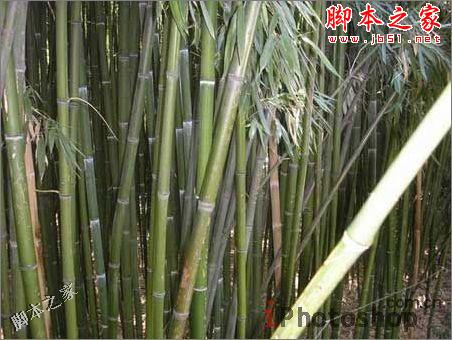
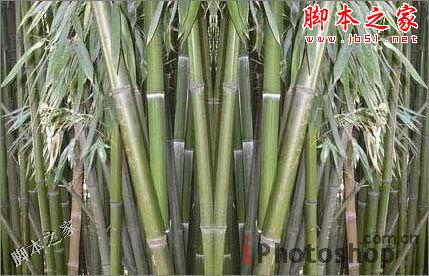
Mark the unnecessary part of this photo with Rectangular MarqueeTool and erase it: Edit ?Cut (ctrl x). Double the remained partwith the command Layer ?Duplicate Layer and transform it with Edit?Transform ?Flip Horizontal.
选择一块我们需要的部分,进行复制-粘贴,并将复制的部分进行反转(编辑-变换路径-水平反转)。

Move a little the picture until it connect with the turned photopart. Connect both layers with the command Layer ?Merge Layer (ctrle).
对图片的位置进行移动,直到两幅图完美的拼接起来,然后点击层-合并图层将两层合并(ctrl E).
Apply the Smart Blur filter to this layer and make a kind of colorcorrectness, using the command Image ?Adjustments - Curves (ctrlm).
使用特殊模糊效果滤镜,并对颜色进行一下调整(图像-调整-曲线ctrl M)
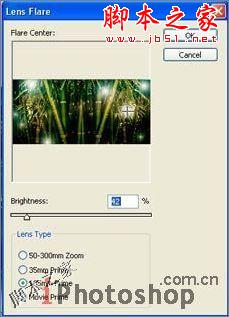
Add several highlights of different intensity, using Filter ?Render?Lens Flare.
使用滤镜-渲染-镜头光晕在图片中如下添加一些小光源。
Create the girl shadow. Copy the girl layer (Layer - DuplicateLayer) and make it darker with the command Image ?Adjustments?Brightness/Contrast. Move it lower then the basic one, justclicking on it and carrying over. Blur a little with Filter ?Blur?Gaussian Blur.
将女孩所在的图层进行复制,然后使用图像-调整-亮度/对比度,将颜色进行加深,向下微微移动一下,然后点击滤镜-模糊-高斯模糊进行模糊操作。
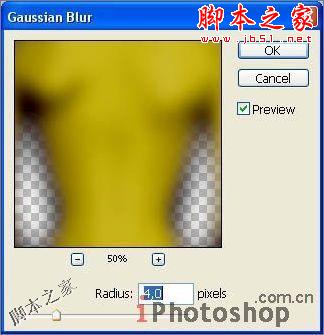
Add the frame, using Rectangle Tool then copy the frame layer andblur it.
新建层,黑色填充,使用矩形工具将完成的MM背部粘贴到黑色背景上方,并使用滤镜-模糊-高斯模糊将边缘模糊一下。

一个效果非常好的蝶蝎美人就完成了,技术是非常简单的,初级用户都可以很简单的完成,但是创意是非常有特色的~希望大家在练习的过程中多多学习一种思维方式,即使不用繁琐的高深的技术也是可以完成非常好的效果的哦~

教程所用的图片素材:


Open the girl skin photo: File -Open (ctrl+o)
打开一张女孩子的图片:点击文件-打开(ctrl+O)。

Outline it along the contour, using Polygonal Lasso Tool. Copy it:Edit ?Copy (ctrl+c) and insert it on a new layer, using the nextcommand Edit ?Paste (ctrl+v). Erase the previous layer, using thebutton of fast erasing on the Layers window.
使用多边形套索工具选出MM的轮廓,复制,粘贴到新的层中,将原始图层里的东西全部擦除掉,可以换个大大的橡皮擦来擦~

Take another instrument (Smudge Tool), preliminary setting brushhardness on 0% and paint the birthmarks and skin unevenness.
使用涂抹工具,将笔触的硬度设置为0%,将皮肤上的痣及其他与肤色不同的东西涂抹掉。

Apply Smart Blur filter.
使用特殊模糊。

Make the layer lighter using the command Image ?Adjustments?Desaturate (shift+ctrl+u).
点击图像-调整-饱和度(shift+ctrl+u)将图像调亮一点。

Give a tone to the skin, using a color filter: Image ?Adjustments?Photo Filter. Choose the yellow color.
点击图像-调整-照片滤镜,选择黄色,让背部的色调柔和一些~

Take two tattoo pictures and place each of them on a new layer.
找两张纹身的图样,我们找的当然是蝴蝶和蝎子~将它们各自放到新的图层中.

Put them over the girl, one above the other and change bothlayers?type on Linear Blum.
把这两个图样放到女孩的背上,如下,进行一次线性模糊。

Make the background now. Take a bamboo photo and place it on a newlayer. Open it like a new file, mark it out with RectangularMarquee Tool and copy it using the command Edit ?Copy (ctrl c). Getback to the photo under processing and insert the background on anew layer with the next command: Edit ?Paste (ctrl v).
下面我们来制作背景。找一幅竹子的图片,放置到一个新的层中。做法是找一幅竹子的大图,使用矩形选区工具选出合适大小,复制并粘贴到新的图层内。

Mark the unnecessary part of this photo with Rectangular MarqueeTool and erase it: Edit ?Cut (ctrl x). Double the remained partwith the command Layer ?Duplicate Layer and transform it with Edit?Transform ?Flip Horizontal.
选择一块我们需要的部分,进行复制-粘贴,并将复制的部分进行反转(编辑-变换路径-水平反转)。

Move a little the picture until it connect with the turned photopart. Connect both layers with the command Layer ?Merge Layer (ctrle).
对图片的位置进行移动,直到两幅图完美的拼接起来,然后点击层-合并图层将两层合并(ctrl E).

Apply the Smart Blur filter to this layer and make a kind of colorcorrectness, using the command Image ?Adjustments - Curves (ctrlm).
使用特殊模糊效果滤镜,并对颜色进行一下调整(图像-调整-曲线ctrl M)

Add several highlights of different intensity, using Filter ?Render?Lens Flare.
使用滤镜-渲染-镜头光晕在图片中如下添加一些小光源。

Create the girl shadow. Copy the girl layer (Layer - DuplicateLayer) and make it darker with the command Image ?Adjustments?Brightness/Contrast. Move it lower then the basic one, justclicking on it and carrying over. Blur a little with Filter ?Blur?Gaussian Blur.
将女孩所在的图层进行复制,然后使用图像-调整-亮度/对比度,将颜色进行加深,向下微微移动一下,然后点击滤镜-模糊-高斯模糊进行模糊操作。

Add the frame, using Rectangle Tool then copy the frame layer andblur it.
新建层,黑色填充,使用矩形工具将完成的MM背部粘贴到黑色背景上方,并使用滤镜-模糊-高斯模糊将边缘模糊一下。

一个效果非常好的蝶蝎美人就完成了,技术是非常简单的,初级用户都可以很简单的完成,但是创意是非常有特色的~希望大家在练习的过程中多多学习一种思维方式,即使不用繁琐的高深的技术也是可以完成非常好的效果的哦~
相关文章
 浮出水面的鲸鱼怎么做?ps中想要做鲸鱼浮出水面的效果,该怎么合成这个效果呢?下面我们就来看看ps合成鲸鱼浮在水面效果的技巧,详细请看下文介绍2022-11-03
 ps图片与背景怎么实现渐变融合?ps中导入的两张图片想要合成到一起,该怎么才能无痕的合成成渐变融合的效果呢?下面我们就来看看ps图片合成技巧2022-03-09
ps怎么设计人物与城市剪影的双重曝光效果? ps双重曝光海报制作技巧
ps怎么设计人物与城市剪影的双重曝光效果?想要做一个人物与城市的双重曝光效果,该怎么制作这个效果呢?下面我们就来看看ps双重曝光海报制作技巧2022-01-10 ps图片白色背景怎么去掉?想要将两个图片合并,其中一个图片是文字,该怎么去掉文字的背景只提取文字呢?下面我们就来看看ps合成去背景只留文字的技巧2021-12-01
 ps怎么给书籍加封面?ps中想要给书吧嗯添加封面图,该怎么制作的毫无违和感呢?下面我们就来看看ps把图片融入书本封面中的技巧2021-11-04
PS如何制作卡通少女碎片化效果?PS制作卡通少女碎片化效果教程
PS的功能非常强大,我们可以使用PS制作非常不可思议的效果,下面小编就来教大家如何使用PS制作卡通少女的碎片化效果2021-10-19 烟雾素材是我们创作一些作品时不可缺少的元素,今天小编就来教大家使用PS制作一款充满创意的烟雾手势,一起来看看教程吧2021-10-19
 ps两张图片怎么叠加融合?有两种图片素材,想要放到一张图中排版,并且毫无违和感,该怎么操作呢?下面我们就来看看ps图片排版的技巧2021-09-07
 ps怎么将鲁夫合成到鸡蛋中?ps中想要将海盗小子鲁夫嵌入到鸡蛋中,该怎么操作呢?下面我们就来看看ps做图片完美嵌入效果的技巧,详细请看下文介绍2021-09-07
如何使用Photoshop制作从云梯走进书本中的奇幻森林场景
今天小编为大家带来了如何使用Photoshop制作从云梯走进书本中的奇幻森林场景,教程不算复杂,喜欢的朋友可以一起学习2021-09-02


最新评论