
MyBatis-Plus+达梦数据库实现高效数据持久化的示例
更新时间:2023年08月03日 09:06:07 作者:不掉头发的阿水
这篇文章主要介绍了MyBatis-Plus和达梦数据库实现高效数据持久化,文中通过示例代码介绍的非常详细,对大家的学习或者工作具有一定的参考学习价值,需要的朋友们下面随着小编来一起学习学习吧

一、添加依赖
首先,我们需要在项目的 pom.xml 文件中添加 MyBatis-Plus 和达梦数据库的依赖:
    <dependencies>
        <dependency>
            <groupId>org.springframework.boot</groupId>
            <artifactId>spring-boot-starter-web</artifactId>
        </dependency>
        <dependency>
            <groupId>org.springframework.boot</groupId>
            <artifactId>spring-boot-starter-test</artifactId>
            <scope>test</scope>
        </dependency>
        <!--  添加dm8 jdbc jar 包依赖-->
        <dependency>
            <groupId>com.dm</groupId>
            <artifactId>DmJdbcDriver</artifactId>
            <version>1.8.0</version>
        </dependency>
        <dependency>
            <groupId>com.baomidou</groupId>
            <artifactId>mybatis-plus-boot-starter</artifactId>
            <version>3.5.2</version>
        </dependency>
        <dependency>
            <groupId>org.projectlombok</groupId>
            <artifactId>lombok</artifactId>
        </dependency>
    </dependencies>
二、配置数据源
在 Spring Boot 的配置文件 application.properties 或 application.yml 中配置达梦数据库的连接信息:
spring:
  datasource:
    url: jdbc:dm://localhost:5236
    username: 账号
    password: 密码
    driver-class-name: dm.jdbc.driver.DmDriver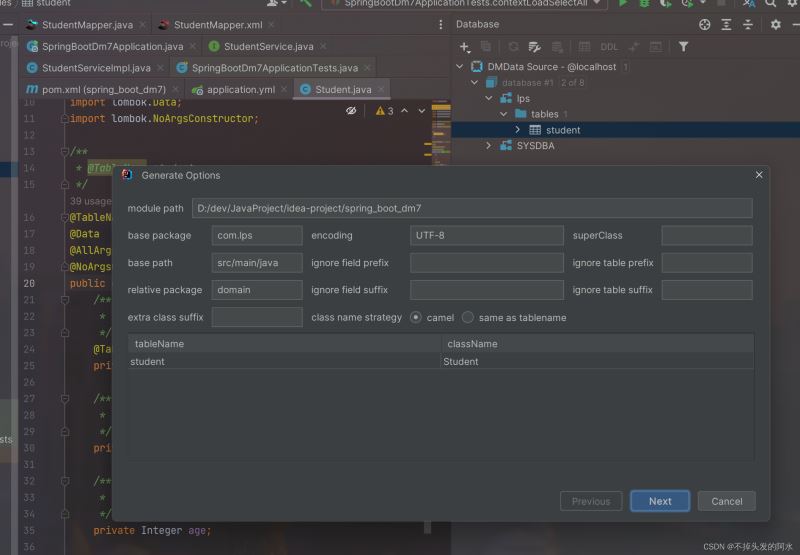
之后可以使用MyBatisX生成以下代码
三、创建实体类和 Mapper 接口
创建与数据库表对应的实体类,并使用 MyBatis-Plus 注解标注主键和表名等信息:
import com.baomidou.mybatisplus.annotation.IdType;
import com.baomidou.mybatisplus.annotation.TableField;
import com.baomidou.mybatisplus.annotation.TableId;
import com.baomidou.mybatisplus.annotation.TableName;
import java.io.Serializable;
import lombok.AllArgsConstructor;
import lombok.Data;
import lombok.NoArgsConstructor;
/**
* @TableName student
*/
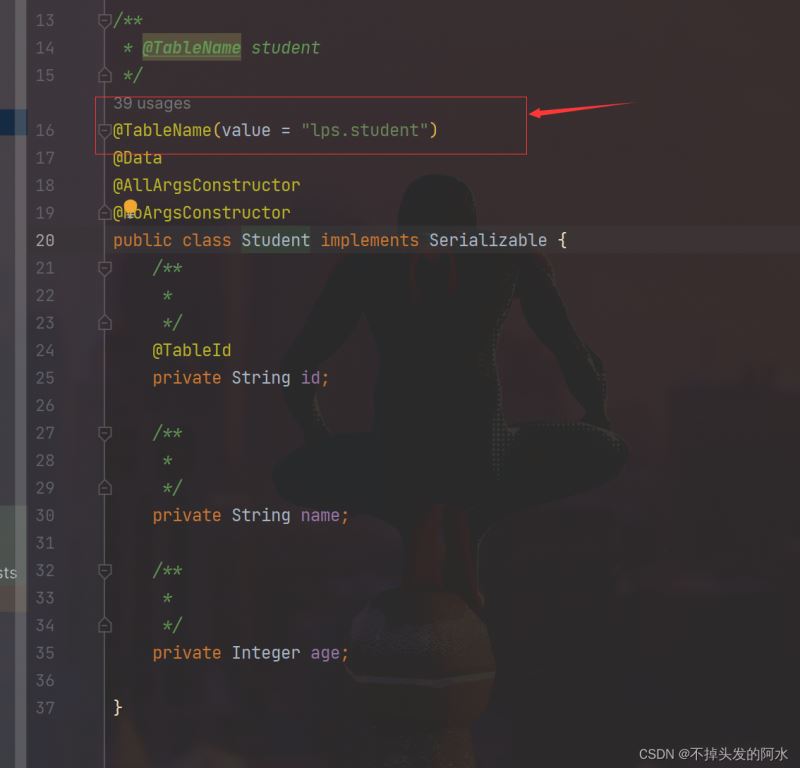
@TableName(value = "lps.student")
@Data
@AllArgsConstructor
@NoArgsConstructor
public class Student implements Serializable {
/**
*
*/
@TableId
private String id;
/**
*
*/
private String name;
/**
*
*/
private Integer age;
}接着,创建继承自 BaseMapper 的 Mapper 接口:
import com.lps.domain.Student;
import com.baomidou.mybatisplus.core.mapper.BaseMapper;
import org.apache.ibatis.annotations.Mapper;
/**
* @author 19449
* @description 针对表【student】的数据库操作Mapper
* @createDate 2023-08-01 16:10:31
* @Entity com.lps.domain.Student
*/
@Mapper
public interface StudentMapper extends BaseMapper<Student> {
}
完成mapper.xml
<?xml version="1.0" encoding="UTF-8"?>
<!DOCTYPE mapper
        PUBLIC "-//mybatis.org//DTD Mapper 3.0//EN"
        "http://mybatis.org/dtd/mybatis-3-mapper.dtd">
<mapper namespace="com.lps.mapper.StudentMapper">
    <resultMap id="BaseResultMap" type="com.lps.domain.Student">
            <id property="id" column="id" jdbcType="VARCHAR"/>
            <result property="name" column="name" jdbcType="VARCHAR"/>
            <result property="age" column="age" jdbcType="OTHER"/>
    </resultMap>
    <sql id="Base_Column_List">
        id,name,age
    </sql>
</mapper>
四、创建 Service 层
创建 Service 接口和实现类,继承自 IService 和 ServiceImpl:
import com.lps.domain.Student;
import com.baomidou.mybatisplus.extension.service.IService;
import java.util.List;
/**
 * @author 19449
 * @description 针对表【student】的数据库操作Service
 * @createDate 2023-08-01 16:10:31
 */
public interface StudentService extends IService<Student> {
    List<Student> selectAll();
    void insert(Student student);
    void deleteBatch(List<Student> studentList);
    void deleteAll();
}
service实现类
import com.baomidou.mybatisplus.extension.service.impl.ServiceImpl;
import com.lps.domain.Student;
import com.lps.service.StudentService;
import com.lps.mapper.StudentMapper;
import org.springframework.beans.factory.annotation.Autowired;
import org.springframework.stereotype.Service;
import java.util.List;
import java.util.stream.Collectors;
/**
 * @author 19449
 * @description 针对表【student】的数据库操作Service实现
 * @createDate 2023-08-01 16:10:31
 */
@Service
public class StudentServiceImpl extends ServiceImpl<StudentMapper, Student>
        implements StudentService {
    @Autowired
    private StudentMapper studentMapper;
    @Override
    public List<Student> selectAll() {
        return studentMapper.selectList(null);
    }
    @Override
    public void insert(Student student) {
        studentMapper.insert(student);
    }
    @Override
    public void deleteBatch(List<Student> studentList) {
        studentMapper.deleteBatchIds(studentList.stream().map(students -> students.getId()).collect(Collectors.toList()));
    }
    @Override
    public void deleteAll() {
        studentMapper.delete(null);
    }
}
五、进行 CRUD 操作
现在就可以在业务逻辑中使用 YourService 进行增删改查操作了:
package com.lps;
import com.lps.domain.Student;
import com.lps.service.StudentService;
import org.junit.jupiter.api.Test;
import org.springframework.beans.factory.annotation.Autowired;
import org.springframework.boot.test.context.SpringBootTest;
import java.util.ArrayList;
import java.util.List;
@SpringBootTest
class SpringBootDm7ApplicationTests {
    @Autowired
    StudentService studentService;
    /**
     * 查询所有
     */
    @Test
    void contextLoadSelectAll() {
        List<Student> students = studentService.selectAll();
        for (Student student : students) {
            System.out.println(student);
        }
    }
    /**
     * 单条插入
     */
    @Test
    void contextLoadsInsert() {
        Student student = new Student("666","刘品水",18);
        studentService.insert(student);
    }
    /**
     * 循环里做插入 主打就是挨训
     */
    @Test
    void contextLoadsInsert2() {
        //还有优化空间 下篇博客见
        List<Student> studentList=new ArrayList<>();
        for (int i = 1; i <= 100000; i++) {
            Student student1 = new Student(i+"","刘品水"+i,1+i);
            studentList.add(student1);
        }
        System.out.println(studentList.size());
        long beginTime = System.currentTimeMillis();
        for (Student student : studentList) {
            studentService.insert(student);
        }
        long endTime = System.currentTimeMillis();
        long spendTime = endTime - beginTime;
        System.out.println("用时:"+spendTime+"毫秒");
    }
    /**
     * 批量插入
     */
    @Test
    void contextLoadsSaveBatch() {
        //还有优化空间 下篇博客见
        List<Student> studentList=new ArrayList<>();
        for (int i = 1; i <= 1000000; i++) {
            Student student1 = new Student(i+"","刘品水"+i,1+i);
            studentList.add(student1);
        }
        System.out.println(studentList.size());
        long beginTime = System.currentTimeMillis();
        studentService.saveBatch(studentList,1000000);
        long endTime = System.currentTimeMillis();
        long spendTime = endTime - beginTime;
        System.out.println("用时:"+spendTime+"毫秒");
    }
    /**
     * 批量保存或者批量更新
     */
    @Test
    void contextLoadSaveOrUpdateBatch() {
        List<Student> studentList=new ArrayList<>();
        Student student1 = new Student("668","吴彦祖",18);
        Student student2 = new Student("669","彭于晏",18);
        Student student3 = new Student("670","霍建华",18);
        studentList.add(student1);
        studentList.add(student2);
        studentList.add(student3);
        studentService.saveOrUpdateBatch(studentList);
    }
    /**
     * 批量删除
     */
    @Test
    void contextLoadDeleteBatch() {
        List<Student> studentList=new ArrayList<>();
        Student student1 = new Student("123456","刘品水",18);
        Student student2 = new Student("654321","刘品水",18);
        Student student3 = new Student("77777","刘品水",18);
        studentList.add(student1);
        studentList.add(student2);
        studentList.add(student3);
        studentService.deleteBatch(studentList);
    }
    /**
     * 删除所有
     */
    @Test
    void contextLoadDeleteBatchAll() {
        studentService.deleteAll();
    }
}
六、总结
本文介绍了如何结合 MyBatis-Plus 和达梦数据库来实现高效的数据持久化操作。通过配置数据源、创建实体类、Mapper 接口和 Service 层,我们可以轻松地完成增删改查等数据库操作。MyBatis-Plus 的强大功能和简便的操作方式,大大提高了开发效率,使得数据持久化变得更加轻松愉快。
最重要的就是实体类上要记得加上你的模式名
以上就是MyBatis-Plus+达梦数据库实现高效数据持久化的示例的详细内容,更多关于MyBatis-Plus数据持久化的资料请关注脚本之家其它相关文章!
相关文章
 StringBuilder、StringBuffer 和 String是Java中处理字符串的三种主要方式,每种有不同的特点和适用场景,下面给大家介绍Java字符串的处理方法及作用介绍2025-04-04
Spring中配置Transaction与不配置的区别及说明
这篇文章主要介绍了Spring中配置Transaction与不配置的区别及说明,具有很好的参考价值,希望对大家有所帮助,如有错误或未考虑完全的地方,望不吝赐教2024-07-07 SpringBoot对常用的数据库支持外,对NoSQL 数据库也进行了封装自动化,下面这篇文章主要给大家介绍了关于springboot使用redis的详细步骤,文中通过实例代码介绍的非常详细,需要的朋友可以参考下2022-06-06
 这篇文章主要介绍了java 字符串截取的实例详解的相关资料,希望通过本文能帮助到大家,需要的朋友可以参考下2017-09-09
 这篇文章主要介绍了通过实例了解如何在JavaWeb实现文件下载,文中通过示例代码介绍的非常详细,对大家的学习或者工作具有一定的参考学习价值,需要的朋友可以参考下2020-09-09
 本文主要介绍了java bootclasspath的具体用法,文中通过示例代码介绍的非常详细,对大家的学习或者工作具有一定的参考学习价值,需要的朋友们下面随着小编来一起学习学习吧2023-01-01
 这篇文章主要介绍了Java获取接口所有实现类的方式详解,文中通过示例代码介绍的非常详细,对大家的学习或者工作具有一定的参考学习价值,需要的朋友们下面随着小编来一起学习学习吧2019-12-12
 这篇文章主要介绍了mybatis的使用-Mapper文件各种语法介绍,具有很好的参考价值,希望对大家有所帮助。一起跟随小编过来看看吧2020-11-11
 这篇文章主要介绍了如何解决IDEA.properties文件中文乱码问题,具有很好的参考价值,希望对大家有所帮助,如有错误或未考虑完全的地方,望不吝赐教2023-12-12
 这篇文章主要介绍了IntelliJ IDEA 的使用界面图文教程,需要的朋友可以参考下2018-10-10


最新评论