
Java并发编程中的ConcurrentLinkedQueue详解
ConcurrentLinkedQueue 详解
ConcurrentLinkedQueue示例 下面通过一个示例来了解ConcurrentLinkedQueue的使用
import java.util.concurrent.ConcurrentLinkedQueue;
class PutThread extends Thread {
    private ConcurrentLinkedQueue<Integer> clq;
    public PutThread(ConcurrentLinkedQueue<Integer> clq) {
        this.clq = clq;
    }
    public void run() {
        for (int i = 0; i < 10; i++) {
            try {
                System.out.println("add " + i);
                clq.add(i);
                Thread.sleep(100);
            } catch (InterruptedException e) {
                e.printStackTrace();
            }
        }
    }
}
class GetThread extends Thread {
    private ConcurrentLinkedQueue<Integer> clq;
    public GetThread(ConcurrentLinkedQueue<Integer> clq) {
        this.clq = clq;
    }
    public void run() {
        for (int i = 0; i < 10; i++) {
            try {
                System.out.println("poll " + clq.poll());
                Thread.sleep(100);
            } catch (InterruptedException e) {
                e.printStackTrace();
            }
        }
    }
}
public class ConcurrentLinkedQueueDemo {
    public static void main(String[] args) {
        ConcurrentLinkedQueue<Integer> clq = new ConcurrentLinkedQueue<Integer>();
        PutThread p1 = new PutThread(clq);
        GetThread g1 = new GetThread(clq);
        p1.start();
        g1.start();
    }
}
运行结果: add 0
poll null
add 1
poll 0
add 2
poll 1
add 3
poll 2
add 4
poll 3
add 5
poll 4
poll 5
add 6
add 7
poll 6
poll 7
add 8
add 9
poll 8
说明: GetThread线程不会因为ConcurrentLinkedQueue队列为空而等待,而是直接返回null,所以当实现队列不空时,等待时,则需要用户自己实现等待逻辑。
ConcurrentLinkedQueue数据结构 ConcurrentLinkedQueue的数据结构与LinkedBlockingQueue的数据结构相同,都是使用的链表结构。ConcurrentLinkedQueue的数据结构如下:
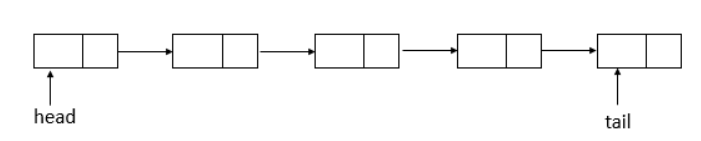
ConcurrentLinkedQueue采用的链表结构,并且包含有一个头节点和一个尾结点
核心函数分析
offer函数
public boolean offer(E e) {
// 元素不为null
checkNotNull(e);
// 新生一个结点
final Node<E> newNode = new Node<E>(e);
for (Node<E> t = tail, p = t;;) { // 无限循环
// q为p结点的下一个结点
Node<E> q = p.next;
if (q == null) { // q结点为null
// p is last node
if (p.casNext(null, newNode)) { // 比较并进行替换p结点的next域
// Successful CAS is the linearization point
// for e to become an element of this queue,
// and for newNode to become "live".
if (p != t) // p不等于t结点,不一致 // hop two nodes at a time
// 比较并替换尾结点
casTail(t, newNode); // Failure is OK.
// 返回
return true;
}
// Lost CAS race to another thread; re-read next
}
else if (p == q) // p结点等于q结点
// We have fallen off list. If tail is unchanged, it
// will also be off-list, in which case we need to
// jump to head, from which all live nodes are always
// reachable. Else the new tail is a better bet.
// 原来的尾结点与现在的尾结点是否相等,若相等,则p赋值为head,否则,赋值为现在的尾结点
p = (t != (t = tail)) ? t : head;
else
// Check for tail updates after two hops.
// 重新赋值p结点
p = (p != t && t != (t = tail)) ? t : q;
}
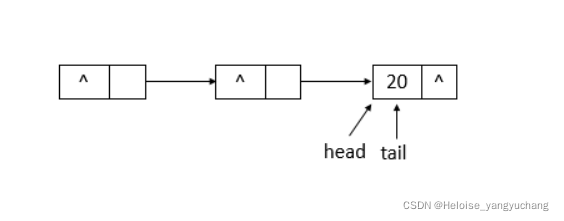
}offer函数用于将指定元素插入此队列的尾部。下面模拟offer函数的操作,队列状态的变化(假设单线程添加元素,连续添加10、20两个元素)。
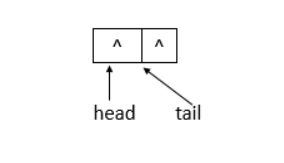
若ConcurrentLinkedQueue的初始状态如上图所示,即队列为空。单线程添加元素,此时,添加元素10,则状态如下所示
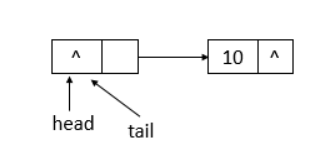
如上图所示,添加元素10后,tail没有变化,还是指向之前的结点,继续添加元素20,则状态如下所示
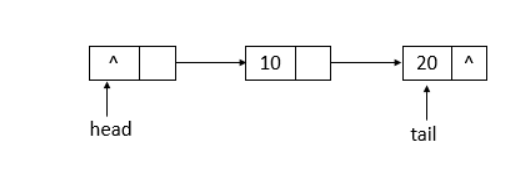
如上图所示,添加元素20后,tail指向了最新添加的结点。
poll函数
public E poll() {
restartFromHead:
for (;;) { // 无限循环
for (Node<E> h = head, p = h, q;;) { // 保存头节点
// item项
E item = p.item;
if (item != null && p.casItem(item, null)) { // item不为null并且比较并替换item成功
// Successful CAS is the linearization point
// for item to be removed from this queue.
if (p != h) // p不等于h // hop two nodes at a time
// 更新头节点
updateHead(h, ((q = p.next) != null) ? q : p);
// 返回item
return item;
}
else if ((q = p.next) == null) { // q结点为null
// 更新头节点
updateHead(h, p);
return null;
}
else if (p == q) // p等于q
// 继续循环
continue restartFromHead;
else
// p赋值为q
p = q;
}
}
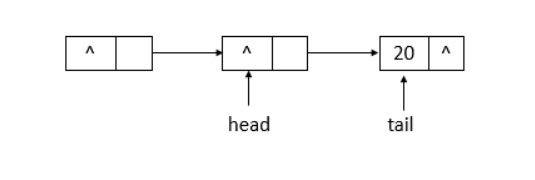
}此函数用于获取并移除此队列的头,如果此队列为空,则返回null。下面模拟poll函数的操作,队列状态的变化(假设单线程操作,状态为之前offer10、20后的状态,poll两次)。

队列初始状态如上图所示,在poll操作后,队列的状态如下图所示
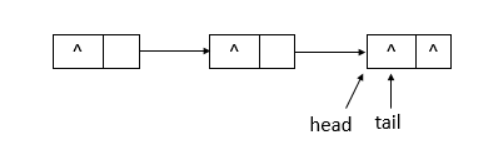
如上图可知,poll操作后,head改变了,并且head所指向的结点的item变为了null。再进行一次poll操作,队列的状态如下图所示。
如上图可知,poll操作后,head结点没有变化,只是指示的结点的item域变成了null。
remove函数
public boolean remove(Object o) {
    // 元素为null,返回
    if (o == null) return false;
    Node<E> pred = null;
    for (Node<E> p = first(); p != null; p = succ(p)) { // 获取第一个存活的结点
        // 第一个存活结点的item值
        E item = p.item;
        if (item != null &&
            o.equals(item) &&
            p.casItem(item, null)) { // 找到item相等的结点,并且将该结点的item设置为null
            // p的后继结点
            Node<E> next = succ(p);
            if (pred != null && next != null) // pred不为null并且next不为null
                // 比较并替换next域
                pred.casNext(p, next);
            return true;
        }
        // pred赋值为p
        pred = p;
    }
    return false;
}
此函数用于从队列中移除指定元素的单个实例(如果存在)。其中,会调用到first函数和succ函数,first函数的源码如下
Node<E> first() {
    restartFromHead:
    for (;;) { // 无限循环,确保成功
        for (Node<E> h = head, p = h, q;;) {
            // p结点的item域是否为null
            boolean hasItem = (p.item != null);
            if (hasItem || (q = p.next) == null) { // item不为null或者next域为null
                // 更新头节点
                updateHead(h, p);
                // 返回结点
                return hasItem ? p : null;
            }
            else if (p == q) // p等于q
                // 继续从头节点开始
                continue restartFromHead;
            else
                // p赋值为q
                p = q;
        }
    }
}
first函数用于找到链表中第一个存活的结点。succ函数源码如下
final Node<E> succ(Node<E> p) {
// p结点的next域
Node<E> next = p.next;
// 如果next域为自身,则返回头节点,否则,返回next
return (p == next) ? head : next;
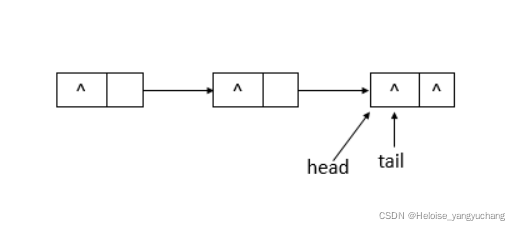
}succ用于获取结点的下一个结点。如果结点的next域指向自身,则返回head头节点,否则,返回next结点。下面模拟remove函数的操作,队列状态的变化(假设单线程操作,状态为之前offer10、20后的状态,执行remove(10)、remove(20)操作)。

如上图所示,为ConcurrentLinkedQueue的初始状态,remove(10)后的状态如下图所示
如上图所示,当执行remove(10)后,head指向了head结点之前指向的结点的下一个结点,并且head结点的item域置为null。继续执行remove(20),状态如下图所示
如上图所示,执行remove(20)后,head与tail指向同一个结点,item域为null。
size函数
public int size() {
    // 计数
    int count = 0;
    for (Node<E> p = first(); p != null; p = succ(p)) // 从第一个存活的结点开始往后遍历
        if (p.item != null) // 结点的item域不为null
            // Collection.size() spec says to max out
            if (++count == Integer.MAX_VALUE) // 增加计数,若达到最大值,则跳出循环
                break;
    // 返回大小
    return count;
}
此函数用于返回ConcurrenLinkedQueue的大小,从第一个存活的结点(first)开始,往后遍历链表,当结点的item域不为null时,增加计数,之后返回大小。
HOPS(延迟更新的策略)的设计 通过上面对offer和poll方法的分析,我们发现tail和head是延迟更新的,两者更新触发时机为:
tail更新触发时机:当tail指向的节点的下一个节点不为null的时候,会执行定位队列真正的队尾节点的操作,找到队尾节点后完成插入之后才会通过casTail进行tail更新;当tail指向的节点的下一个节点为null的时候,只插入节点不更新tail。
head更新触发时机:当head指向的节点的item域为null的时候,会执行定位队列真正的队头节点的操作,找到队头节点后完成删除之后才会通过updateHead进行head更新;当head指向的节点的item域不为null的时候,只删除节点不更新head。
并且在更新操作时,源码中会有注释为:hop two nodes at a time。所以这种延迟更新的策略就被叫做HOPS的大概原因是这个(猜的),从上面更新时的状态图可以看出,head和tail的更新是“跳着的”即中间总是间隔了一个。那么这样设计的意图是什么呢?
如果让tail永远作为队列的队尾节点,实现的代码量会更少,而且逻辑更易懂。但是,这样做有一个缺点,如果大量的入队操作,每次都要执行CAS进行tail的更新,汇总起来对性能也会是大大的损耗。如果能减少CAS更新的操作,无疑可以大大提升入队的操作效率,所以doug lea大师每间隔1次(tail和队尾节点的距离为1)进行才利用CAS更新tail。对head的更新也是同样的道理,虽然,这样设计会多出在循环中定位队尾节点,但总体来说读的操作效率要远远高于写的性能,因此,多出来的在循环中定位尾节点的操作的性能损耗相对而言是很小的。
ConcurrentLinkedQueue适合的场景
ConcurrentLinkedQueue通过无锁来做到了更高并发量,是个高性能的队列,但是使用场景相对不如阻塞队列常见,毕竟取数据也要不停的去循环,不如阻塞的逻辑好设计,但是在并发量特别大的情况下,是个不错的选择,性能上好很多,而且这个队列的设计也是特别费力,尤其的使用的改良算法和对哨兵的处理。
整体的思路都是比较严谨的,这个也是使用了无锁造成的,我们自己使用无锁的条件的话,这个队列是个不错的参考。
到此这篇关于Java并发编程中的ConcurrentLinkedQueue详解的文章就介绍到这了,更多相关ConcurrentLinkedQueue详解内容请搜索脚本之家以前的文章或继续浏览下面的相关文章希望大家以后多多支持脚本之家!
相关文章
 java 自定义注解验证可自己添加所需要的注解,下面这篇文章主要给大家介绍了关于JAVA中通过自定义注解进行数据验证的相关资料,文中通过示例代码介绍的非常详细,需要的朋友可以参考借鉴,下面随着小编来一起学习学习吧2018-08-08
 本文主要介绍了如何采用Java自带的Image IO实现图片添加水印的需求,并整合了一些其他功能,感兴趣的朋友可以参考下2021-06-06
 本文讲解了java HashMap通过value反查key的方法,直接提供代码供大家参考使用2013-11-11
解决MyBatis-Plus使用动态表名selectPage不生效的问题
这篇文章主要介绍了如恶化解决MyBatis-Plus使用动态表名selectPage不生效的问题,文中通过示例代码介绍的非常详细,对大家的学习或者工作具有一定的参考学习价值,需要的朋友们下面随着小编来一起学习学习吧2023-11-11 为了保证订单业务的消息数据不丢失,需要使用到RabbitMQ的死信队列机制,本文主要介绍了Springboot结合rabbitmq实现的死信队列,具有一定的参考价值,感兴趣的可以了解一下2023-09-09
 这篇文章主要为大家详细介绍了Spring中WebDataBinder的使用,具有一定的参考价值,感兴趣的小伙伴们可以参考一下2017-07-07
JDK + Maven +IDEA 安装配置一条龙教程(2025 最新)
这篇文章主要介绍了JDK + Maven +IDEA安装配置的相关资料,通过一个简单的HelloWorld示例展示了如何在IDEA中创建和运行Java项目,文中给出了详细的图文教程,需要的朋友可以参考下2025-11-11 这篇文章主要介绍了Java开发环境不再需要配置classpath问题,具有很好的参考价值,希望对大家有所帮助。如有错误或未考虑完全的地方,望不吝赐教2022-12-12
 文章介绍了Java SPI(Service Provider Interface)机制,包括其概念、入门案例、原理分析以及实际应用,SPI机制通过服务接口和实现类的解耦,实现了服务的动态加载和扩展,文章详细解释了SPI机制的工作原理,包括迭代、hasNextService和nextService方法的实现2025-05-05
 本文介绍了如何在SpringBoot项目中配置路径映射,使得除static目录外的资源可被访问,文中通过示例代码介绍的非常详细,对大家的学习或者工作具有一定的参考学习价值,需要的朋友们下面随着小编来一起学习学习吧2025-08-08


最新评论