
springboot自动装配之@ComponentScan使用方式
1.@ComponentScan注解作用
@ComponentScan用于类或接口上主要是指定扫描路径,spring会把指定路径下带有指定注解的类自动装配到bean容器里。
会被自动装配的注解包括@Controller、@Service、@Component、@Repository等等。
与ComponentScan注解相对应的XML配置就是<context:component-scan/>, 根据指定的配置自动扫描package,将符合条件的组件加入到IOC容器中;
XML的配置方式如下:
	<context:component-scan
		base-package="com.example.test" use-default-filters="false">
		<context:exclude-filter type="custom"
		expression="com.example.test.filter.MtyTypeFilter" />
	</context:component-scan>
2. @ComponentScan注解属性
@ComponentScan有如下常用属性:
basePackages和value:指定要扫描的路径(package),如果为空则以@ComponentScan注解的类所在的包为基本的扫描路径。basePackageClasses:指定具体扫描的类。includeFilters:指定满足Filter条件的类。excludeFilters:指定排除Filter条件的类。useDefaultFilters=true/false:指定是否需要使用Spring默认的扫描规则:被@Component, @Repository, @Service, @Controller或者已经声明过@Component自定义注解标记的组件;
在过滤规则Filter中:
FilterType:指定过滤规则,支持的过滤规则有:
ANNOTATION:按照注解规则,过滤被指定注解标记的类(默认);ASSIGNABLE_TYPE:按照给定的类型;ASPECTJ:按照ASPECTJ表达式;REGEX:按照正则表达式;CUSTOM:自定义规则,自定义的Filter需要实现TypeFilter接口;
value和classes:指定在该规则下过滤的表达式;
@ComponentScan的常见的配置如下:
@ComponentScan(
    excludeFilters = {@Filter(
    type = FilterType.CUSTOM,
    classes = {TypeExcludeFilter.class}
), @Filter(
    type = FilterType.CUSTOM,
    classes = {AutoConfigurationExcludeFilter.class}
)}
)
3. @ComponentScan过滤规则说明
规则表达式说明:
- 1.扫描指定类文件
@ComponentScan(basePackageClasses = Person.class)
- 2.扫描指定包,使用默认扫描规则,即被@Component, @Repository, @Service, @Controller或者已经声明过@Component自定义注解标记的组件;
@ComponentScan(value = "com.example")
- 3.扫描指定包,加载被@Component注解标记的组件和默认规则的扫描(因为useDefaultFilters默认为true)
@ComponentScan(value = "com.example", includeFilters = { @Filter(type = FilterType.ANNOTATION, value = Component.class) })- 4.扫描指定包,只加载Person类型的组件
@ComponentScan(value = "com.example", includeFilters = { @Filter(type = FilterType.ASSIGNABLE_TYPE, value = Person.class) }, useDefaultFilters = false)- 5.扫描指定包,过滤掉被@Component标记的组件
@ComponentScan(value = "com.example", excludeFilters = { @Filter(type = FilterType.ANNOTATION, value = Component.class) })- 6.扫描指定包,自定义过滤规则
@ComponentScan(value = "com.example", includeFilters = { @Filter(type = FilterType.CUSTOM, value = MtyTypeFilter.class) }, useDefaultFilters = true)4. 自定义扫描过滤规则
用户自定义扫描过滤规则,需要实现org.springframework.core.type.filter.TypeFilter接口。
//1.自定义类实现TypeFilter接口并重写match()方法
public class MtyTypeFilter implements TypeFilter {
    /**
     *
     * @param metadataReader:读取到当前正在扫描的类的信息
     * @param metadataReaderFactory:可以获取到其他任何类的信息
     * @return
     * @throws IOException
     */
    @Override
    public boolean match(MetadataReader metadataReader, MetadataReaderFactory metadataReaderFactory) throws IOException {
        System.out.println("========MtyTypeFilter===========");
        //获取当前类的注解的信息
        AnnotationMetadata annotationMetadata = metadataReader.getAnnotationMetadata();
        System.out.println("annotationMetadata: "+annotationMetadata);
        //输出结果:annotationMetadata: com.example.test.bean.Color

        //获取当前正在扫描的类的类信息
        ClassMetadata classMetadata = metadataReader.getClassMetadata();
        System.out.println("classMetadata: "+classMetadata);
        //输出结果: classMetadata: com.example.test.bean.Color

        //获取当前类资源(类的路径)
        Resource resource = metadataReader.getResource();
        System.out.println("resource: "+resource);
        //输出结果:resource: file [D:\idea\demo-02\target\classes\com\example\test\bean\Color.class]


        //获取类名
        String className = classMetadata.getClassName();
        System.out.println("className: "+className);
        //输出结果:className: com.example.test.bean.Color
        Class<?> forName = null;
        try {
            forName = Class.forName(className);
            if (Color.class.isAssignableFrom(forName)) {
                // 如果是Color的子类,就加载到IOC容器
                return true;
            }
        } catch (ClassNotFoundException e) {
            e.printStackTrace();
        }

        System.out.println("========MtyTypeFilter===========");
        return false;
    }
}
5. @ComponentScans
可以一次声明多个@ComponentScan
@Retention(RetentionPolicy.RUNTIME)
@Target(ElementType.TYPE)
@Documented
@Repeatable(ComponentScans.class)  //指定ComponentScan可以被ComponentScans作为数组使用
public @interface ComponentScan {
}


@Retention(RetentionPolicy.RUNTIME)
@Target(ElementType.TYPE)
@Documented
public @interface ComponentScans {

	ComponentScan[] value();

}
@ComponentScans(value = { @ComponentScan(value = "com.example.test"),
@ComponentScan(value = "com.example.test", includeFilters = {
@Filter(type = FilterType.CUSTOM, value = MtyTypeFilter.class) }) })
public class MainConfig {
@Bean(name = "pers", initMethod = "init", destroyMethod = "destory")
public Person person() {
return new Person();
}
}6. spring boot处理@ComponentScan源码分析
spring创建bean对象的基本流程是先创建对应的BeanDefinition对象,然后在基于BeanDefinition对象来创建Bean对象,SpringBoot也是如此,只不过通过注解创建BeanDefinition对象的时机和解析方式不同而已。
SpringBoot是通过ConfigurationClassPostProcessor这个BeanFactoryPostProcessor类来处理。
本演示的demo涉及到4个演示类,分别是:
- 带有@SpringBootApplication注解的启动类Demo02Application。
- 带有@RestController注解的类HelloController。
- 带有@Configuration注解且有通过@Bean注解来创建addInterceptors的方法的MyMvcConfig类。
- Account实体类无任何注解。
本文的最后会贴出所有代码。先从启动类为入口,SpringBoot启动类如下:
@SpringBootApplication
public class Demo02Application {

    public static void main(String[] args) {
        //1、返回我们IOC容器
        ConfigurableApplicationContext run = SpringApplication.run(Demo02Application.class, args);
	}
}
从:
SpringApplication.run(Demo02Application.class, args);
一路断点到核心方法
SpringApplication.ConfigurableApplicationContext run(String... args)
run方法干了两件事:
- 创建SpringApplication对象
- 利用创建好的SpringApplication对象调用run方法
 public ConfigurableApplicationContext run(String... args) {
        long startTime = System.nanoTime();
        DefaultBootstrapContext bootstrapContext = this.createBootstrapContext();
        ConfigurableApplicationContext context = null;
        this.configureHeadlessProperty();
        //初始化监听器
        SpringApplicationRunListeners listeners = this.getRunListeners(args);
        //发布ApplicationStartingEven
        listeners.starting(bootstrapContext, this.mainApplicationClass);

        try {
        	 //装配参数和环境
            ApplicationArguments applicationArguments = new DefaultApplicationArguments(args);
            //发布ApplicationEnvironmentPreparedEvent
            ConfigurableEnvironment environment = this.prepareEnvironment(listeners, bootstrapContext, applicationArguments);
            this.configureIgnoreBeanInfo(environment);
            Banner printedBanner = this.printBanner(environment);
            //创建ApplicationContext,并装配
            context = this.createApplicationContext();
            context.setApplicationStartup(this.applicationStartup);
            //发布ApplicationPreparedEvent
            this.prepareContext(bootstrapContext, context, environment, listeners, applicationArguments, printedBanner);
            this.refreshContext(context);
            this.afterRefresh(context, applicationArguments);
            Duration timeTakenToStartup = Duration.ofNanos(System.nanoTime() - startTime);
            if (this.logStartupInfo) {
                (new StartupInfoLogger(this.mainApplicationClass)).logStarted(this.getApplicationLog(), timeTakenToStartup);
            }
			//发布ApplicationStartedEven
            listeners.started(context, timeTakenToStartup);
            //执行Spring中@Bean下的一些操作,如静态方法
            this.callRunners(context, applicationArguments);
        } catch (Throwable var12) {
            this.handleRunFailure(context, var12, listeners);
            throw new IllegalStateException(var12);
        }

        try {
            Duration timeTakenToReady = Duration.ofNanos(System.nanoTime() - startTime);
            listeners.ready(context, timeTakenToReady);
            return context;
        } catch (Throwable var11) {
            this.handleRunFailure(context, var11, (SpringApplicationRunListeners)null);
            throw new IllegalStateException(var11);
        }
    }
重点方法一:本方法法实现的重点功能:
- 本
demo是web工程,springboot通过反射创建上下文context:AnnotationConfigServletWebServerApplicationContext类 - 在构建context的无参构造方法中构建成员变量reader=new AnnotatedBeanDefinitionReader(this),在AnnotatedBeanDefinitionReader的无参构造方法中会beanFactory对象,并向beanFactory中注册5个BeanDefinition对象,重点关注ConfigurationClassPostProcessor。
context = this.createApplicationContext();
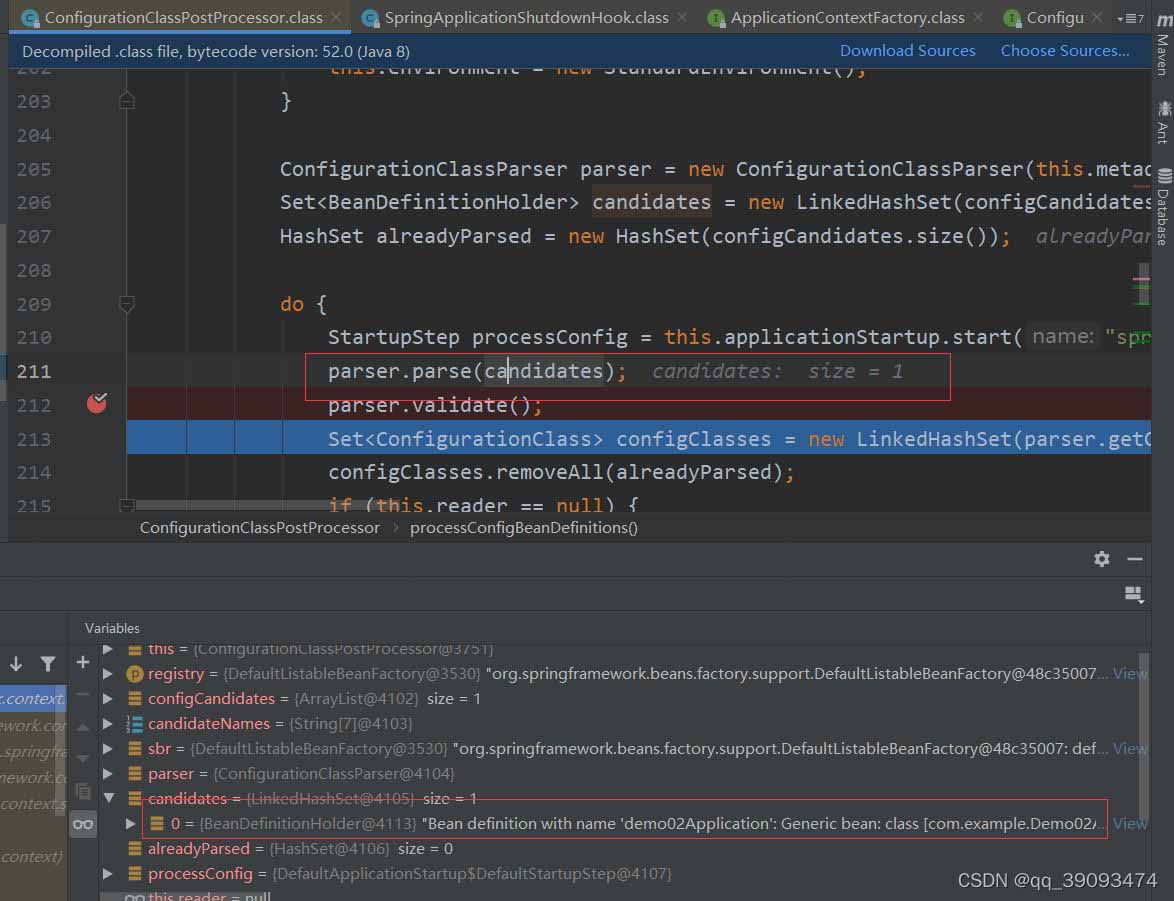
重点方法二:本方法实现的重点功能本方法会构建启动类Demo02Application对应的BeanDefinition对象,并注册到beanFactory中,此时的context对象可见下图
this.prepareContext(context, environment, listeners, applicationArguments, printedBanner);
重点方法三:本方法实现的重点功能该方法实际调用applicationContext的refresh方法,本文后面只会分析ConfigurationClassPostProcessor对象的创建和postProcessBeanDefinitionRegistry方法的执行
    this.refreshContext(context);
    this.afterRefresh(context, applicationArguments);
this.prepareContext(context, environment, listeners, applicationArguments, printedBanner);
代码执行后的截图如下:

ConfigurationClassPostProcessor实现BeanFactoryPostProcessor,关于BeanFactoryPostProcessor扩展接口的作用在此处不做介绍。
ConfigurationClassPostProcessor对象的创建和方法执行的断点如下:
this.refreshContext(context);–> AbstractApplicationContext.refresh() --> invokeBeanFactoryPostProcessors() -->PostProcessorRegistrationDelegate.invokeBeanFactoryPostProcessors()->invokeBeanDefinitionRegistryPostProcessors()
下面重点看ConfigurationClassPostProcessor类的postProcessBeanDefinitionRegistry()方法如何处理@ComponentScan注解:
同过源代码发现最终是由ConfigurationClassParser的解析类来处理,继续查看ConfigurationClassParser.doProcessConfigurationClass
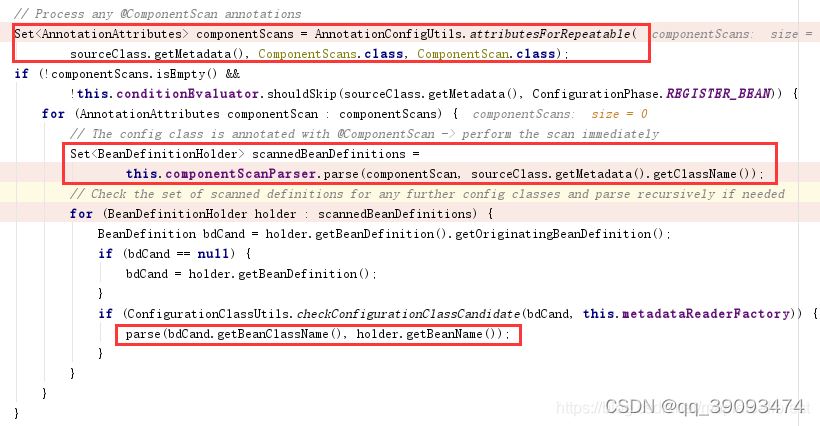
原来在这里对@ComponentScan注解做了判断,上面一段代码做了核心的几件事:
- 扫描@ComponentScan注解包下面的所有的可自动装备类,生成BeanDefinition对象,并注册到beanFactory对象中。
- 通过DeferredImportSelectorHandler处理@EnableAutoConfiguration注解,后续会有专文介绍。
- 将带有@Configuration 注解的类解析成ConfigurationClass对象并缓存,后面创建@Bean注解的Bean对象所对应的BeanDefinition时会用到到此为止MyFilter2对应的BeanDefinition已创建完毕。
- 如下图:

总结
以上为个人经验,希望能给大家一个参考,也希望大家多多支持脚本之家。
相关文章

Java项目全面升级转化经验(涉及JDK、Spring boot版本及依赖管理架构)
在软件开发领域,项目升级是一个必然的过程,随着技术的不断进步和业务需求的变化,对于旧项目的升级和优化已成为许多企业必须面对的问题,这篇文章主要介绍了Java项目全面升级转化的相关资料,包括JDK、Spring boot版本及依赖管理架构,需要的朋友可以参考下2025-09-09
SpringBoot 使用Prometheus采集自定义指标数据的方案
这篇文章主要介绍了SpringBoot 使用Prometheus采集自定义指标数据,我们在k8s集群成功搭建了Prometheus服务,今天,我们将在springboot2.x中使用prometheus记录指标,需要的朋友可以参考下2022-10-10 这篇文章主要介绍了java数据结构实现双向链表的示例,需要的朋友可以参考下2014-03-03
Java将集合List转换成String字符串(或String转换成List)详解
今天在写项目的时候遇到一个问题,就是要把得到的一个集合转换成字符串,下面这篇文章主要给大家介绍了关于Java将集合List转换成String字符串(或String转换成List)的相关资料,需要的朋友可以参考下2023-06-06
JDBC中PreparedStatement详解以及应用场景实例介绍
PreparedStatement对象代表的是一个预编译的SQL语句,用它提供的setter方法可以传入查询的变量,这篇文章主要给大家介绍了关于JDBC中PreparedStatement详解以及应用场景实例介绍的相关资料,需要的朋友可以参考下2024-02-02 这篇文章主要介绍了IDEA打包maven多模块相互依赖项目全过程,具有很好的参考价值,希望对大家有所帮助,如有错误或未考虑完全的地方,望不吝赐教2024-08-08
 本文主要介绍了Java实现贪吃蛇大作战小游戏的示例代码,文中通过示例代码介绍的非常详细,对大家的学习或者工作具有一定的参考学习价值,需要的朋友们下面随着小编来一起学习学习吧2022-07-07
 这篇文章主要为大家详细介绍了Java实现宠物商店管理系统,文中示例代码介绍的非常详细,具有一定的参考价值,感兴趣的小伙伴们可以参考一下2020-10-10
 这篇文章主要介绍了Spring整合junit的配置过程图解,文中通过示例代码介绍的非常详细,对大家的学习或者工作具有一定的参考学习价值,需要的朋友可以参考下2020-02-02
 很多刚学Java反射的同学可能对反射技术一头雾水,为什么要学习反射,学习反射有什么作用,下面这篇文章主要给大家介绍了关于JAVA中反射机制和模块化的相关资料,需要的朋友可以参考下2021-09-09


最新评论