
Mybatis XML配置文件实现增删改查的示例代码
更新时间:2025年03月25日 08:31:56 作者:鸽鸽程序猿
本文主要介绍了Mybatis XML配置文件实现增删改查的示例代码,文中通过示例代码介绍的非常详细,对大家的学习或者工作具有一定的参考学习价值,需要的朋友们下面随着小编来一起学习学习吧
一、环境准备
在使用XML来实现的数据库操作的时候,我们的依赖下载与前面的使用注解时的依赖是一样的。
		<dependency>
            <groupId>org.mybatis.spring.boot</groupId>
            <artifactId>mybatis-spring-boot-starter</artifactId>
            <version>3.0.4</version>
        </dependency>

        <dependency>
            <groupId>com.mysql</groupId>
            <artifactId>mysql-connector-j</artifactId>
            <scope>runtime</scope>
        </dependency>

		<dependency>
            <groupId>org.mybatis.spring.boot</groupId>
            <artifactId>mybatis-spring-boot-starter-test</artifactId>
            <version>3.0.4</version>
            <scope>test</scope>
        </dependency>
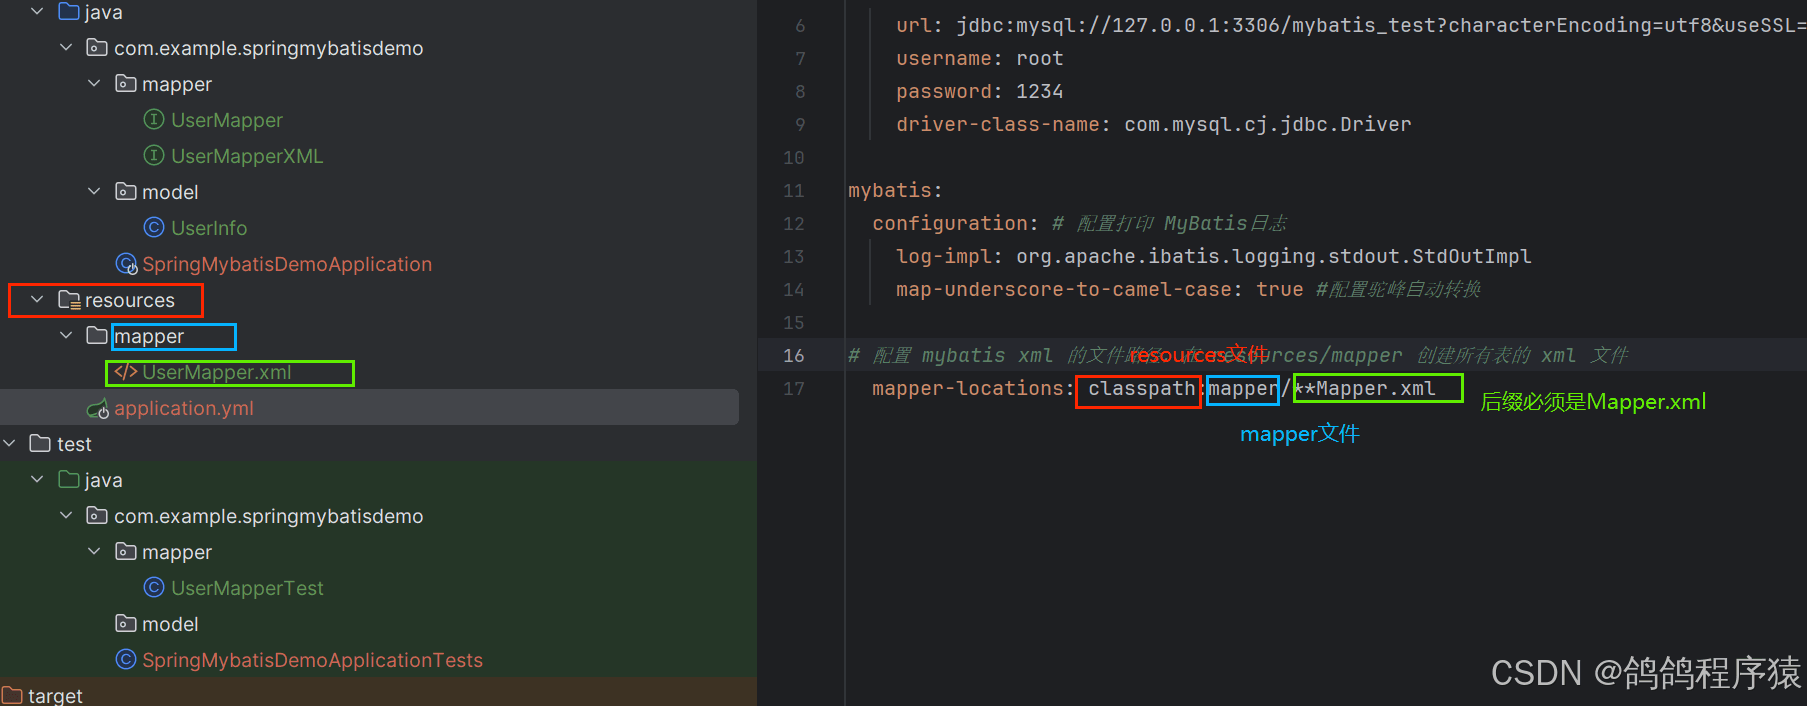
在配置文件yml格式,也需要添加上跟使用注解时的配置。还要多加上mybatis. mapper-locations: classpath:mapper/**Mapper.xml
# 数据库连接配置
spring:
  application:
    name: spring-mybatis-demo

  datasource:
    url: jdbc:mysql://127.0.0.1:3306/mybatis_test?characterEncoding=utf8&useSSL=false
    username: root
    password: 1234
    driver-class-name: com.mysql.cj.jdbc.Driver

mybatis:
  configuration: # 配置打印 MyBatis⽇志
    log-impl: org.apache.ibatis.logging.stdout.StdOutImpl
    map-underscore-to-camel-case: true #配置驼峰⾃动转换

# 配置 mybatis xml 的⽂件路径,在 resources/mapper 创建所有表的 xml ⽂件
  mapper-locations: classpath:mapper/**Mapper.xml
二、简单启动
我们先安装一个插件MybatisX,可以帮我们更简单实现xml文件与接口之间的跳转。
mapper接口:
package com.example.springmybatisdemo.mapper;

import com.example.springmybatisdemo.model.UserInfo;
import org.apache.ibatis.annotations.Mapper;

import java.util.List;
@Mapper
public interface UserMapperXML {
    List<UserInfo> selectAll();
}
xml文件:
<?xml version="1.0" encoding="UTF-8"?>
<!DOCTYPE mapper PUBLIC "-//mybatis.org//DTD Mapper 3.0//EN"
        "http://mybatis.org/dtd/mybatis-3-mapper.dtd">
<mapper namespace="com.example.springmybatisdemo.mapper.UserMapperXML">

    <select id="selectAll" resultType="com.example.springmybatisdemo.model.UserInfo">
        select * from user_info;
    </select>

</mapper>
- <mapper> 标签:需要指定 namespace 属性,表⽰命名空间,值为 UserMapperXML 接⼝的全限定名,包括全包名.类名。
- <select> 查询标签:是⽤来执⾏数据库的查询操作的:
- id :是和 Interface (接⼝)中定义的⽅法名称⼀样的,表⽰对接⼝的具体实现⽅法。
- resultType :是返回的数据类型,也就是我们定义的实体类.
测试:
package com.example.springmybatisdemo.mapper;

import org.junit.jupiter.api.AfterEach;
import org.junit.jupiter.api.BeforeEach;
import org.junit.jupiter.api.Test;
import org.springframework.beans.factory.annotation.Autowired;
import org.springframework.boot.test.context.SpringBootTest;

import static org.junit.jupiter.api.Assertions.*;
@SpringBootTest
class UserMapperXMLTest {
    @Autowired
    private UserMapperXML userMapperXML;
    @BeforeEach
    void setUp() {
    }

    @AfterEach
    void tearDown() {
    }

    @Test
    void selectAll() {
        System.out.println(userMapperXML.selectAll());
    }
}
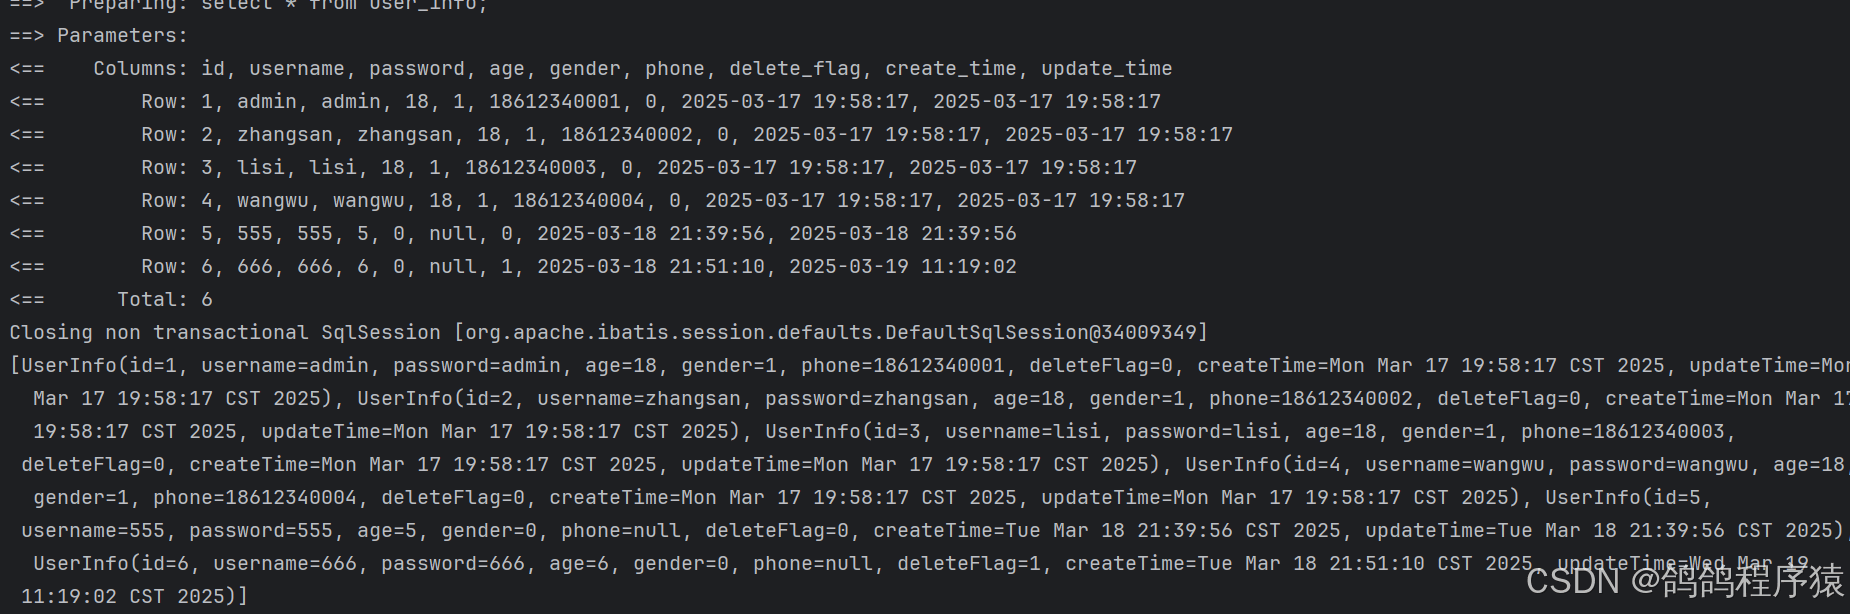
结果:
三、增< insert id = >
使用标签< Insert >来写入数据,直接使⽤UserInfo对象的属性名来获取参数。
    <insert id="insertOne">
        insert into user_info (username, password, age) values (#{username},#{password},#{age})
    </insert>
测试函数:
    @Test
    void insertOne() {
        UserInfo userInfo = new UserInfo();
        userInfo.setAge(8);
        userInfo.setPassword("888");
        userInfo.setUsername("888");
        Integer result = userMapperXML.insertOne(userInfo);
        System.out.println("增加函数:"+ result);
    }
测试结果:

四、返回主键
还是使用< insert >标签来写入数据,只不过设置useGeneratedKeys 和keyProperty属性 。
- useGeneratedKeys:这会令 MyBatis 使⽤ JDBC 的 getGeneratedKeys ⽅法来取出由数据库内部⽣成的主键(⽐如:像 MySQL 和 SQL Server 这样的关系型数据库管理系统的⾃动递增字段),默认值:false.
- keyProperty:指定能够唯⼀识别对象的属性,MyBatis 会使⽤ getGeneratedKeys 的返回值或 insert 语句的 selectKey ⼦元素设置它的值,默认值:未设置(unset)
<insert id="insertOne" useGeneratedKeys="true" keyProperty="id">
        insert into user_info (username, password, age) values (#{username},#{password},#{age})
    </insert>
测试方法:
    @Test
    void insertOne() {
        UserInfo userInfo = new UserInfo();
        userInfo.setAge(9);
        userInfo.setPassword("999");
        userInfo.setUsername("999");
        Integer result = userMapperXML.insertOne(userInfo);
        System.out.println("增加函数:"+ result+", 增加数据的id:"+userInfo.getId());
    }
结果:

五、删<delete id = >
使用< delete >标签,加上删除的SQL语句即可。
    <delete id="deleteOne">
        delete from user_info where id = #{id}
    </delete>
测试方法:
    @Test
    void deleteOne() {
        userMapperXML.deleteOne(9);
    }
结果:

六、改<update id = >
修改数据直接使用< update >注解,加上修改SQL语句即可。
    <update id="updateOne">
        update user_info set delete_flag = #{deleteFlag} where id = #{id}
    </update>
测试方法:
   @Test
    void updateOne() {
        UserInfo userInfo = new UserInfo();
        userInfo.setId(8);
        userInfo.setDeleteFlag(1);
        userMapperXML.updateOne(userInfo);
    }
结果:

七、查< select id = resultType = >
查询我们只需要使用标签即可。
但是我们也会遇见像前面注解的时候因为字段名和变量名不同而导致映射错误。解决方式与前面也相似。
- 使用起别名的查询语句,将数据库不同字段名取别名为属性名。
<?xml version="1.0" encoding="UTF-8"?>
<!DOCTYPE mapper PUBLIC "-//mybatis.org//DTD Mapper 3.0//EN"
        "http://mybatis.org/dtd/mybatis-3-mapper.dtd">
<mapper namespace="com.example.springmybatisdemo.mapper.UserMapperXML">

    <select id="selectAll" resultType="com.example.springmybatisdemo.model.UserInfo">

        select username , password, age, gender, phone,
        delete_flag as deleteFlag , create_time as createTime, update_time as updateTime
        from user_info

    </select>

</mapper>
- 使用配置文件将数据库字段中使用下划线的蛇形命名转换为小驼峰命名。
mybatis.configuration.map-underscore-to-camel-case: true
mybatis:
  configuration:
    map-underscore-to-camel-case: true #配置驼峰⾃动转换
- 使用标签result和resultMap。在resultMap标签中放入result标签数组,result标签的column属性对应数据库字段,property属性对应类属性名。当其他查询语句需要使用相同的映射时,这需要在select标签的resultMap属性写上resultMap标签的id属性即可。
	<resultMap id="UserMap" type="com.example.springmybatisdemo.model.UserInfo">
        <result column="delete_flag" property="deleteFlag"></result>
        <result column="create_time" property="createTime"></result>
        <result column="update_time" property="updateTime"></result>
    </resultMap>

    <select id="selectAll" resultType="com.example.springmybatisdemo.model.UserInfo" resultMap="UserMap">
        select * from user_info
    </select>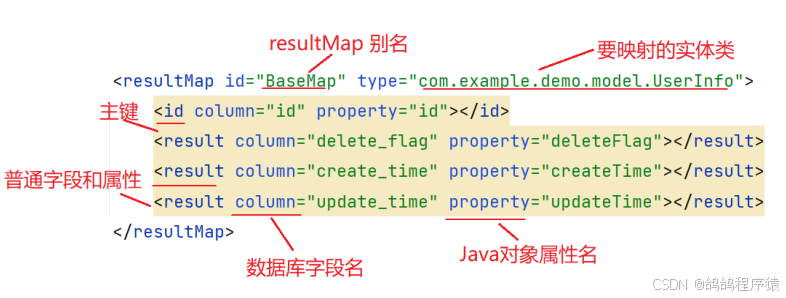
到此这篇关于Mybatis XML配置文件实现增删改查的示例代码的文章就介绍到这了,更多相关Mybatis XML增删改查内容请搜索脚本之家以前的文章或继续浏览下面的相关文章希望大家以后多多支持脚本之家!
相关文章
 这篇文章主要介绍了使用IDEA如何导入SpringBoot项目问题,具有很好的参考价值,希望对大家有所帮助,2023-12-12
 构造方法作用就是对类进行初始化。 如果你没有定议任何构造方法的形式,程式会为你取一个不带任何参数的构造函数,那么你产生类的对像时只能用不带参数的方法.下面小编和大家来一起学习一下吧2019-06-06
 这篇文章介绍了JAVA垃圾收集器与内存分配策略,文中示例代码介绍的非常详细,具有一定的参考价值,感兴趣的小伙伴们可以参考一下2015-07-07
 在我多年的Java开发经验中,异常处理无疑是项目开发中必写的模块,虽然Java它本身提供了异常处理机制,但很多开发者在使用过程中往往会犯一些常见的错误,导致程序出现不必要的异常捕获和性能问题,在本文中,我将分享一些关于Java异常处理的实用技巧,需要的朋友可以参考下2025-08-08
 Apache的Groovy是Java平台上设计的面向对象编程语言,这门动态语言拥有类似Python、Ruby和Smalltalk中的一些特性,可以作为Java平台的脚本语言使用,这篇文章主要介绍了Java 热更新 Groovy 实践及踩坑指南,需要的朋友可以参考下2022-09-09
 这篇文章主要为大家详细介绍了java实现双人五子棋游戏,文中示例代码介绍的非常详细,具有一定的参考价值,感兴趣的小伙伴们可以参考一下2022-05-05
 今天小编就为大家分享一篇关于Spring Boot集成MyBatis的方法,小编觉得内容挺不错的,现在分享给大家,具有很好的参考价值,需要的朋友一起跟随小编来看看吧2018-12-12
 这篇文章主要介绍了进一步理解Java中的多态概念,是Java入门学习中的基础知识,需要的朋友可以参考下2015-08-08
 这篇文章主要介绍了深入剖析Java中的各种异常处理方式,是Java入门学习中的基础知识,需要的朋友可以参考下2015-07-07
 这篇文章主要介绍了Java多线程并发synchronized 关键字,Java 在虚拟机层面提供了 synchronized 关键字供开发者快速实现互斥同步的重量级锁来保障线程安全。2022-06-06


最新评论