
Spring3整合MyBatis实现分页查询和搜索功能
在实际项目开发中,数据库数据量往往较大,直接查询全量数据会导致性能下降、页面加载缓慢;同时,用户需要快速定位目标数据,搜索功能必不可少。本文基于 MyBatis 框架,结合前端 Vue+Element UI 与后端 SpringBoot 技术栈,详细讲解分页查询与搜索功能的完整实现流程,涵盖后端插件配置、动态 SQL 编写、前端请求封装与页面展示,帮助开发者高效落地核心业务功能。
一、技术栈说明与环境准备
1.1 核心技术栈
后端:SpringBoot(基础框架)、MyBatis(持久层框架)、PageHelper(MyBatis 分页插件)、MySQL(数据库)
前端:Vue3(前端框架)、axios(HTTP 请求工具)、Element UI(UI 组件库,含 el-table 表格、el-pagination 分页、el-input 搜索框等组件)
1.2 环境准备
后端:确保已完成 SpringBoot 与 MyBatis 的基础整合(可参考前文 SpringBoot3 整合 MyBatis 步骤),引入 PageHelper 依赖;
前端:搭建 Vue3+Element UI 项目,安装 axios 依赖,配置基础请求拦截器。
二、安装依赖
npm i axios -S

三、简单测试axios
在Home.vue当中配置
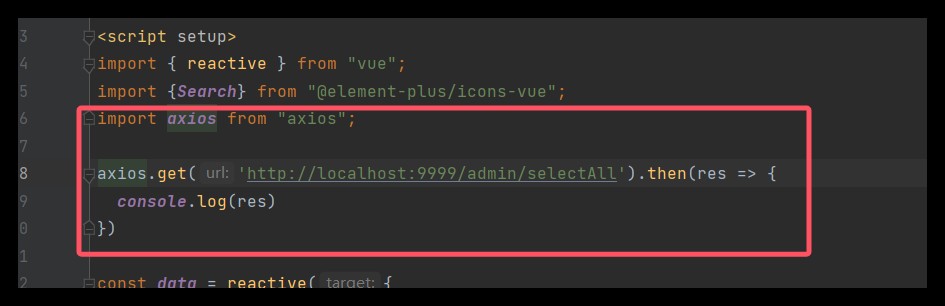
import axios from "axios";
axios.get("http://localhost:8080/user/findAll").then(res => {
  console.log(res.data);
});
四、SpringBoot设置跨域配置
前后端分离项目中,前端请求后端接口会存在跨域问题(浏览器同源策略限制),需在 SpringBoot 中添加跨域配置,允许前端域名的请求访问。

package com.qcby.schoolshop.common;
import org.springframework.context.annotation.Bean;
import org.springframework.context.annotation.Configuration;
import org.springframework.web.cors.CorsConfiguration;
import org.springframework.web.cors.UrlBasedCorsConfigurationSource;
import org.springframework.web.filter.CorsFilter;
@Configuration
public class CorsConfig {
    @Bean
    public CorsFilter corsFilter() {
        // 1. 创建CORS配置对象
        CorsConfiguration config = new CorsConfiguration();
        // 允许的源(前端地址,*表示允许所有源,生产环境建议指定具体地址)
        config.addAllowedOrigin("http://localhost:5173");
        // 允许的请求头(*表示允许所有)
        config.addAllowedHeader("*");
        // 允许的请求方法(*表示允许所有,也可以指定GET、POST、PUT等)
        config.addAllowedMethod("*");
        // 允许携带Cookie(如果需要跨域传递Cookie,需要开启这个,且前端请求也要配置withCredentials: true)
        config.setAllowCredentials(true);
        // 预检请求的缓存时间(单位:秒,减少预检请求的次数)
        config.setMaxAge(3600L);
        // 2. 配置路径映射(/**表示所有路径)
        UrlBasedCorsConfigurationSource source = new UrlBasedCorsConfigurationSource();
        source.registerCorsConfiguration("/**", config);
        // 3. 返回CORS过滤器
        return new CorsFilter(source);
    }
}
原因:前后端分离项目中,前端和后端通常运行在不同域名 / 端口(如前端 8081、后端 8080),浏览器的 “同源策略” 会禁止这种跨源请求,设置跨域是为了允许前端合法访问后端接口,避免请求被拦截,确保数据正常交互。
重启测试
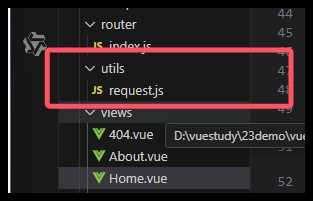
五、封装统一的请求工具:request.js
为了简化重复代码(不用每次请求都写基础配置)、统一管理请求规则(如基础 URL、超时时间、请求头),还能集中处理请求 / 响应拦截(如 Token 添加、错误提示),提升代码复用性和可维护性,以后方便使用,我们新建一个request.js的文件来处理后台发来的数据

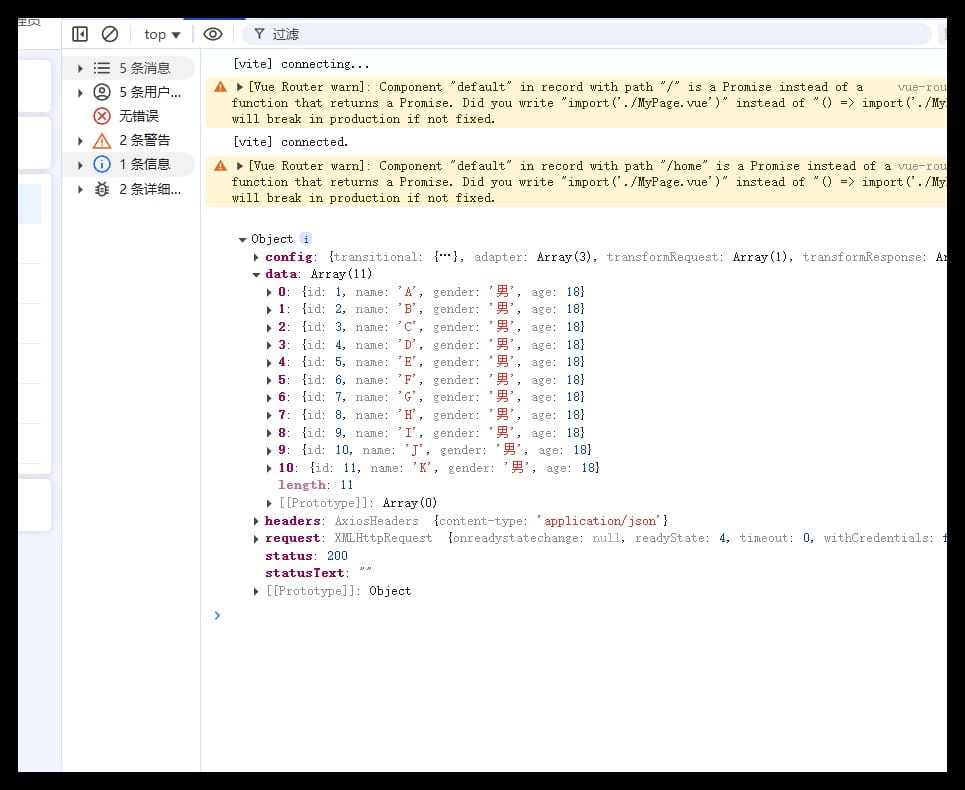
 import axios from "axios";
 axios.get('http://localhost:8080/user/findAll').then(res=>{
     console.log(res)
 })
import axios from "axios";
import {ElMessage} from "element-plus";
const request = axios.create({
  baseURL: 'http://localhost:9999',
  timeout: 30000  // 后台接口超时时间
})
// request 拦截器
// 可以自请求发送前对请求做一些处理
request.interceptors.request.use(config => {
  config.headers['Content-Type'] = 'application/json;charset=utf-8';
  return config
}, error => {
  return Promise.reject(error)
});
// response 拦截器
// 可以在接口响应后统一处理结果
request.interceptors.response.use(
  response => {
    let res = response.data;
    // 兼容服务端返回的字符串数据
    if (typeof res === 'string') {
      res = res ? JSON.parse(res) : res
    }
    return res;
  },
  error => {
    if (error.response.status === 404) {
      ElMessage.error('未找到请求接口')
    } else if (error.response.status === 500) {
      ElMessage.error('系统异常,请查看后端控制台报错')
    } else {
      console.error(error.message)
    }
    return Promise.reject(error)
  }
)
export default request
六、设置查询分页
6.1 Mapper.xml文件
<!--注意最后别写;-->
<select id="findAll" resultType="com.qcby.vuespringbootdemo.entity.User">
    select * from user order by id desc
</select>
6.2 导入分页的jar包 pom.xml
<!-- 分页插件pagehelper -->
<dependency>
    <groupId>com.github.pagehelper</groupId>
    <artifactId>pagehelper-spring-boot-starter</artifactId>
    <version>1.4.6</version>
    <!--排除和我们引入的mybatis的影响-->
    <exclusions>
        <exclusion>
            <groupId>org.mybatis</groupId>
            <artifactId>mybatis</artifactId>
        </exclusion>
    </exclusions>
</dependency>
6.3 service层开启分页查询

public PageInfo<User> selectPage(Integer pageNum,Integer pageSize){
    //开启分页查询
    PageHelper.startPage(pageNum,pageSize);
    List<User> users = userDao.findAll();
    return PageInfo.of(users);
}
6.4 Controller层
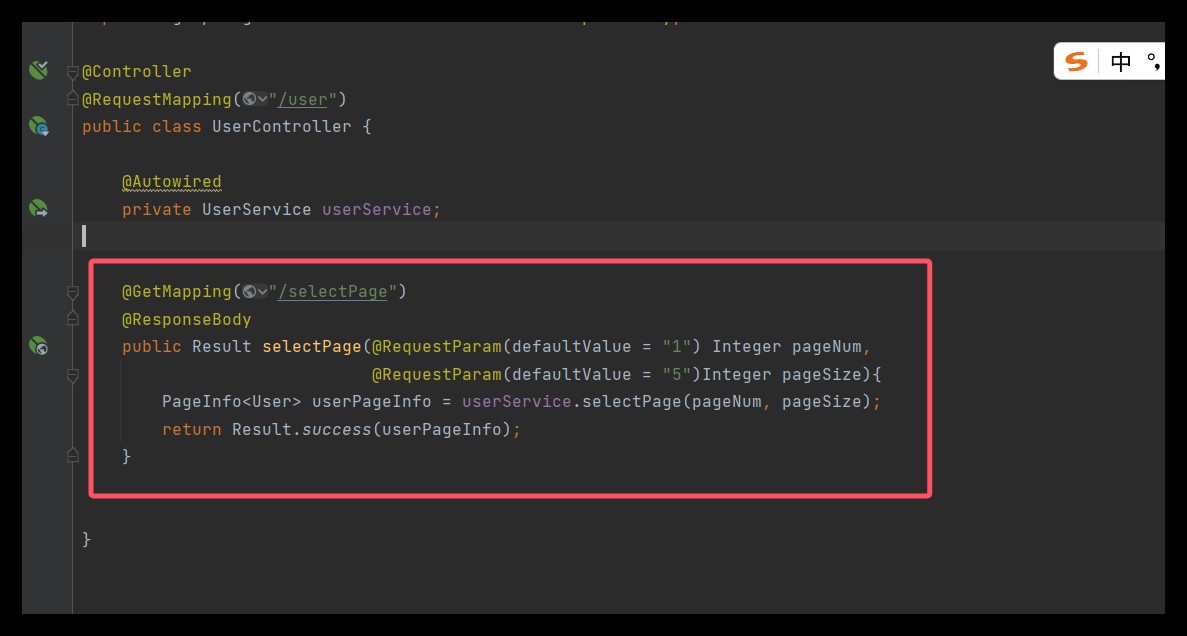
@GetMapping("/selectPage")
@ResponseBody
public Result selectPage(@RequestParam(defaultValue = "1") Integer pageNum,
                         @RequestParam(defaultValue = "5")Integer pageSize){
    PageInfo<User> userPageInfo = userService.selectPage(pageNum, pageSize);
    return Result.success(userPageInfo);
}
6.5 接口测试
http://localhost:8081/user/selectPage?pageNum=1&pageSize=5

6.6 前端展示
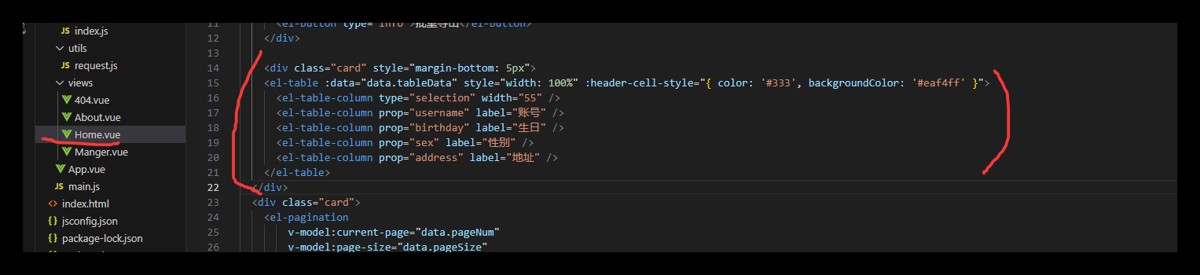
<div class="card" style="margin-bottom: 5px">
      <el-table :data="data.tableData" style="width: 100%" :header-cell-style="{ color: '#333', backgroundColor: '#eaf4ff' }">
        <!-- type="selection":这指定该列将包含用于行选择的复选框。它允许用户在表格中选择一行或多行。 -->
        <el-table-column type="selection" width="55" />
        <el-table-column prop="username" label="用户名" width="180" />
        <el-table-column prop="birthday" label="生日" width="180" />
        <el-table-column prop="sex" label="性别" width="80" />
        <el-table-column prop="address" label="地址" width="180" />
      </el-table>
    </div>
6.7 前端请求数据

import { reactive } from "vue";
import {Search} from "@element-plus/icons-vue";
import request from "@/utils/request.js";
import {ElMessage} from "element-plus";
const data = reactive({
  name: null,
  pageNum: 1,
  pageSize: 5,
  total:0,
  tableData: []
})
const load = () => {
  request.get('/user/selectPage', {
    params: {
      pageNum: data.pageNum,
      pageSize: data.pageSize
    }
  }).then(res => {
    if (res.code === '200') {
      data.tableData = res.data.list
      data.total = res.data.total
    } else {
      ElMessage.error(res.msg)
    }
  })
}
load()
接下来处理一下时间的显示问题
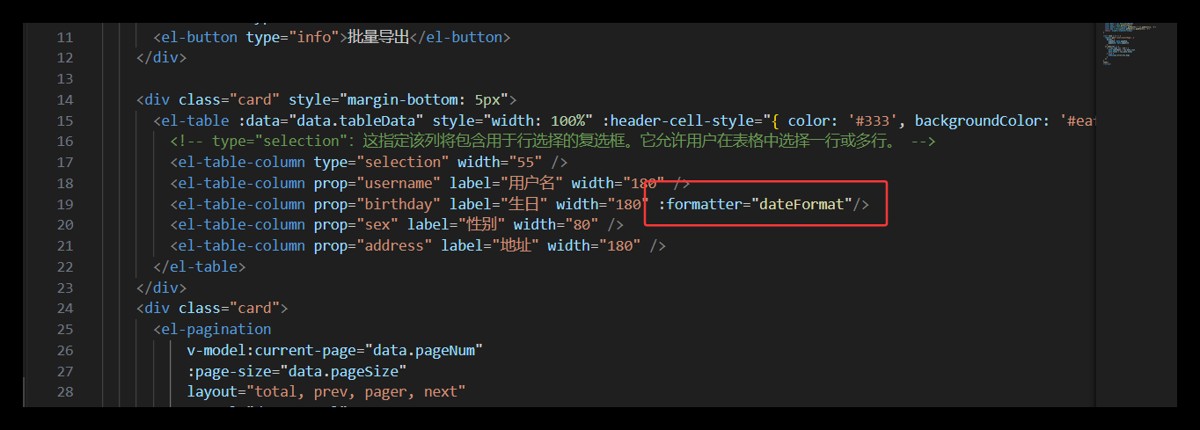
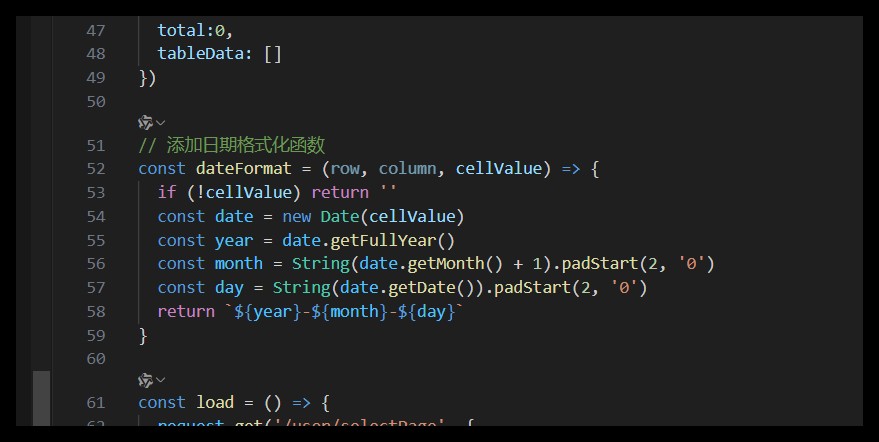
// 添加日期格式化函数
const dateFormat = (row, column, cellValue) => {
  if (!cellValue) return ''
  const date = new Date(cellValue)
  const year = date.getFullYear()
  const month = String(date.getMonth() + 1).padStart(2, '0')
  const day = String(date.getDate()).padStart(2, '0')
  return `${year}-${month}-${day}`
}
最后别忘了

<div class="card">
      <el-pagination
          v-model:current-page="data.pageNum"
          :page-size="data.pageSize"
          layout="total, prev, pager, next"
          :total="data.total"
          @current-change="load"
          @size-change="load"
      />
    </div>
七、搜索设置
7.1 前端设置搜索框

<div class="card" style="margin-bottom: 5px">
      <el-input clearable @clear="load" style="width: 260px; margin-right: 5px" v-model="data.username" placeholder="请输入用户名查询" :prefix-icon="Search"></el-input>
      <el-input clearable @clear="load" style="width: 260px; margin-right: 5px" v-model="data.address" placeholder="请输入地址查询" :prefix-icon="Search"></el-input>
      <el-button type="primary" @click="load">查 询</el-button>
      <el-button @click="reset">重 置</el-button>
</div>
7.2 前端设置入参
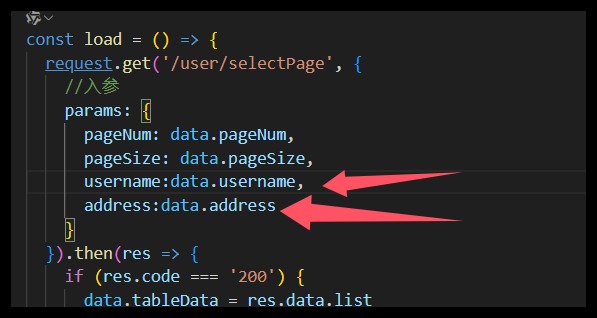
 params: {
      pageNum: data.pageNum,
      pageSize: data.pageSize,
      username: data.username,
      address: data.address
    }
7.3 设置重置
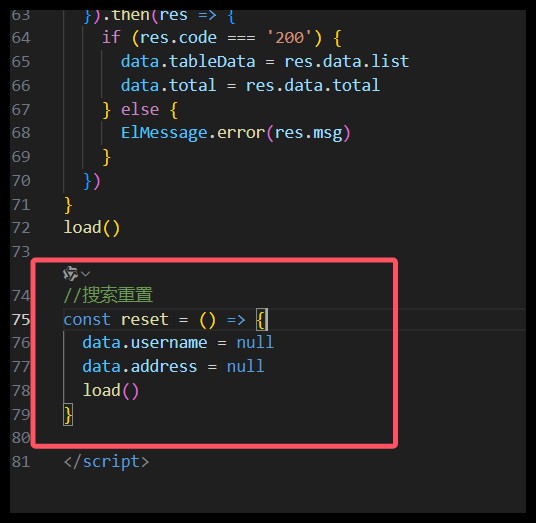
//搜索重置
const reset = () => {
  data.username = null
  data.address = null
  load()
}
7.4 Mapper.xml设置查询
<select id="findAll" resultType="com.qcby.springboot.entity.User"
        parameterType="com.qcby.springboot.entity.User">
    select * from user
        <where>
           <if test="username!=null">
               username like concat('%', #{username}, '%')
           </if>
            <if test="address!=null">
                and address  like concat('%', #{address}, '%')
            </if>
        </where>
    order by id
</select>
7.5 service层

@Override
public PageInfo<User> selectPage(Integer pageNum, Integer pageSize,User user) {
    //开启分页查询
    PageHelper.startPage(pageNum,pageSize);
    List<User> users = userDao.findAll(user);
    return PageInfo.of(users);
}
7.6 controller层
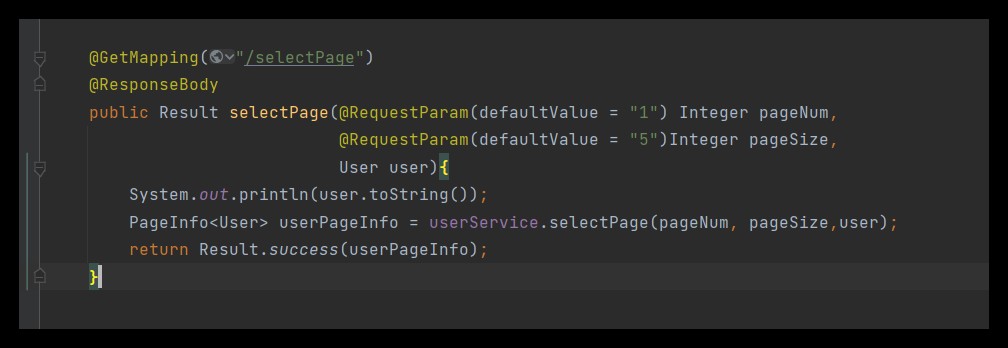
@GetMapping("/selectPage")
@ResponseBody
public Result selectPage(@RequestParam(defaultValue = "1") Integer pageNum,
                         @RequestParam(defaultValue = "5")Integer pageSize,
                         User user){
    System.out.println(user.toString());
    PageInfo<User> userPageInfo = userService.selectPage(pageNum, pageSize,user);
    return Result.success(userPageInfo);
}
到此这篇关于Spring3整合MyBatis实现分页查询和搜索功能的文章就介绍到这了,更多相关Spring3 MyBatis分页查询和搜索内容请搜索脚本之家以前的文章或继续浏览下面的相关文章希望大家以后多多支持脚本之家!
相关文章

Springboot新建项目Spring Initializr Error问题及解决
这篇文章主要介绍了Springboot新建项目Spring Initializr Error问题及解决方案,具有很好的参考价值,希望对大家有所帮助,如有错误或未考虑完全的地方,望不吝赐教2023-11-11 这篇文章主要介绍了Java编程中Annotation注解对象的使用方法,注解以"@注解名"的方式被编写,与类、接口、枚举是在同一个层次,需要的朋友可以参考下2016-03-03
低版本IntelliJ IDEA使用高版本JDK语言特性问题的具体解决步骤
在我们项目开发的过程中可能会遇到JDK版本过高或者过低导致一些程序无法启动,不兼容的问题,这篇文章主要介绍了低版本IntelliJ IDEA使用高版本JDK语言特性问题的具体解决步骤,需要的朋友可以参考下2025-10-10
Eclipse添加xml文件提示及Hibernate配置学习
文件提示功能在开发过程中很实用的,本文实现了一个Eclipse添加xml文件提示,感兴趣的朋友可以了解下啊,希望本文对你有所帮助2013-01-01 本文将详细解释如何用Java实现FTP协议下的文件上传和下载功能,涵盖连接设置、文件操作以及异常处理等方面,介绍了 java.net 和 org.apache.commons.net.ftp 库,以及如何使用这些库提供的工具和方法进行文件传输,需要的朋友可以参考下2025-07-07
 这篇文章主要为大家详细介绍了springboot实现邮箱验证码功能,文中示例代码介绍的非常详细,具有一定的参考价值,感兴趣的小伙伴们可以参考一下2020-02-02
 这篇文章主要介绍了Spring Bean管理注解方式代码实例,文中通过示例代码介绍的非常详细,对大家的学习或者工作具有一定的参考学习价值,需要的朋友可以参考下2020-03-03
 这篇文章主要介绍了解读@NotNull和@NonNull的区别及使用,具有很好的参考价值,希望对大家有所帮助。2023-01-01
 这篇文章主要介绍了字符串转 OffSetDateTime 你真的会用吗?具有很好的参考价值,希望对大家有所帮助。如有错误或未考虑完全的地方,望不吝赐教2021-08-08
 这篇文章主要为大家详细介绍了JAVA抽象类和接口的比较,文中示例代码介绍的非常详细,具有一定的参考价值,感兴趣的小伙伴们可以参考一下,希望能够给你带来帮助2022-03-03


最新评论