
Spring Security自定义Oauth2的授权服务器配置指南
引言
在现代 Web 应用程序架构中,安全认证与授权机制是系统设计的基石之一。随着微服务和前后端分离架构的普及,传统的 Session 认证方式已难以满足分布式系统的安全需求。OAuth2(Open Authorization 2.0)作为当前主流的授权框架,被广泛应用于第三方登录、单点登录(SSO)、API 权限控制等场景。
Spring Security 作为 Java 生态中最强大的安全框架,从 5.x 版本开始深度整合了 Spring Security OAuth2,提供了对 OAuth2 授权服务器(Authorization Server)和资源服务器(Resource Server)的完整支持。尽管早期版本通过 spring-security-oauth 模块实现,但自 Spring Security 5.7 起,官方推出了全新的 Spring Authorization Server 项目,旨在提供更灵活、可扩展的 OAuth2 和 OpenID Connect 1.0 支持。
本文将带你从零开始构建一个自定义的 OAuth2 授权服务器,涵盖核心概念、依赖配置、代码实现、令牌管理、客户端注册、用户认证流程以及安全性优化等多个方面,并结合实际 Java 示例帮助你深入理解整个体系结构。
什么是 OAuth2?
OAuth2 是一种开放标准,允许用户让第三方应用访问其存储在另一服务上的资源,而无需共享密码。它不是认证协议,而是授权协议,用于授予访问权限。
主要角色
- Resource Owner(资源拥有者):通常是用户。
- Client(客户端):请求访问资源的应用,如 Web 前端或移动 App。
- Authorization Server(授权服务器):发放访问令牌的服务。
- Resource Server(资源服务器):托管受保护资源的服务,验证令牌后提供数据。
四种授权模式
OAuth2 提供了多种授权流程以适应不同场景:
| 模式 | 使用场景 |
|---|---|
| Authorization Code | Web 应用,最安全推荐使用 ✅ |
| Implicit | 传统 SPA(现已不推荐) |
| Resource Owner Password Credentials | 受信任的第一方应用(需谨慎) |
| Client Credentials | 服务间调用 |
在本篇博客中,我们将重点实现 Authorization Code 模式 和 Client Credentials 模式,并基于 Spring Security 构建完整的授权服务器。
为什么需要自定义授权服务器?
虽然市面上有许多现成的身份提供商(如 Auth0、Okta、Keycloak),但在以下情况下,我们可能需要自行搭建授权服务器:
- 需要完全掌控用户数据与认证逻辑;
- 企业内部系统要求私有部署;
- 需要定制化登录页面、多因素认证、短信验证码等功能;
- 与其他系统深度集成(如 LDAP、CAS、自定义数据库);
Spring Security 提供了足够的灵活性来满足这些高级需求,尤其是借助新的 Spring Authorization Server 模块。
Spring 官方推荐使用 Spring Authorization Server 作为未来发展方向。该项目目前仍在积极维护中,兼容 Spring Boot 3+ 和 Java 17+ 环境。
技术栈准备
在开始编码之前,请确保你的开发环境满足以下条件:
- JDK 17 或更高版本
- Spring Boot 3.2+
- Maven / Gradle
- IDE(IntelliJ IDEA / VS Code)
- 数据库(H2 / MySQL / PostgreSQL)
我们将使用 Maven 作为构建工具,采用嵌入式 H2 数据库存储客户端信息和授权记录,便于演示。
添加依赖项
<dependencies>
    <!-- Spring Boot Web -->
    <dependency>
        <groupId>org.springframework.boot</groupId>
        <artifactId>spring-boot-starter-web</artifactId>
    </dependency>
    <!-- Spring Security -->
    <dependency>
        <groupId>org.springframework.boot</groupId>
        <artifactId>spring-boot-starter-security</artifactId>
    </dependency>
    <!-- Spring Authorization Server -->
    <dependency>
        <groupId>org.springframework.security</groupId>
        <artifactId>spring-security-oauth2-authorization-server</artifactId>
    </dependency>
    <!-- Thymeleaf for login page (optional) -->
    <dependency>
        <groupId>org.springframework.boot</groupId>
        <artifactId>spring-boot-starter-thymeleaf</artifactId>
    </dependency>
    <!-- H2 Database -->
    <dependency>
        <groupId>com.h2database</groupId>
        <artifactId>h2</artifactId>
        <scope>runtime</scope>
    </dependency>
    <!-- JPA -->
    <dependency>
        <groupId>org.springframework.boot</groupId>
        <artifactId>spring-boot-starter-data-jpa</artifactId>
    </dependency>
</dependencies>
注意:spring-security-oauth2-authorization-server 并未包含在 Spring Boot Starter 中,需显式添加版本号。建议查阅官方文档获取最新稳定版。
初始化项目结构
创建基本包结构如下:
src/
 └── main/
     ├── java/
     │   └── com.example.authserver/
     │       ├── config/           # 安全配置类
     │       ├── entity/           # JPA 实体
     │       ├── repository/       # 数据访问层
     │       ├── service/          # 业务逻辑
     │       └── AuthServerApplication.java
     └── resources/
         ├── application.yml
         ├── data.sql              # 初始化数据
         └── schema.sql            # 表结构
数据模型设计
为了持久化客户端信息和授权状态,我们需要创建必要的数据库表。Spring Authorization Server 提供了一套默认的表结构建议。
创建表结构(schema.sql)
DROP TABLE IF EXISTS oauth2_registered_client;
CREATE TABLE oauth2_registered_client (
    id varchar(100) NOT NULL,
    client_id varchar(100) NOT NULL,
    client_id_issued_at timestamp DEFAULT CURRENT_TIMESTAMP NOT NULL,
    client_secret varchar(200) DEFAULT NULL,
    client_secret_expires_at timestamp DEFAULT NULL,
    client_name varchar(200) NOT NULL,
    client_authentication_methods varchar(1000) NOT NULL,
    authorization_grant_types varchar(1000) NOT NULL,
    redirect_uris varchar(1000) DEFAULT NULL,
    scopes varchar(1000) NOT NULL,
    client_settings varchar(2000) NOT NULL,
    token_settings varchar(2000) NOT NULL,
    PRIMARY KEY (id)
);
DROP TABLE IF EXISTS oauth2_authorization;
CREATE TABLE oauth2_authorization (
    id varchar(100) NOT NULL,
    registered_client_id varchar(100) NOT NULL,
    principal_name varchar(200) NOT NULL,
    authorization_grant_type varchar(100) NOT NULL,
    authorized_scopes varchar(1000) DEFAULT NULL,
    attributes varchar(4000) DEFAULT NULL,
    state varchar(500) DEFAULT NULL,
    authorization_code_value blob DEFAULT NULL,
    authorization_code_issued_at timestamp DEFAULT NULL,
    authorization_code_expires_at timestamp DEFAULT NULL,
    authorization_code_metadata varchar(2000) DEFAULT NULL,
    access_token_value blob DEFAULT NULL,
    access_token_issued_at timestamp DEFAULT NULL,
    access_token_expires_at timestamp DEFAULT NULL,
    access_token_metadata varchar(2000) DEFAULT NULL,
    access_token_type varchar(100) DEFAULT NULL,
    access_token_scopes varchar(1000) DEFAULT NULL,
    refresh_token_value blob DEFAULT NULL,
    refresh_token_issued_at timestamp DEFAULT NULL,
    refresh_token_expires_at timestamp DEFAULT NULL,
    refresh_token_metadata varchar(2000) DEFAULT NULL,
    oidc_id_token_value blob DEFAULT NULL,
    oidc_id_token_issued_at timestamp DEFAULT NULL,
    oidc_id_token_expires_at timestamp DEFAULT NULL,
    oidc_id_token_metadata varchar(2000) DEFAULT NULL,
    oidc_id_token_claims varchar(2000) DEFAULT NULL,
    PRIMARY KEY (id)
);
DROP TABLE IF EXISTS oauth2_authorization_consent;
CREATE TABLE oauth2_authorization_consent (
    registered_client_id varchar(100) NOT NULL,
    principal_name varchar(200) NOT NULL,
    authorities varchar(1000) NOT NULL,
    PRIMARY KEY (registered_client_id, principal_name)
);
初始化客户端数据(data.sql)
INSERT INTO oauth2_registered_client (
    id, client_id, client_name, client_secret,
    client_authentication_methods, authorization_grant_types, redirect_uris,
    scopes, client_settings, token_settings
) VALUES (
    '1', 'demo-client', 'Demo Client App', '{noop}secret',
    'client_secret_basic', 'authorization_code,refresh_token', 'http://127.0.0.1:8080/login/oauth2/code/demo-client',
    'openid,profile,email', '{"@class":"java.util.HashMap"}', '{"@class":"java.util.HashMap"}'
);
这里我们注册了一个名为 demo-client 的客户端,支持授权码模式和刷新令牌,回调地址为本地测试 URL。
{noop} 是 Spring Security 对密码编码器的前缀,表示“无加密”,仅用于演示。生产环境应使用 BCrypt 编码。
用户模型与认证
接下来我们需要一个用户系统来进行身份验证。我们将使用 Spring Security 的 UserDetailsService 接口加载用户信息。
User 实体类
@Entity
@Table(name = "app_user")
public class AppUser {

    @Id
    @GeneratedValue(strategy = GenerationType.IDENTITY)
    private Long id;

    @Column(unique = true, nullable = false)
    private String username;

    @Column(nullable = false)
    private String password;

    private String role = "USER";

    // getters and setters
}
UserRepository
public interface UserRepository extends JpaRepository<AppUser, Long> {
    Optional<AppUser> findByUsername(String username);
}
自定义 UserDetailsService
@Service
public class CustomUserDetailsService implements UserDetailsService {

    @Autowired
    private UserRepository userRepository;

    @Override
    public UserDetails loadUserByUsername(String username) throws UsernameNotFoundException {
        AppUser user = userRepository.findByUsername(username)
                .orElseThrow(() -> new UsernameNotFoundException("User not found: " + username));

        return org.springframework.security.core.userdetails.User
                .withUsername(user.getUsername())
                .password(user.getPassword())
                .authorities(new SimpleGrantedAuthority("ROLE_" + user.getRole()))
                .build();
    }
}
初始化用户数据(data.sql 续)
INSERT INTO app_user (username, password, role) VALUES
('alice', '$2a$10$vQqDKEIeXk9BBz/6.sJ/lOe.fKpM70/bBxZLx.oVqHPFtW6wNfGjC', 'USER');
$2a$10$... 是 BCrypt 加密后的密码 “123456”,你可以使用在线工具生成。
配置 Spring Security 核心安全策略
现在我们进入最关键的一步:配置 Spring Security,启用表单登录、CSRF 防护、用户认证流程等。
SecurityConfig.java
@Configuration
@EnableWebSecurity
public class SecurityConfig {

    @Bean
    @Order(1)
    public SecurityFilterChain authorizationServerSecurityFilterChain(HttpSecurity http) throws Exception {
        OAuth2AuthorizationServerConfiguration.applyDefaultSecurity(http);

        http.getConfigurer(OAuth2AuthorizationServerConfigurer.class)
            .oidc(Customizer.withDefaults()); // Enable OIDC

        http.exceptionHandling(exceptions ->
            exceptions.authenticationEntryPoint(
                new LoginUrlAuthenticationEntryPoint("/login")
            )
        );

        return http.build();
    }

    @Bean
    @Order(2)
    public SecurityFilterChain defaultSecurityFilterChain(HttpSecurity http) throws Exception {
        http
            .authorizeHttpRequests(auth -> auth
                .requestMatchers("/login", "/css/**").permitAll()
                .anyRequest().authenticated()
            )
            .formLogin(formLogin -> formLogin
                .loginPage("/login").permitAll()
            .and()
            .csrf().disable() // For simplicity; enable in production with proper tokens
            );

        return http.build();
    }

    @Bean
    public UserDetailsService userDetailsService() {
        return new CustomUserDetailsService();
    }

    @Bean
    public PasswordEncoder passwordEncoder() {
        return PasswordEncoderFactories.createDelegatingPasswordEncoder();
    }

    @Bean
    public AuthenticationManager authenticationManager(
            AuthenticationConfiguration configuration) throws Exception {
        return configuration.getAuthenticationManager();
    }
}
注意:@Order(1) 和 @Order(2) 确保授权服务器的安全链优先于默认链执行。这是关键点!
注册客户端存储库
Spring Authorization Server 要求实现 RegisteredClientRepository 接口来管理客户端信息。
RegisteredClientRepository 实现
@Component
public class JdbcRegisteredClientRepository implements RegisteredClientRepository {

    @Autowired
    private NamedParameterJdbcTemplate jdbcTemplate;

    @Autowired
    private PasswordEncoder passwordEncoder;

    private final static String SELECT_SQL =
        "SELECT * FROM oauth2_registered_client WHERE client_id = :clientId";

    private final static String INSERT_SQL = """
        INSERT INTO oauth2_registered_client (
            id, client_id, client_name, client_secret,
            client_authentication_methods, authorization_grant_types,
            redirect_uris, scopes, client_settings, token_settings
        ) VALUES (
            :id, :client_id, :client_name, :client_secret,
            :client_authentication_methods, :authorization_grant_types,
            :redirect_uris, :scopes, :client_settings, :token_settings
        )
        """;

    @Override
    public void save(RegisteredClient registeredClient) {
        Map<String, Object> paramMap = new HashMap<>();
        paramMap.put("id", registeredClient.getId());
        paramMap.put("client_id", registeredClient.getClientId());
        paramMap.put("client_name", registeredClient.getClientName());
        paramMap.put("client_secret", registeredClient.getClientSecret());
        paramMap.put("client_authentication_methods",
                serializeMethods(registeredClient.getClientAuthenticationMethods()));
        paramMap.put("authorization_grant_types",
                serializeMethods(registeredClient.getAuthorizationGrantTypes()));
        paramMap.put("redirect_uris",
                serializeSet(registeredClient.getRedirectUris()));
        paramMap.put("scopes",
                serializeSet(registeredClient.getScopes()));
        paramMap.put("client_settings", writeMap(registeredClient.getClientSettings().getSettings()));
        paramMap.put("token_settings", writeMap(registeredClient.getTokenSettings().getSettings()));

        jdbcTemplate.update(INSERT_SQL, paramMap);
    }

    @Override
    public RegisteredClient findById(String id) {
        throw new UnsupportedOperationException("Not implemented");
    }

    @Override
    public RegisteredClient findByClientId(String clientId) {
        try {
            return jdbcTemplate.queryForObject(SELECT_SQL,
                Map.of("clientId", clientId),
                this::mapRowToRegisteredClient);
        } catch (EmptyResultDataAccessException e) {
            return null;
        }
    }

    private RegisteredClient mapRowToRegisteredClient(ResultSet rs, int rowNum) throws SQLException {
        return RegisteredClient.withId(rs.getString("id"))
            .clientId(rs.getString("client_id"))
            .clientSecret(rs.getString("client_secret"))
            .clientName(rs.getString("client_name"))
            .clientAuthenticationMethod(
                parseMethods(rs.getString("client_authentication_methods")).iterator().next())
            .authorizationGrantType(
                parseMethods(rs.getString("authorization_grant_types")).iterator().next())
            .redirectUri(rs.getString("redirect_uris"))
            .scope(parseSet(rs.getString("scopes")).iterator().next())
            .clientSettings(ClientSettings.builder().build())
            .tokenSettings(TokenSettings.builder().build())
            .build();
    }

    private Set<String> parseSet(String value) {
        if (value == null || value.isEmpty()) return Set.of();
        return Arrays.stream(value.split(",")).collect(Collectors.toSet());
    }

    private String serializeSet(Set<String> set) {
        return String.join(",", set);
    }

    private Set<AuthenticationMethod> parseMethods(String value) {
        return Arrays.stream(value.split(","))
            .map(AuthenticationMethod::new)
            .collect(Collectors.toSet());
    }

    private Set<GrantType> parseGrantTypes(String value) {
        return Arrays.stream(value.split(","))
            .map(GrantType::new)
            .collect(Collectors.toSet());
    }

    private String writeMap(Map<String, Object> map) {
        try {
            return new ObjectMapper().writeValueAsString(map);
        } catch (Exception e) {
            throw new RuntimeException(e);
        }
    }
}
此处简化了部分字段处理逻辑,真实项目中建议使用 Jackson 或专用序列化工具进行 JSON 转换。
🪝 配置授权服务器端点
Spring Authorization Server 提供多个标准端点:
/oauth2/authorize—— 授权端点(跳转登录页)/oauth2/token—— 获取令牌/oauth2/introspect—— 令牌校验(需启用)/oauth2/jwks—— 公钥发布(用于 JWT 签名验证)
我们需要注册这些端点并配置签名密钥。
AuthorizationServerConfig.java
@Configuration
public class AuthorizationServerConfig {

    @Bean
    public RegisteredClientRepository registeredClientRepository() {
        return new JdbcRegisteredClientRepository();
    }

    @Bean
    public JWKSource<SecurityContext> jwkSource() {
        RSAKey rsaKey = generateRsaKey();
        JWKSet jwkSet = new JWKSet(rsaKey);
        return (jwkSelector, context) -> jwkSelector.select(jwkSet);
    }

    private static RSAKey generateRsaKey() {
        KeyPair keyPair = generateRsaKeyPair();
        RSAPublicKey publicKey = (RSAPublicKey) keyPair.getPublic();
        RSAPrivateKey privateKey = (RSAPrivateKey) keyPair.getPrivate();
        return new RSAKey.Builder(publicKey)
                .privateKey(privateKey)
                .keyID(UUID.randomUUID().toString())
                .build();
    }

    private static KeyPair generateRsaKeyPair() {
        KeyPairGenerator keyPairGenerator;
        try {
            keyPairGenerator = KeyPairGenerator.getInstance("RSA");
        } catch (NoSuchAlgorithmException e) {
            throw new IllegalStateException(e);
        }
        keyPairGenerator.initialize(2048);
        return keyPairGenerator.generateKeyPair();
    }

    @Bean
    public JwtDecoder jwtDecoder(JWKSource<SecurityContext> jwkSource) {
        return OAuth2AuthorizationServerConfiguration.jwtDecoder(jwkSource);
    }

    @Bean
    public AuthorizationServerSettings authorizationServerSettings() {
        return AuthorizationServerSettings.builder().build();
    }
}
使用 RSA 密钥对 JWT 进行签名,保证令牌不可篡改。公钥可通过 .well-known/jwks.json 获取。
登录页面与控制器
为了让用户能输入账号密码,我们需要一个简单的登录界面。
LoginController.java
@Controller
public class LoginController {

    @GetMapping("/login")
    public String showLoginForm(@RequestParam(name = "error", required = false) String error,
                                Model model) {
        if ("true".equals(error)) {
            model.addAttribute("errorMessage", "Invalid username or password!");
        }
        return "login";
    }
}
templates/login.html(Thymeleaf 模板)
<!DOCTYPE html>
<html xmlns:th="http://www.thymeleaf.org">
<head>
    <title>Login</title>
    <style>
        body { font-family: Arial, sans-serif; text-align: center; margin-top: 100px; }
        form { display: inline-block; padding: 20px; border: 1px solid #ccc; border-radius: 8px; }
        input[type="text"], input[type="password"] {
            width: 200px; margin: 10px 0; padding: 8px; border: 1px solid #ddd; }
        button { background: #007cba; color: white; padding: 10px 20px; border: none; cursor: pointer; }
        button:hover { background: #005a87; }
    </style>
</head>
<body>
    <h2>Welcome to Auth Server</h2>
    <form th:action="@{/login}" method="post">
        <div>
            <input type="text" name="username" placeholder="Username" required />
        </div>
        <div>
            <input type="password" name="password" placeholder="Password" required />
        </div>
        <button type="submit">Login</button>
    </form>
    <div th:if="${errorMessage}" style="color:red;margin-top:10px;">
        [[${errorMessage}]]
    </div>
</body>
</html>
授权流程详解
下面我们通过一个流程图展示完整的 Authorization Code Flow 流程:
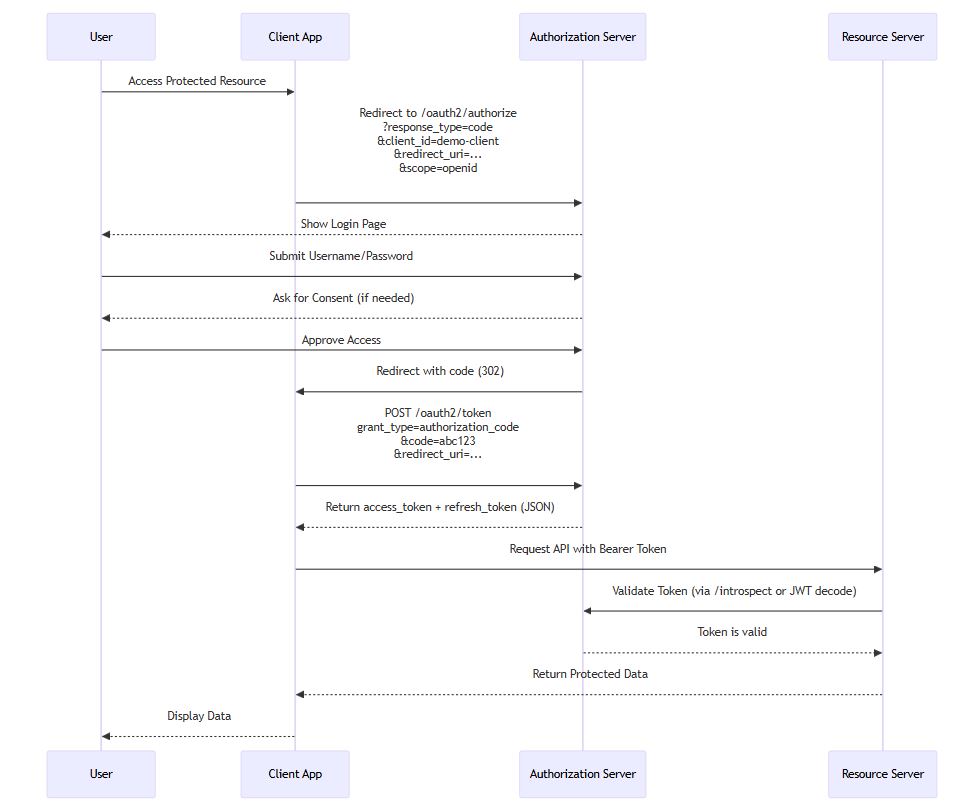
这个流程展示了用户如何通过浏览器完成授权,客户端最终获得令牌访问资源服务器的过程。
测试授权流程
启动应用后,访问以下 URL 开始测试:
http://localhost:8080/oauth2/authorize?
  response_type=code&
  client_id=demo-client&
  scope=openid&
  redirect_uri=http://127.0.0.1:8080/login/oauth2/code/demo-client&
  state=xyz
你会被重定向到 /login 页面,输入用户名 alice 和密码 123456 后提交。
若一切正常,授权服务器会重定向回指定 redirect_uri 并附带 code 参数,例如:
http://127.0.0.1:8080/login/oauth2/code/demo-client?code=abcd1234&state=xyz
此时客户端可用该 code 换取令牌:
curl -X POST http://localhost:8080/oauth2/token \
  -H "Content-Type: application/x-www-form-urlencoded" \
  -u "demo-client:secret" \
  -d "grant_type=authorization_code" \
  -d "code=abcd1234" \
  -d "redirect_uri=http://127.0.0.1:8080/login/oauth2/code/demo-client"
响应示例:
{
  "access_token": "eyJhbGciOiJSUzI1NiIs...",
  "token_type": "Bearer",
  "expires_in": 3600,
  "refresh_token": "def5678..."
}
刷新令牌机制
当 access_token 过期后,客户端可使用 refresh_token 获取新令牌:
curl -X POST http://localhost:8080/oauth2/token \
  -H "Content-Type: application/x-www-form-urlencoded" \
  -u "demo-client:secret" \
  -d "grant_type=refresh_token" \
  -d "refresh_token=def5678..."
刷新令牌只能使用一次,使用后原令牌失效,防止重放攻击。
安全性增强建议
尽管上述实现已经可以运行,但在生产环境中还需考虑以下几点:
启用 CSRF 保护
虽然我们在示例中禁用了 CSRF,但在真实项目中必须开启:
http.csrf(c -> c.ignoringRequestMatchers("/oauth2/token"));
或者为 /oauth2/token 使用 client_secret_post 方式传递凭证。
使用 HTTPS
所有 OAuth2 端点应在 HTTPS 下运行,防止中间人攻击。
限制重定向 URI
确保客户端注册时的 redirect_uris 是白名单形式,避免开放重定向漏洞。
日志审计
记录登录尝试、令牌发放、异常请求等事件,便于排查问题。
速率限制
对 /oauth2/token 接口增加限流机制,防止暴力 破解。
扩展功能:支持 Client Credentials 模式
除了授权码模式,我们还可以支持服务间调用的 Client Credentials 模式。
修改 data.sql 中的客户端配置:
UPDATE oauth2_registered_client SET
  authorization_grant_types = 'authorization_code,refresh_token,client_credentials',
  redirect_uris = null
WHERE client_id = 'demo-client';
然后客户端可以直接请求令牌:
curl -X POST http://localhost:8080/oauth2/token \
  -H "Content-Type: application/x-www-form-urlencoded" \
  -u "demo-client:secret" \
  -d "grant_type=client_credentials" \
  -d "scope=api.read"
适用于后台服务调用 API 的场景。
架构总结
下图展示了整个系统的组件关系:
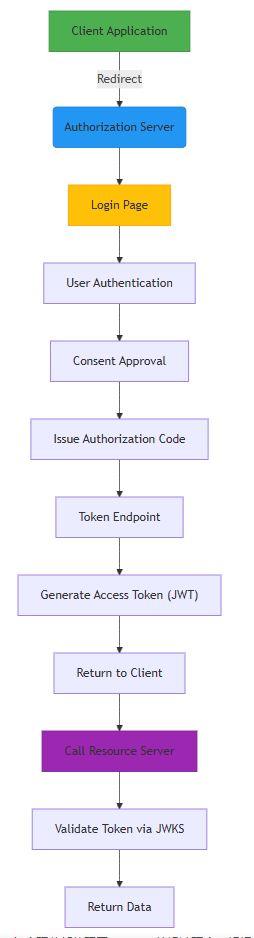
每个环节都体现了 OAuth2 的设计理念:解耦、安全、可控。
与资源服务器协同工作
我们的授权服务器颁发的是 JWT 格式的令牌,资源服务器只需配置相同的公钥即可解析验证。
资源服务器配置片段:
spring:
  security:
    oauth2:
      resourceserver:
        jwt:
          issuer-uri: http://localhost:8080
Spring Security 会自动从 /.well-known/openid-configuration 和 /oauth2/jwks 获取元数据和公钥。
升级路径与迁移指南
如果你正在使用旧版 spring-security-oauth,建议逐步迁移到新的 Spring Authorization Server。主要变化包括:
| 旧版 | 新版 |
|---|---|
@EnableAuthorizationServer | 基于组件注册模式 |
InMemoryClientDetailsService | RegisteredClientRepository |
JwtAccessTokenConverter | 使用 JWT Decoder + JWKSource |
TokenStore | 状态less JWT,无需存储 |
迁移过程建议采用双轨并行,逐步切换客户端。
常见问题排查
❌ Invalid grant: authorization code not found
原因:授权码已被使用或超时(默认 5 分钟)
解决:重新发起授权请求
❌ Unauthorized redirect URI
原因:请求中的 redirect_uri 与注册时不一致
解决:检查客户端配置,精确匹配
❌ Bad credentials
原因:用户名或密码错误
解决:确认 UserDetailsService 返回正确密码,注意编码方式
❌ CORS error in browser
原因:前端跨域请求受限
解决:添加 CORS 配置或使用代理
总结
本文详细讲解了如何使用 Spring Security 构建一个功能完整的自定义 OAuth2 授权服务器。我们完成了以下内容:
- 搭建基础项目结构
- 设计数据库模型
- 实现用户认证与客户端管理
- 配置授权服务器端点
- 支持 Authorization Code 与 Client Credentials 模式
- 展示完整授权流程
- 提供安全性优化建议
OAuth2 是现代应用安全的核心支柱,掌握其原理与实现对于开发者至关重要。Spring Authorization Server 提供了强大且灵活的扩展能力,使我们能够在保持标准兼容的同时,实现高度定制化的身份认证服务。
无论你是构建企业级 SSO 系统,还是为微服务提供统一鉴权中心,这套方案都能为你打下坚实的基础。
以上就是Spring Security自定义Oauth2的授权服务器配置指南的详细内容,更多关于Spring Security Oauth2授权服务器配置的资料请关注脚本之家其它相关文章!
相关文章
 这篇文章主要介绍了Mybatis Plus代码生成器(时间管理大师)的相关知识,本文通过实例代码给大家介绍的非常详细,对大家的学习或工作具有一定的参考借鉴价值,需要的朋友可以参考下2020-07-07
Java微服务分布式调度Elastic-job环境搭建及配置
Elastic-Job在配置中提供了JobEventConfiguration,支持数据库方式配置,会在数据库中自动创建JOB_EXECUTION_LOG和JOB_STATUS_TRACE_LOG两张表以及若干索引,来记录作业的相关信息2023-02-02 Java 线程通信是将多个独立的线程个体进行关联处理,使得线程与线程之间能进行相互通信,下面这篇文章主要给大家介绍了关于Java使用wait和notify实现线程之间通信的相关资料,文中通过示例代码介绍的非常详细,需要的朋友可以参考下2022-04-04
 因为在我们写的程序当中可能会经常使用到synchronized关键字,因此JVM对synchronized做出了很多优化,而在本篇文章当中我们将仔细介绍JVM对synchronized的偏向锁的细节2023-02-02
 Java中的流程控制语句可以这样分类:顺序结构,选择结构,循环结构。下面文章我们就来看看来顺序结构的详细介绍,主要以顺序结构简单图示及详细解说该内容,需要的小伙伴可以参考一下2021-12-12
 最近项目中使用到Java实现写入PDF文件,这篇文章主要给大家介绍了关于Java如何使用itext向PDF插入数据和图片的相关资料,文中通过代码介绍的非常详细,需要的朋友可以参考下2024-01-01
 这篇文章主要介绍了mybatis的dtd约束文件及配置文件xml自动提示操作,具有很好的参考价值,希望对大家有所帮助。一起跟随小编过来看看吧2020-12-12
 这篇文章主要介绍了Java Map遍历2种实现方法代码实例,文中通过示例代码介绍的非常详细,对大家的学习或者工作具有一定的参考学习价值,需要的朋友可以参考下2020-10-10
 目前Java开发包中包含了对动态代理的支持,但是其实现只支持对接口的的实现。这篇文章主要介绍了详解java动态代理的2种实现方式 ,有兴趣的可以了解一下。2016-11-11
 这篇文章主要介绍了解读查看zookeeper事务日志的正确姿势。具有很好的参考价值,希望对大家有所帮助。如有错误或未考虑完全的地方,望不吝赐教2023-04-04


最新评论