
OpenClaw 中转站配置详细教程
OpenClaw 中转站配置教程
前言
本教程教你如何配置 OpenClaw 使用自定义 API 中转站。
适用系统: Windows / macOS / Linux
预计时间: 10 分钟
第一步:安装与初始化
1. 安装 OpenClaw
npm install -g openclaw
注意:Windows 用户如果提示 openclaw 不是命令,可以使用 clawdbot 代替。
2. 执行初始化
openclaw onboard
按提示完成基础设置。
第二步:修改主配置文件
⚠️ 重要提示
OpenClaw 不支持通过环境变量 ANTHROPIC_BASE_URL 来设置自定义 API 端点。必须通过配置文件的 models.providers 来配置。
配置文件位置
| 系统 | 配置文件路径 |
|---|---|
| Windows | C:\Users\你的用户名\.clawdbot\clawdbot.json |
| macOS | ~/.clawdbot/clawdbot.json 或 ~/openclaw/clawdbot.json |
| Linux | ~/.clawdbot/clawdbot.json 或 ~/openclaw/clawdbot.json |
注意: 配置文件可能在 .clawdbot 或 openclaw 目录,取决于你的安装方式。
步骤 1:备份配置文件(可选)
macOS/Linux:
# 如果在 .clawdbot 目录
cp ~/.clawdbot/clawdbot.json ~/.clawdbot/clawdbot.json.bak
# 或者在 openclaw 目录
cp ~/openclaw/clawdbot.json ~/openclaw/clawdbot.json.bak
Windows:
copy %USERPROFILE%\.clawdbot\clawdbot.json %USERPROFILE%\.clawdbot\clawdbot.json.bak
步骤 2:编辑配置文件
macOS/Linux:
# 如果在 .clawdbot 目录
nano ~/.clawdbot/clawdbot.json
# 或者在 openclaw 目录
nano ~/openclaw/clawdbot.json
Windows:
notepad %USERPROFILE%\.clawdbot\clawdbot.json
步骤 3:复制以下配置内容
{
  "models": {
    "mode": "merge",
    "providers": {
      "api-proxy-gpt": {
        "baseUrl": "https://apipro.maynor1024.live/v1",
        "api": "openai-completions",
        "apiKey": "sk-你的API密钥",
        "models": [
          {
            "id": "gpt-4o",
            "name": "GPT-4o",
            "reasoning": false,
            "input": ["text"],
            "cost": {
              "input": 0,
              "output": 0,
              "cacheRead": 0,
              "cacheWrite": 0
            },
            "contextWindow": 128000,
            "maxTokens": 8192
          }
        ]
      },
      "api-proxy-claude": {
        "baseUrl": "https://apipro.maynor1024.live",
        "api": "anthropic-messages",
        "apiKey": "sk-你的API密钥",
        "models": [
          {
            "id": "claude-sonnet-4-5-20250929",
            "name": "Claude Sonnet 4.5",
            "reasoning": false,
            "input": ["text"],
            "cost": {
              "input": 0,
              "output": 0,
              "cacheRead": 0,
              "cacheWrite": 0
            },
            "contextWindow": 200000,
            "maxTokens": 8192
          }
        ]
      },
      "api-proxy-google": {
        "baseUrl": "https://apipro.maynor1024.live/v1beta",
        "api": "google-generative-ai",
        "apiKey": "sk-你的API密钥",
        "models": [
          {
            "id": "gemini-3-pro-preview",
            "name": "Gemini 3 Pro",
            "reasoning": false,
            "input": ["text"],
            "cost": {
              "input": 0,
              "output": 0,
              "cacheRead": 0,
              "cacheWrite": 0
            },
            "contextWindow": 2000000,
            "maxTokens": 8192
          }
        ]
      }
    }
  },
  "agents": {
    "defaults": {
      "model": {
        "primary": "api-proxy-claude/claude-sonnet-4-5-20250929"
      },
      "models": {
        "api-proxy-gpt/gpt-4o": {
          "alias": "GPT-4o"
        },
        "api-proxy-claude/claude-sonnet-4-5-20250929": {
          "alias": "Claude Sonnet 4.5"
        },
        "api-proxy-google/gemini-3-pro-preview": {
          "alias": "Gemini 3 Pro"
        }
      }
    }
  },
  "auth": {
    "profiles": {
      "api-proxy-gpt:default": {
        "provider": "api-proxy-gpt",
        "mode": "api_key"
      },
      "api-proxy-claude:default": {
        "provider": "api-proxy-claude",
        "mode": "api_key"
      },
      "api-proxy-google:default": {
        "provider": "api-proxy-google",
        "mode": "api_key"
      }
    }
  }
}
关键配置说明
| 字段 | 说明 | 必需 |
|---|---|---|
baseUrl | 自定义 API 端点地址 | ✅ |
apiKey | 你的 API 密钥(直接写在这里) | ✅ |
api | API 类型 | ✅ |
models | 模型列表配置 | ✅ |
🔑 重要:将所有 sk-你的API密钥 替换为你的真实 API Key!
第三步:配置鉴权文件
配置文件位置
| 系统 | 鉴权文件路径 |
|---|---|
| Windows | C:\Users\你的用户名\.clawdbot\agents\main\agent\auth-profiles.json |
| macOS | ~/.clawdbot/agents/main/agent/auth-profiles.json 或~/openclaw/agents/main/agent/auth-profiles.json |
| Linux | ~/.clawdbot/agents/main/agent/auth-profiles.json 或~/openclaw/agents/main/agent/auth-profiles.json |
编辑鉴权文件
macOS/Linux:
# 如果在 .clawdbot 目录
nano ~/.clawdbot/agents/main/agent/auth-profiles.json
# 或者在 openclaw 目录
nano ~/openclaw/agents/main/agent/auth-profiles.json
Windows:
notepad %USERPROFILE%\.clawdbot\agents\main\agent\auth-profiles.json
复制以下内容
{
  "version": 1,
  "profiles": {
    "api-proxy-gpt:default": {
      "type": "api_key",
      "provider": "api-proxy-gpt",
      "key": "sk-你的API密钥"
    },
    "api-proxy-claude:default": {
      "type": "api_key",
      "provider": "api-proxy-claude",
      "key": "sk-你的API密钥"
    },
    "api-proxy-google:default": {
      "type": "api_key",
      "provider": "api-proxy-google",
      "key": "sk-你的API密钥"
    }
  },
  "lastGood": {
    "api-proxy-gpt": "api-proxy-gpt:default",
    "api-proxy-claude": "api-proxy-claude:default",
    "api-proxy-google": "api-proxy-google:default"
  }
}
🔑 重要:将所有 sk-你的API密钥 替换为你的真实 API Key!
第四步:检查并启动
1. 运行健康检查(可选)
openclaw doctor
2. 启动 Gateway 服务
openclaw gateway
预期输出:
🚀 OpenClaw Gateway starting...
📡 WebSocket server listening on ws://127.0.0.1:18789
🌐 Web interface available at http://127.0.0.1:18789
✨ Gateway ready!
保持这个窗口打开!
3. 启动 TUI(新窗口)
打开新的终端窗口,运行:
openclaw tui
4. 测试对话
在 TUI 中输入:
你好
如果 AI 正常回复,配置成功!🎉
5. 访问 Web 控制台(可选)
打开浏览器访问:http://127.0.0.1:18789/
使用 openclaw onboard 结尾输出的 Token 登录。
常用命令
| 命令 | 说明 |
|---|---|
/models | 查看所有可用模型 |
/model api-proxy-gpt/gpt-4o | 切换到 GPT-4o |
/model api-proxy-claude/claude-sonnet-4-5-20250929 | 切换到 Claude Sonnet 4.5 |
/model api-proxy-google/gemini-3-pro-preview | 切换到 Gemini 3 Pro |
/model status | 查看当前模型状态 |
/clear | 清空对话历史 |
/save | 保存当前会话 |
/quit | 退出 TUI |
常见问题
问题 1: (no output) - 没有响应
原因: API Key 未配置或配置错误
解决步骤:
- 检查
clawdbot.json中的apiKey字段 - 检查
auth-profiles.json中的key字段 - 确认两个文件中的 API Key 一致
- 确认没有拼写错误和多余空格
- 重启 Gateway 和 TUI
问题 2: fetch failed - 请求失败
原因: 网络连接问题或 API 地址错误
解决步骤:
检查
baseUrl是否正确:- GPT:
https://apipro.maynor1024.live/v1 - Claude:
https://apipro.maynor1024.live - Gemini:
https://apipro.maynor1024.live/v1beta
- GPT:
测试网络连接:
curl -I https://apipro.maynor1024.live
- 查看 Gateway 日志查找错误
问题 3: 端口被占用
错误信息: Port 18789 already in use
Windows 解决:
netstat -ano | findstr :18789
taskkill /PID <PID> /F
macOS/Linux 解决:
lsof -i :18789
kill -9 <PID>
问题 4: 找不到配置文件
解决: 确保已经运行过 openclaw onboard 初始化
如果配置目录不存在,手动创建:
Windows:
mkdir %USERPROFILE%\.clawdbot\agents\main\agent
macOS/Linux:
mkdir -p ~/.clawdbot/agents/main/agent
# 或者
mkdir -p ~/openclaw/agents/main/agent
配置文件完整路径速查
Windows
主配置文件:
C:\Users\你的用户名\.clawdbot\clawdbot.json
鉴权文件:
C:\Users\你的用户名\.clawdbot\agents\main\agent\auth-profiles.json
macOS/Linux
主配置文件:
~/.clawdbot/clawdbot.json
或
~/openclaw/clawdbot.json
鉴权文件:
~/.clawdbot/agents/main/agent/auth-profiles.json
或
~/openclaw/agents/main/agent/auth-profiles.json
提示: 使用以下命令查找配置文件位置:
macOS/Linux:
find ~ -name "clawdbot.json" 2>/dev/null
Windows (PowerShell):
Get-ChildItem -Path $env:USERPROFILE -Filter "clawdbot.json" -Recurse -ErrorAction SilentlyContinue
配置要点总结
- ✅ API Key 需要配置在两个地方:
config.json的models.providers[].apiKeyauth-profiles.json的profiles[].key
- ✅ 两个文件中的 API Key 必须一致
- ✅ baseUrl 必须正确:
- GPT 需要
/v1后缀 - Claude 不需要后缀
- Gemini 需要
/v1beta后缀
- GPT 需要
- ✅ 不支持环境变量配置
- ✅ 配置完成后需要重启 Gateway
总结
配置步骤:
- ✅ 安装 OpenClaw
- ✅ 修改
config.json(包含 apiKey) - ✅ 修改
auth-profiles.json(包含 key) - ✅ 启动 Gateway 和 TUI
- ✅ 开始使用
到此这篇关于OpenClaw 中转站配置完全指南的文章就介绍到这了,更多相关OpenClaw 中转站配置内容请搜索脚本之家以前的文章或继续浏览下面的相关文章,希望大家以后多多支持脚本之家!
相关文章
Windows10一键部署OpenClaw小龙虾的保姆级教程(2026年)
OpenClaw 是 2026 年初爆火的开源本地 AI 智能体框架,本文为Windows10用户提供了OpenClaw(小龙虾)AI智能体的安装教程,包括下载、解压、启动、配置等步骤,并针对Win10系统2026-04-28 部署OpenClaw的过程看似简单,却因为细节问题踩了不少坑,这篇文章主要介绍了docker部署openclaw遇到的一些踩坑记录,文中通过代码及图文介绍的非常详细,需要的朋友可以参考下2026-04-28
 OpenClaw支持多Agent并行部署,满足场景隔离、多角色协作等需求,核心分为 “单Gateway多 Agent” 和 “双Gateway独立部署” 两种方式,具有一定的参考价值,感兴趣的可以2026-04-27
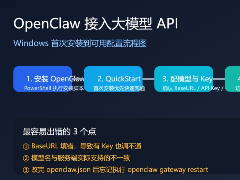
OpenClaw接入大模型API的完整配置流程(Windows实测可用)
这篇文章主要介绍了在Windows上首次安装OpenClaw的详细步骤和关键配置项,帮助用户解决安装和配置过程中可能遇到的问题,特别是如何正确配置BaseURL、APIKey、模型名和Gatewa2026-04-27
2026年Openclaw快速接入DeepSeek V4 Pro的完整教学指南
DeepSeek v4 重磅发布,博查 Model API 在首发当日便已支持v4 全系的调用,那么如何在 OpenClaw 平台中通过修改配置文件接入博查 Model API 以使用 DeepSeek V4 系列模型呢2026-04-27
OpenClaw如何切换不同AI模型?2026年OpenClaw模型配置与切换指南
OpenClaw 是一个强大的 AI 助手框架,支持多种国产大语言模型,本文档详细介绍如何配置和切换 OpenClaw 使用的模型,帮助你根据不同场景选择最合适的模型2026-04-24
Ubuntu安装OpenClaw报错Gateway service check failed的原因及解决方法
OpenClaw近期受到较多关注,但在安装过程中,用户常因环境配置和依赖问题导致失败,这篇文章主要介绍了Ubuntu安装OpenClaw报错Gateway service check failed的原因及解决方法,2026-04-24
Docker部署OpenClaw后容器内无法使用代理的解决方法
在本地跑得好好的OpenClaw,一放到Docker容器里,代理就不生效了,如果你正在经历这些,别怀疑人生——这不是你的问题,是Docker网络和OpenClaw代理解析逻辑的双重夹击,我2026-04-23 Skill 是 OpenClaw 的核心扩展机制,通过编写一个 SKILL.md 文件,你就能教会 AI Agent 新的能力,本文将和大家分享8个常用的openclaw Skill,感兴趣的小伙伴可以跟随小编一2026-04-22
OpenClaw 升级 到最新版 + 迁移飞书官方插件的踩坑记录
这篇文章给大家介绍OpenClaw 升级 到最新版 + 迁移飞书官方插件的踩坑记录,记录一下我这次从旧环境升级到可用状态的完整过程,给后面碰到类似问题的人一个可复用的参考,感2026-04-22


最新评论