
ORACLE 11g从 11.2.0.1升级到11.2.0.4 详细实战教程
1、准备安装
查看当前oracle版本,确定是比较旧的11.2.0.1
[oracle@hch_test_121_90 ~]$ rlwrap sqlplus / as sysdba
SQL*Plus: Release 11.2.0.1.0 Production on Fri Mar 17 15:20:45 2017
Copyright (c) 1982, 2009, Oracle. All rights reserved.
Connected to:
Oracle Database 11g Enterprise Edition Release 11.2.0.1.0 - 64bit Production
With the Partitioning, OLAP, Data Mining and Real Application Testing options
SQL> exit
Disconnected from Oracle Database 11g Enterprise Edition Release 11.2.0.1.0 - 64bit Production
With the Partitioning, OLAP, Data Mining and Real Application Testing options
[oracle@hch_test_121_90 ~]$
上传11.2.0.4的安装包p13390677_112040_Linux-x86-64_1of7.zip、p13390677_112040_Linux-x86-64_2of7.zip到服务器上。Oracle11.2.0.4的安装包下载,请查阅我的blog地址,这上面有下载源:http://blog.csdn.net/mchdba/article/details/51418063
升级准备:
解压缩:
[oracle@hch_test_121_90 oracle]$ unzip p13390677_112040_Linux-x86-64_1of7.zip
[oracle@hch_test_121_90 oracle]$ unzip p13390677_112040_Linux-x86-64_2of7.zip
打开启动图像界面
[oracle@hch_test_121_90 oracle]$ cd database/
[oracle@hch_test_121_90 database]$ ./runInstaller
Starting Oracle Universal Installer...
Checking Temp space: must be greater than 120 MB. Actual 6024 MB Passed
Checking swap space: must be greater than 150 MB. Actual 1798 MB Passed
Checking monitor: must be configured to display at least 256 colors. Actual 16777216 Passed
Preparing to launch Oracle Universal Installer from /tmp/OraInstall2017-03-17_03-11-29PM. Please wait ...[oracle@hch_test_121_90 database]$
[oracle@hch_test_121_90 database]$
2、开始升级
C:\pic\oracle\100.png,填写邮箱地址(也可以忽略不填写),然后下一步

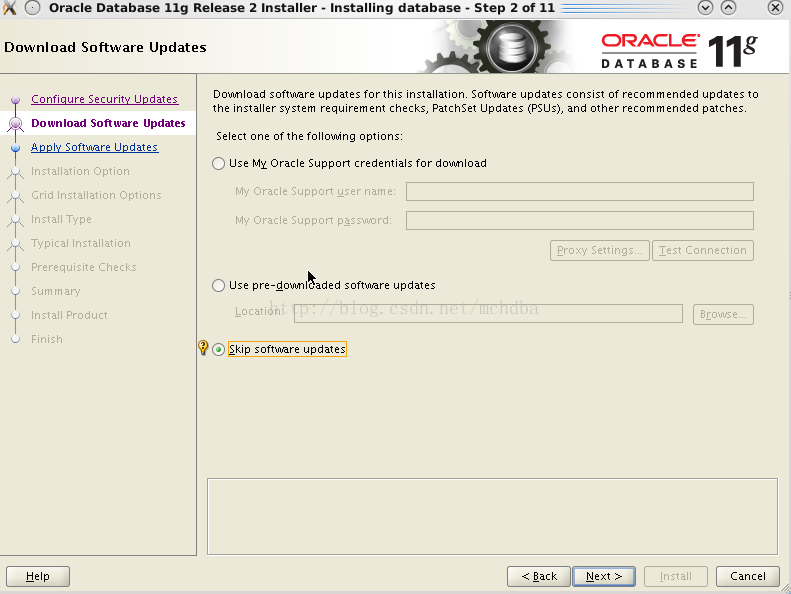
选择忽略软件升级,下一步吗,如101.png
然后选择升级,如下102.png

然后继续进行,有个INS-35373错误,选择Yes,如下

然后选择好语言种类,简体中文、繁体中文、英语、美式英语等,如104.png所示:

继续下一步,选择企业版,如

接下来,开始选择oracle目录了,是选择新建的目录呢还是选择原来的老版本11.2.0.1的目录呢?这里最好选择一个新的目录,因为万一升级失败了,老的oracle版本软件目录没有被覆盖掉,还可以继续使用的,否则升级失败,就基本只有彻底暴力清除所有文件以及注册信息,之后重新安装oracle了。
我这里就选择一个新的目录11.2.0.4的目录,如106.png、107.png所示


接下来,继续,选择新的的Inventory Directory目录,默认的会报错,如108.png所示

接下来选择用户组和操作组,如109.png所示:

接下来,会有checking各种lib包,一些比较偏的,缺少了也没事,直接Ignore忽略掉就ok,如110.png所示:

下一步看安装的目录以及基本信息,如111.png所示:

然后点击“”Install“”按钮,开始安装,如图112.png

中级需要执行配置脚本,如图112_1.png

重新打开xshell,ssh连接到数据库,在命令行去执行命令:
[root@hch_test_121_90 oracle]# bash -x/oracle/app/oraInventory11.2.0.4/orainstRoot.sh
[root@hch_test_121_90 oracle]# bash -x/oracle/app/oracle/product/11.2.0.4/dbhome_1/root.sh
执行过程如下:
[root@hch_test_121_90 oracle]# bash -x /oracle/app/oraInventory11.2.0.4/orainstRoot.sh
+ AWK=/bin/awk
+ CHMOD=/bin/chmod
+ CHGRP=/bin/chgrp
+ CP=/bin/cp
+ ECHO=/bin/echo
+ MKDIR=/bin/mkdir
++ /usr/bin/id
++ /bin/awk '-F(' '{print $1}'
++ /bin/awk -F= '{print $2}'
+ RUID=0
+ '[' 0 '!=' 0 ']'
+ '[' -d /etc ']'
+ /bin/chmod 755 /etc
+ '[' -f /oracle/app/oraInventory11.2.0.4/oraInst.loc ']'
+ /bin/cp /oracle/app/oraInventory11.2.0.4/oraInst.loc /etc/oraInst.loc
+ /bin/chmod 644 /etc/oraInst.loc
+ /bin/echo 'Changing permissions of /oracle/app/oraInventory11.2.0.4.
Adding read,write permissions for group.
Removing read,write,execute permissions for world.
'
Changing permissions of /oracle/app/oraInventory11.2.0.4.
Adding read,write permissions for group.
Removing read,write,execute permissions for world.
+ /bin/chmod -R g+rw,o-rwx /oracle/app/oraInventory11.2.0.4
+ '[' 0 '!=' 0 ']'
+ /bin/echo 'Changing groupname of /oracle/app/oraInventory11.2.0.4 to oinstall.'
Changing groupname of /oracle/app/oraInventory11.2.0.4 to oinstall.
+ /bin/chgrp -R oinstall /oracle/app/oraInventory11.2.0.4
+ '[' 0 '!=' 0 ']'
+ /bin/echo 'The execution of the script is complete.'
The execution of the script is complete.
[root@hch_test_121_90 oracle]#
[root@hch_test_121_90 oracle]#
[root@hch_test_121_90 ~]# sh /oracle/app/oracle/product/11.2.0.4/dbhome_1/root.sh
Performing root user operation for Oracle 11g
The following environment variables are set as:
 ORACLE_OWNER= oracle
 ORACLE_HOME= /oracle/app/oracle/product/11.2.0.4/dbhome_1
Enter the full pathname of the local bin directory: [/usr/local/bin]: /oracle/app/oracle/product/11.2.0.4/dbhome_1/bin
The contents of "dbhome" have not changed. No need to overwrite.
The contents of "oraenv" have not changed. No need to overwrite.
The contents of "coraenv" have not changed. No need to overwrite.
Entries will be added to the /etc/oratab file as needed by
Database Configuration Assistant when a database is created
Finished running generic part of root script.
Now product-specific root actions will be performed.
Finished product-specific root actions.
[root@hch_test_121_90 ~]#
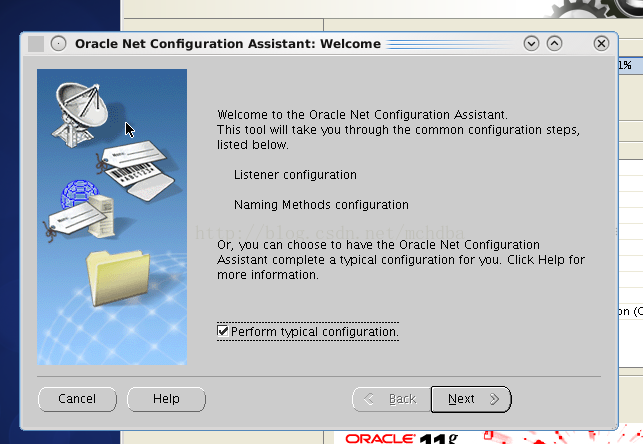
之后回到vnc远程的窗口,点击界面的OK,会提示安装Oracle Net Configuration Assistant: Welcome操作:
接下来会配置网络,如下113.png、114.png

设置sys密码,如115.png所示

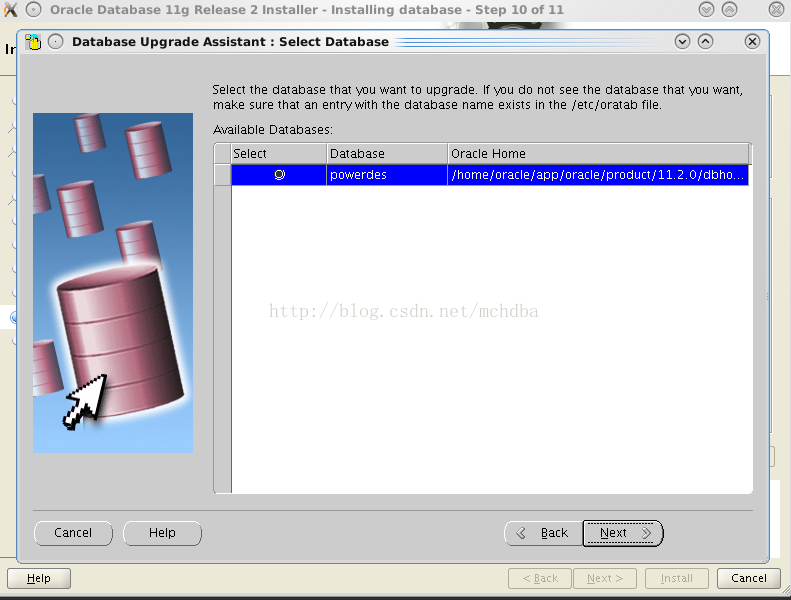
看到这里,问题来了,中间没有数据库让你选择去升级,问题在哪里呢,在/etc/oratab没有配置,所以赶紧去配置:
[root@hch_test_121_90 ~]# more /etc/oratab
#
# This file is used by ORACLE utilities. It is created by root.sh
# and updated by either Database Configuration Assistant while creating
# a database or ASM Configuration Assistant while creating ASM instance.
# A colon, ':', is used as the field terminator. A new line terminates
# the entry. Lines beginning with a pound sign, '#', are comments.
#
# Entries are of the form:
# $ORACLE_SID:$ORACLE_HOME:<N|Y>:
#
# The first and second fields are the system identifier and home
# directory of the database respectively. The third filed indicates
# to the dbstart utility that the database should , "Y", or should not,
# "N", be brought up at system boot time.
#
# Multiple entries with the same $ORACLE_SID are not allowed.
#
powerdes:/hom/oracle/app/oracle/product/11.2.0/dbhome_1:Y
[root@hch_test_121_90 ~]#
配置完后,前面的步骤重新来一遍,到此就会有下面的出现的database选择项让我们选择,如116.png、117.png、118.png所示:


接下来,选择升级时区以及备份数据库,如119.png所示:

选择升级过程中不移动数据文件,如图120.png

选择默认的闪回恢复区以及恢复区大小,也可以自己手动调整,如121.png

接下来默认下一步,准备企业管理器,当然也可以选择不需要的,直接忽略掉,如下图122.png

接下来,点击“Finish”按钮(这个时间会比较长,至少1个小时吧,我这里用了1.5个小时,可能在ssd上时间比较短),如图123.png、124.png、125.png所示

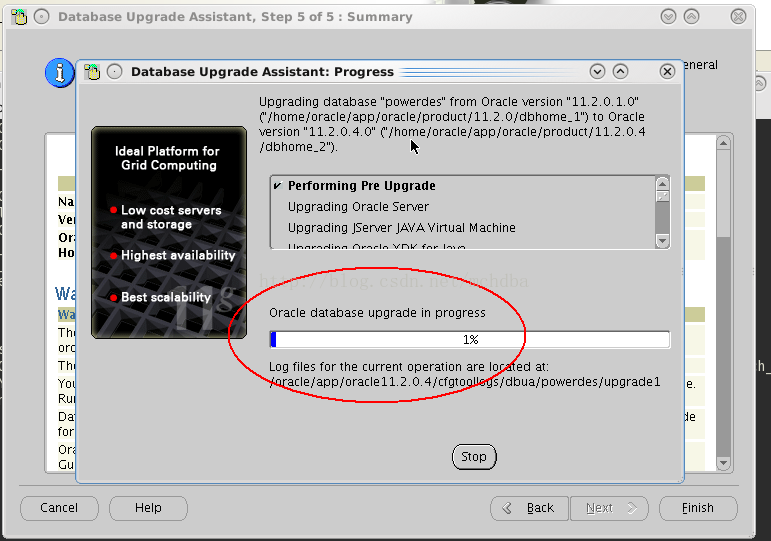

OK,等待进度条变成100%,然后基本的升级就好了,就完成了,后续记得修改.bash_profile里面的ORACLE_HOME目录为新的11.2.0.4目录即可。
以上所述是小编给大家介绍的ORACLE 11g从 11.2.0.1升级到11.2.0.4 详细实战教程,希望对大家有所帮助,如果大家有任何疑问请给我留言,小编会及时回复大家的。在此也非常感谢大家对脚本之家网站的支持
相关文章
 这篇文章主要介绍了oracle基础语法详解,非常适合Oracle数据库的初步学习,本文给大家介绍的非常详细,对大家的学习或工作具有一定的参考借鉴价值,需要的朋友可以参考下2021-05-05
 这篇文章主要给大家介绍了关于oracle数据库查询所有表名和注释等的相关资料,文中通过实例代码介绍的非常详细,对大家学习或者使用oracle具有一定的参考学习价值,需要的朋友可以参考下2023-04-04
Oracle11.2.0.1如何升级到11.2.0.3 Oracle同版本升级
这篇文章主要为大家详细介绍了Oracle11.2.0.1如何升级到11.2.0.3的过程,Oracle同版本升级的方法,感兴趣的小伙伴们可以参考一下2016-07-07 自动备份Oracle数据库...2007-03-03
 在本篇文章里小编给大家整理的是关于oracle处理锁表基本操作以及相关代码,需要的朋友们学习下。2019-11-11
 这篇文章主要介绍了oracle用户权限、角色管理的使用和示例,需要的朋友可以参考下2014-04-04
 Oracle 8i在P4上的安装...2007-03-03
 自动备份Oracle数据库...2007-03-03
 这两天一朋友问如何更改数据库名,于是做个测试,简单记录下,以便说明问题。2009-10-10
 MySQL安全性指南 (2)(转)...2007-03-03


最新评论