
在Ubuntu上快速部署OpenClaw并接入飞书的完整过程
发布时间:2026-03-13 11:21:23 作者:DayanAILab  我要评论
我要评论
OpenClaw是一个可扩展的 AI 助手运行框架,核心目标是让助手真正“能做事”,这篇文章主要介绍了在Ubuntu上快速部署OpenClaw并接入飞书的完整过程,文中通过图文介绍的非常详细,需要的朋友可以参考下
前言
本文记录我在 Ubuntu 22.04 服务器上从零部署 OpenClaw 并接入飞书的完整过程,包括遇到的坑和解决方法。
环境信息
- 系统: Ubuntu 22.04 LTS
- 配置: 4核 8GB 内存,100M 带宽
- 类型 CPU
一、安装依赖
1.1 更新系统包索引
sudo apt update
1.2 安装 curl
sudo apt install -y curl
1.3 通过 NodeSource 安装最新稳定 LTS 版本
# 添加 NodeSource 仓库并安装
curl -fsSL https://deb.nodesource.com/setup_lts.x | sudo -E bash -
sudo apt-get install -y nodejs
# 安装完成后,验证版本
node -v
npm -v
实际输出:
ubuntu@gt-ubuntu22-04-cmd-v3-0-8gb-100m:~$ node -v
v24.14.0
ubuntu@gt-ubuntu22-04-cmd-v3-0-8gb-100m:~$ npm -v
11.9.0
1.4 设置淘宝镜像(最常用)
npm config set registry https://registry.npmmirror.com
# 查询是否配置成功
npm config get registry
验证输出:
ubuntu@gt-ubuntu22-04-cmd-v3-0-8gb-100m:~$ npm config get registry
https://registry.npmmirror.com
二、安装 OpenClaw
执行安装脚本(注意:安装过程中要勾选 yes):
curl -fsSL https://openclaw.ai/install.sh | bash
完整安装日志:
ubuntu@gt-ubuntu22-04-cmd-v3-0-8gb-100m:~$ curl -fsSL https://openclaw.ai/install.sh | bash
🦞 OpenClaw Installer
The only crab in your contacts you actually want to hear from. 🦞
✓ Detected: linux
Install plan
OS: linux
Install method: npm
Requested version: latest
[1/3] Preparing environment
✓ Node.js v24.14.0 found
· Active Node.js: v24.14.0 (/usr/bin/node)
· Active npm: 11.9.0 (/usr/bin/npm)
[2/3] Installing OpenClaw
✓ Git already installed
· Configuring npm for user-local installs
✓ npm configured for user installs
· Installing OpenClaw v2026.2.26
✓ OpenClaw npm package installed
✓ OpenClaw installed
[3/3] Finalizing setup
! PATH missing npm global bin dir: /home/ubuntu/.npm-global/bin
This can make openclaw show as "command not found" in new terminals.
Fix (zsh: ~/.zshrc, bash: ~/.bashrc):
export PATH="/home/ubuntu/.npm-global/bin:$PATH"
🦞 OpenClaw installed successfully (2026.2.26)!
All done! I promise to only judge your code a little bit.
· Starting setup
🦞 OpenClaw 2026.2.26 (bc50708) — Ship fast, log faster.
▄▄▄▄▄▄▄▄▄▄▄▄▄▄▄▄▄▄▄▄▄▄▄▄▄▄▄▄▄▄▄▄▄▄▄▄▄▄▄▄▄▄▄▄▄▄▄▄▄▄▄▄
██░▄▄▄░██░▄▄░██░▄▄▄██░▀██░██░▄▄▀██░████░▄▄▀██░███░██
██░███░██░▀▀░██░▄▄▄██░█░█░██░█████░████░▀▀░██░█░█░██
██░▀▀▀░██░█████░▀▀▀██░██▄░██░▀▀▄██░▀▀░█░██░██▄▀▄▀▄██
▀▀▀▀▀▀▀▀▀▀▀▀▀▀▀▀▀▀▀▀▀▀▀▀▀▀▀▀▀▀▀▀▀▀▀▀▀▀▀▀▀▀▀▀▀▀▀▀▀▀▀▀
🦞 OPENCLAW 🦞
┌ OpenClaw onboarding
│
◇ Security ─────────────────────────────────────────────────────────────────────────────────╮
│ │
│ Security warning — please read. │
│ │
│ OpenClaw is a hobby project and still in beta. Expect sharp edges. │
│ By default, OpenClaw is a personal agent: one trusted operator boundary. │
│ This bot can read files and run actions if tools are enabled. │
│ A bad prompt can trick it into doing unsafe things. │
│ │
│ OpenClaw is not a hostile multi-tenant boundary by default. │
│ If multiple users can message one tool-enabled agent, they share that delegated tool │
│ authority. │
│ │
│ If you’re not comfortable with security hardening and access control, don’t run │
│ OpenClaw. │
│ Ask someone experienced to help before enabling tools or exposing it to the internet. │
│ │
│ Recommended baseline: │
│ - Pairing/allowlists + mention gating. │
│ - Multi-user/shared inbox: split trust boundaries (separate gateway/credentials, ideally │
│ separate OS users/hosts). │
│ - Sandbox + least-privilege tools. │
│ - Shared inboxes: isolate DM sessions (`session.dmScope: per-channel-peer`) and keep │
│ tool access minimal. │
│ - Keep secrets out of the agent’s reachable filesystem. │
│ - Use the strongest available model for any bot with tools or untrusted inboxes. │
│ │
│ Run regularly: │
│ openclaw security audit --deep │
│ openclaw security audit --fix │
│ │
│ Must read: https://docs.openclaw.ai/gateway/security │
│ │
├────────────────────────────────────────────────────────────────────────────────────────────╯
│
◇ I understand this is personal-by-default and shared/multi-user use requires lock-down. Continue?
│ Yes
│
◇ Onboarding mode
│ QuickStart
│
◇ QuickStart ─────────────────────────╮
│ │
│ Gateway port: 18789 │
│ Gateway bind: Loopback (127.0.0.1) │
│ Gateway auth: Token (default) │
│ Tailscale exposure: Off │
│ Direct to chat channels. │
│ │
├──────────────────────────────────────╯
│
◇ Model/auth provider
│ Z.AI
│
◇ Z.AI auth method
│ CN
│
◇ How do you want to provide this API key?
│ Paste API key now
│
◇ Enter Z.AI API key
│ xxx.xxxx
│
◇ Model configured ───────────────╮
│ │
│ Default model set to zai/glm-5 │
│ │
├──────────────────────────────────╯
│
◇ Default model
│ zai/glm-4.7
│
◇ Channel status ────────────────────────────╮
│ │
│ Telegram: needs token │
│ WhatsApp (default): not linked │
│ Discord: needs token │
│ Slack: needs tokens │
│ Signal: needs setup │
│ signal-cli: missing (signal-cli) │
│ iMessage: needs setup │
│ imsg: missing (imsg) │
│ IRC: not configured │
│ Google Chat: not configured │
│ Feishu: install plugin to enable │
│ Google Chat: install plugin to enable │
│ Nostr: install plugin to enable │
│ Microsoft Teams: install plugin to enable │
│ Mattermost: install plugin to enable │
│ Nextcloud Talk: install plugin to enable │
│ Matrix: install plugin to enable │
│ BlueBubbles: install plugin to enable │
│ LINE: install plugin to enable │
│ Zalo: install plugin to enable │
│ Zalo Personal: install plugin to enable │
│ Synology Chat: install plugin to enable │
│ Tlon: install plugin to enable │
│ │
├─────────────────────────────────────────────╯
│
◇ How channels work ───────────────────────────────────────────────────────────────────────╮
│ │
│ DM security: default is pairing; unknown DMs get a pairing code. │
│ Approve with: openclaw pairing approve <channel> <code> │
│ Public DMs require dmPolicy="open" + allowFrom=["*"]. │
│ Multi-user DMs: run: openclaw config set session.dmScope "per-channel-peer" (or │
│ "per-account-channel-peer" for multi-account channels) to isolate sessions. │
│ Docs: channels/pairing │
│ │
│ Telegram: simplest way to get started — register a bot with @BotFather and get going. │
│ WhatsApp: works with your own number; recommend a separate phone + eSIM. │
│ Discord: very well supported right now. │
│ IRC: classic IRC networks with DM/channel routing and pairing controls. │
│ Google Chat: Google Workspace Chat app with HTTP webhook. │
│ Slack: supported (Socket Mode). │
│ Signal: signal-cli linked device; more setup (David Reagans: "Hop on Discord."). │
│ iMessage: this is still a work in progress. │
│ Feishu: 飞书/Lark enterprise messaging with doc/wiki/drive tools. │
│ Nostr: Decentralized protocol; encrypted DMs via NIP-04. │
│ Microsoft Teams: Bot Framework; enterprise support. │
│ Mattermost: self-hosted Slack-style chat; install the plugin to enable. │
│ Nextcloud Talk: Self-hosted chat via Nextcloud Talk webhook bots. │
│ Matrix: open protocol; install the plugin to enable. │
│ BlueBubbles: iMessage via the BlueBubbles mac app + REST API. │
│ LINE: LINE Messaging API bot for Japan/Taiwan/Thailand markets. │
│ Zalo: Vietnam-focused messaging platform with Bot API. │
│ Zalo Personal: Zalo personal account via QR code login. │
│ Synology Chat: Connect your Synology NAS Chat to OpenClaw with full agent capabilities. │
│ Tlon: decentralized messaging on Urbit; install the plugin to enable. │
│ │
├───────────────────────────────────────────────────────────────────────────────────────────╯
│
◇ Select channel (QuickStart)
│ Skip for now
Updated ~/.openclaw/openclaw.json
Workspace OK: ~/.openclaw/workspace
Sessions OK: ~/.openclaw/agents/main/sessions
│
◇ Skills status ─────────────╮
│ │
│ Eligible: 4 │
│ Missing requirements: 40 │
│ Unsupported on this OS: 7 │
│ Blocked by allowlist: 0 │
│ │
├─────────────────────────────╯
│
◇ Configure skills now? (recommended)
│ No
│
◇ Hooks ──────────────────────────────────────────────────────────────────╮
│ │
│ Hooks let you automate actions when agent commands are issued. │
│ Example: Save session context to memory when you issue /new or /reset. │
│ │
│ Learn more: https://docs.openclaw.ai/automation/hooks │
│ │
├──────────────────────────────────────────────────────────────────────────╯
│
◇ Enable hooks?
│ Skip for now
Config overwrite: /home/ubuntu/.openclaw/openclaw.json (sha256 f763f7d577aba2ed75a863a91e3e9a116eab6ecc856e7731972988b006426453 -> 8eac9ee80087618bf88b5f7a2f1f6bdb4b5abf5dfa646c22bf65f64e92063204, backup=/home/ubuntu/.openclaw/openclaw.json.bak)
│
◇ Systemd ────────────────────────────────────────────────────────────────────────────────╮
│ │
│ Linux installs use a systemd user service by default. Without lingering, systemd stops │
│ the user session on logout/idle and kills the Gateway. │
│ Enabling lingering now (may require sudo; writes /var/lib/systemd/linger). │
│ │
├──────────────────────────────────────────────────────────────────────────────────────────╯
│
◇ Systemd ───────────────────────────────╮
│ │
│ Enabled systemd lingering for ubuntu. │
│ │
├─────────────────────────────────────────╯
│
◇ Gateway service runtime ────────────────────────────────────────────╮
│ │
│ QuickStart uses Node for the Gateway service (stable + supported). │
│ │
├──────────────────────────────────────────────────────────────────────╯
│
◐ Installing Gateway service…
Installed systemd service: /home/ubuntu/.config/systemd/user/openclaw-gateway.service
◇ Gateway service installed.
│
◇
Agents: main (default)
Heartbeat interval: 30m (main)
Session store (main): /home/ubuntu/.openclaw/agents/main/sessions/sessions.json (0 entries)
│
◇ Optional apps ────────────────────────╮
│ │
│ Add nodes for extra features: │
│ - macOS app (system + notifications) │
│ - iOS app (camera/canvas) │
│ - Android app (camera/canvas) │
│ │
├────────────────────────────────────────╯
│
◇ Control UI ─────────────────────────────────────────────────────────────────────╮
│ │
│ Web UI: http://127.0.0.1:18789/ │
│ Web UI (with token): │
│ http://127.0.0.1:18789/#token=2962e8f5116c63d86ea9c8224bc8d6445cce2e806ed1e183 │
│ Gateway WS: ws://127.0.0.1:18789 │
│ Gateway: reachable │
│ Docs: https://docs.openclaw.ai/web/control-ui │
│ │
├──────────────────────────────────────────────────────────────────────────────────╯
│
◇ Start TUI (best option!) ─────────────────────────────────╮
│ │
│ This is the defining action that makes your agent you. │
│ Please take your time. │
│ The more you tell it, the better the experience will be. │
│ We will send: "Wake up, my friend!" │
│ │
├────────────────────────────────────────────────────────────╯
│
◇ Token ─────────────────────────────────────────────────────────────────────────────────╮
│ │
│ Gateway token: shared auth for the Gateway + Control UI. │
│ Stored in: ~/.openclaw/openclaw.json (gateway.auth.token) or OPENCLAW_GATEWAY_TOKEN. │
│ View token: openclaw config get gateway.auth.token │
│ Generate token: openclaw doctor --generate-gateway-token │
│ Web UI stores a copy in this browser's localStorage (openclaw.control.settings.v1). │
│ Open the dashboard anytime: openclaw dashboard --no-open │
│ If prompted: paste the token into Control UI settings (or use the tokenized dashboard │
│ URL). │
│ │
├─────────────────────────────────────────────────────────────────────────────────────────╯
│
◇ How do you want to hatch your bot?
│ Open the Web UI
│
◇ Dashboard ready ────────────────────────────────────────────────────────────────╮
│ │
│ Dashboard link (with token): │
│ http://127.0.0.1:18789/#token=2962e8f5116c63d86ea9c8224bc8d6445cce2e806ed1e183 │
│ Copy/paste this URL in a browser on this machine to control OpenClaw. │
│ No GUI detected. Open from your computer: │
│ ssh -N -L 18789:127.0.0.1:18789 ubuntu@10.0.20.195 │
│ Then open: │
│ http://localhost:18789/ │
│ http://localhost:18789/#token=2962e8f5116c63d86ea9c8224bc8d6445cce2e806ed1e183 │
│ Docs: │
│ https://docs.openclaw.ai/gateway/remote │
│ https://docs.openclaw.ai/web/control-ui │
│ │
├──────────────────────────────────────────────────────────────────────────────────╯
│
◇ Workspace backup ────────────────────────────────────────╮
│ │
│ Back up your agent workspace. │
│ Docs: https://docs.openclaw.ai/concepts/agent-workspace │
│ │
├───────────────────────────────────────────────────────────╯
│
◇ Security ──────────────────────────────────────────────────────╮
│ │
│ Running agents on your computer is risky — harden your setup: │
│ https://docs.openclaw.ai/security │
│ │
├─────────────────────────────────────────────────────────────────╯
│
◇ Shell completion ────────────────────────────────────────────────────────╮
│ │
│ Shell completion installed. Restart your shell or run: source ~/.bashrc │
│ │
├───────────────────────────────────────────────────────────────────────────╯
│
◇ Web search (optional) ─────────────────────────────────────────────────────────────────╮
│ │
│ If you want your agent to be able to search the web, you’ll need an API key. │
│ │
│ OpenClaw uses Brave Search for the `web_search` tool. Without a Brave Search API key, │
│ web search won’t work. │
│ │
│ Set it up interactively: │
│ - Run: openclaw configure --section web │
│ - Enable web_search and paste your Brave Search API key │
│ │
│ Alternative: set BRAVE_API_KEY in the Gateway environment (no config changes). │
│ Docs: https://docs.openclaw.ai/tools/web │
│ │
├─────────────────────────────────────────────────────────────────────────────────────────╯
│
◇ What now ─────────────────────────────────────────────────────────────╮
│ │
│ What now: https://openclaw.ai/showcase ("What People Are Building"). │
│ │
├────────────────────────────────────────────────────────────────────────╯
│
└ Onboarding complete. Use the dashboard link above to control OpenClaw.
ubuntu@gt-ubuntu22-04-cmd-v3-0-8gb-100m:~$ 三、解决 PATH 问题
安装完成后,如果执行 which openclaw 找不到命令,需要手动配置 PATH:
# 检查 openclaw 是否在 PATH 中
which openclaw

# 如果找不到,查看 npm 全局安装目录
npm prefix -g

# 查看当前 shell
echo $SHELL
# 如果输出 /bin/bash,使用 ~/.bashrc
# 如果输出 /bin/zsh,使用 ~/.zshrc

# 将 npm 全局 bin 目录添加到 PATH
echo 'export PATH="$(npm prefix -g)/bin:$PATH"' >> ~/.bashrc

# 重新加载配置文件
source ~/.bashrc

# 验证添加是否成功
echo $PATH | grep npm
四、访问控制界面
4.1 本地ssh连接服务器
在本地电脑执行,按提示输入远程linux云主机密码即可:
ssh -N -L 18789:127.0.0.1:18789 ubuntu@你的云主机IP

4.2 访问openclaw web ui
携带部署过程中生成的Dashboard link在本地进行访问,如下图:
http://localhost:18789/#token=你的token

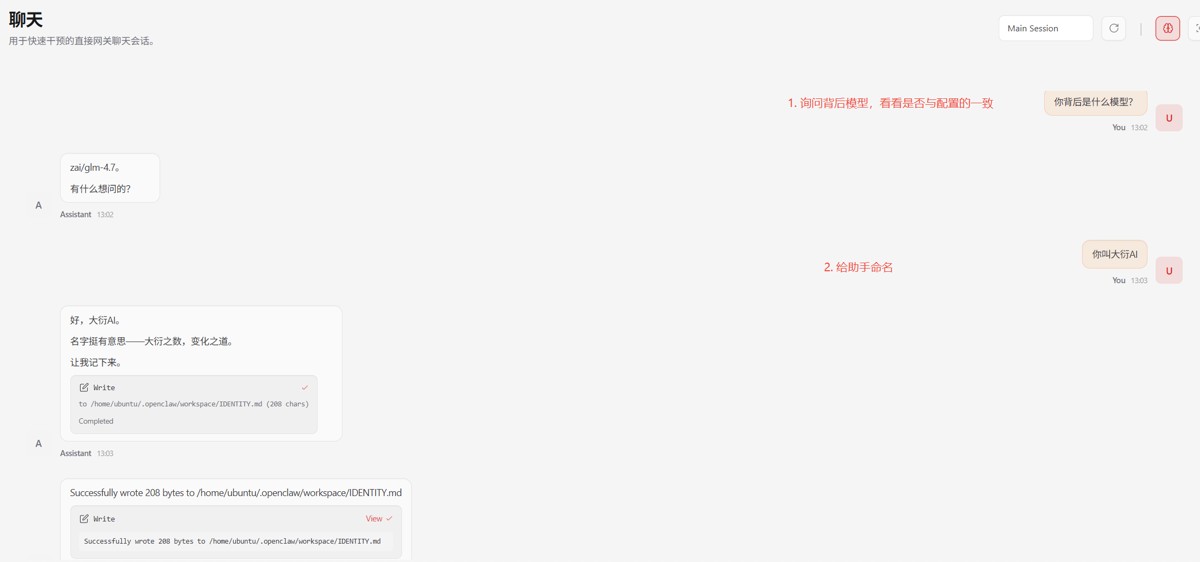
4.3 测试
- 询问背后模型,如下图告知是glm4.7,与配置的一致
- 给AI助手起名为“大衍AI”,如下图,可切换界面等待其生效


五、总结
本文详细记录了在 Ubuntu 22.04 服务器上从零部署 OpenClaw 的完整流程,包括:
- 环境准备:Node.js LTS 安装与 npm 镜像配置
- OpenClaw 安装:通过官方脚本一键安装,处理 PATH 配置问题
- 初始化配置:QuickStart 模式、Z.AI 模型接入
- 远程访问:通过 SSH 隧道访问 Web 控制界面进行问答
六、后续内容预告
OpenClaw 的功能远不止于此,接下来我将在博客和B站频道推出更多深度内容,包括:
- 🔧 进阶配置:自定义 Skills 技能、Hooks 自动化、多 Agent 管理
- 🔒 安全加固:生产环境部署、访问控制、审计日志配置
- 🛠️ 插件开发:自定义飞书工具插件、接入企业内部系统
- 🤖 模型调优:Prompt 工程、多模型切换、上下文管理
- 📊 实战案例:搭建团队知识库助手、自动化工作流机器人
到此这篇关于在Ubuntu上快速部署OpenClaw并接入飞书的文章就介绍到这了,更多相关Ubuntu部署OpenClaw接入飞书内容请搜索脚本之家以前的文章或继续浏览下面的相关文章,希望大家以后多多支持脚本之家!
相关文章
 OpenClaw 是一个个人 AI 代理框架,支持连接多种聊天平台(如飞书、Telegram 等)并集成多种模型,这篇文章主要介绍了OpenClaw飞书官方插件安装教程的相关资料,文中通过代码2026-03-27
ubuntu (V100)中 部署openclaw并链接飞书的操作方法
本文介绍了在Ubuntu上部署Ollama的大模型推理框架及OpenClaw的方法,包括编译安装Ollama、使用OpenClaw的安装脚本和配置文件等步骤,并简要介绍了OpenClaw的工作流程,感兴趣2026-03-26 OpenClaw 的 ACP机制允许将 Codex、Claude Code、Gemini CLI 等外部编程工具纳入 OpenClaw 的 Agent 编排体系,很多读者在飞书渠道部署 OpenClaw 后,想知道如何在这个环境2026-03-26
 当你的 AI 助手突然聋了——能发消息却收不到回复,问题可能藏在一个你根本不会去看的 .ts 文件里,下面小编就和大家详细介绍一下OpenClaw飞书插件加载失败的问题排查与解决2026-03-25
OpenClaw多渠道接入WhatsApp、Telegram、飞书的实战指南
OpenClaw的Channels多渠道接入系统是其六层架构的第一层,负责连接外部消息平台与AI Agent系统,本文深入剖析Channels的核心概念、架构设计、与Gateway的交互机制,详细介绍2026-03-23 最近在使用 OpenClaw 进行飞书机器人配对时,执行命令时遇到了错误,同时启动日志中反复出现警告这个问题的根本原因是 OpenClaw 环境中存在两个 ID 相同的飞书插件,本文借2026-03-19
OpenClaw解决飞书 duplicate plugin id detected 问题
文章介绍了OpenClaw在启动过程中检测到重复的feishu插件ID并导致冲突的问题,通过查找和删除全局插件文件并调整配置文件,成功解决了这个问题,感兴趣的朋友跟随小编一起看看2026-03-17 本文详细介绍如何将OpenClaw AI 智能体网关与飞书(Feishu)集成,实现企业内部的 AI 助手功能,涵盖飞书应用创建、权限配置、OpenClaw 连接和高级功能设置,本文给大家介绍2026-03-17
OpenClaw 从零配置指南并接入飞书 + 常用命令 + 原理全解析
本文介绍了如何从零配置OpenClaw并接入飞书,包括安装、配置、权限设置、模型切换、技能管理等步骤,以及常用命令和配置文件说明,感兴趣的朋友跟随小编一起看看吧2026-03-12 2026年OpenClaw(前身为Moltbot)凭借轻量化部署、强大的AI任务执行能力与灵活的生态集成特性,成为企业智能化办公的核心工具,这篇文章主要介绍了OpenClaw连接飞书插件安装、2026-03-10


最新评论