
使用Atom支持基于Jupyter的Python开教程详解
有关于使用Atom进行Python开发的网上资料比较少,最近发现使用Atom结合Hydrogen插件进行Python开发,尤其是数据挖掘相关的工作,整体体验要好于Vscode,Vscode虽然说也有连接Jupyter的工具,但是交互式的开发Hydrogen体验更好。
这里放了个动图来展示一下Hydrogen的强大

插件安装
Python
- Hydrogen
- atom-ide-ui
- ide-python
这里要注意,本地的pip需要 安装 python-language-server[all],在ide-python的readme中有详细说明
远程连接
- Remote FTP
- 美化
- simplified-chinese-menu(汉化补丁)
- file-icons(文件夹图标)
- bracket-colorizer(彩虹括号,找了好久,确定就是必须配合暗色主题)
- atom-bracket-highlight(括号高亮)
- atom-clock(加个时钟在右下角)
- highlight-selected(高亮选择)
- minimap(类似sublime的右侧map栏)
- minimap-highlight-selected(选择代码后,map上也高亮,方便定位代码)
插件配置
Remote FTP
这里先讲一下我的需求,我是需要利用其连接公司服务器上的内容,但是公司服务器是需要跳板机的,所以我需要通过跳板机才能访问,因此配置上会有些复杂
{
    "protocol": "sftp",
    "host": "跳板机域名", // string - Hostname or IP address of the server. Default: 'localhost'
    "port": 跳板机端口, // integer - Port number of the server. Default: 22
    "user": "用户名", // string - Username for authentication. Default: (none)
    "pass": "如果用密钥这里就不用填", // string - Password for password-based user authentication. Default: (none)
    "promptForPass": false, // boolean - Set to true for enable password/passphrase dialog. This will prevent from using cleartext password/passphrase in this config. Default: false
    "remote": "实际的服务器目录,例如:/服务器域名/用户名/目录", // try to use absolute paths starting with /
    "agent": "", // string - Path to ssh-agent's UNIX socket for ssh-agent-based user authentication. Linux/Mac users can set "env" as a value to use env SSH_AUTH_SOCK variable. Windows users: set to 'pageant' for authenticating with Pageant or (actual) path to a cygwin "UNIX socket." Default: (none)
    "privatekey": "本地私钥path", // string - Absolute path to the private key file (in OpenSSH format). Default: (none)
    "passphrase": "", // string - For an encrypted private key, this is the passphrase used to decrypt it. Default: (none)
    "hosthash": "", // string - 'md5' or 'sha1'. The host's key is hashed using this method and passed to the hostVerifier function. Default: (none)
    "ignorehost": true,
    "connTimeout": 10000, // integer - How long (in milliseconds) to wait for the SSH handshake to complete. Default: 10000
    "keepalive": 10000, // integer - How often (in milliseconds) to send SSH-level keepalive packets to the server (in a similar way as OpenSSH's ServerAliveInterval config option). Set to 0 to disable. Default: 10000
    "keyboardInteractive": 如果要用动态令牌,这里就要填true, // boolean - Set to true for enable verifyCode dialog. Keyboard interaction authentication mechanism. For example using Google Authentication (Multi factor)
    "keyboardInteractiveForPass": false, // boolean - Set to true for enable keyboard interaction and use pass options for password. No open dialog.
    "remoteCommand": "",
    "remoteShell": "",
    "watch":[],
    "watchTimeout":500, // integer - The duration ( in milliseconds ) from when the file was last changed for the upload to begin.
}
ide-python
需要配置一下Python Executable
填写你的python路径,比如使用的是conda虚拟环境,就这样写
/xxx/anaconda3/envs/xxx/bin/python
Hydrogen
连接本地Kernel
首先需要在上面填写的路径下的python环境中安装ipykernel
python -m ipykernel install --user --name py37
然后用atom打开一个py文件,输入
# %%
print('hello atom')# %%
print('每一个# %%代表一个新的cell')
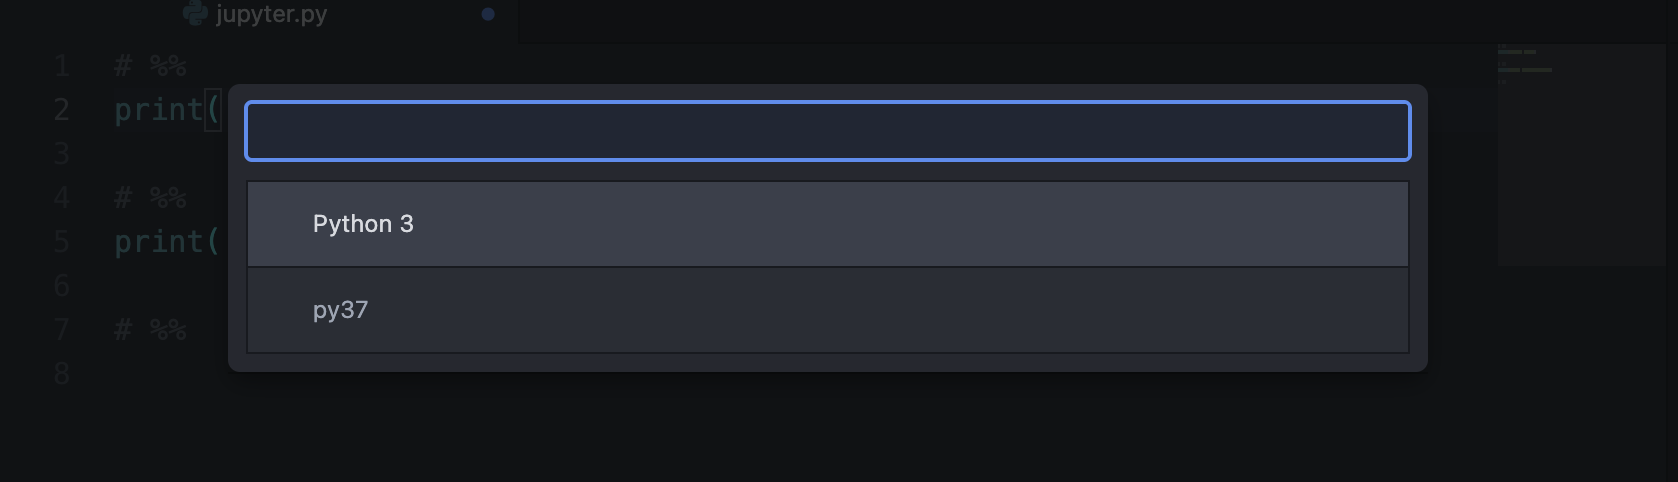
然后再第2行末尾按ctrl+enter就会自动弹出来让你选择环境的弹窗,选择刚刚新建的环境即可
然后在Hydrogen里面通过使用# %%来分割每一个cell,在Mac中使用option+shift+enter组合键来实现运行当前整个ceil,使用command+enter实现运行当前行,使用shift+enter实现运行当前行并跳转下一行,具体可参考官方文档
连接远程Kernel
连接远程的Jupyter只需要配置一下Hydrogen设置里面的Kernel Gateways,填上如下内容即可
[{"name": "Remote server",
  "options": {
    "baseUrl": "jupyter url",
    "token": "jupyter token"
  }
}]
然后点击Connect to Remote Kernel即可

到此这篇关于使用Atom支持基于Jupyter的Python开发的文章就介绍到这了,更多相关Atom基于Jupyter的Python开发内容请搜索脚本之家以前的文章或继续浏览下面的相关文章希望大家以后多多支持脚本之家!
相关文章
 这篇文章主要介绍了详解Python开发中如何使用Hook技巧,详细的介绍了Python Hook的用法和示例,有兴趣的可以了解一下2017-11-11
 这篇文章主要为大家详细介绍了Python实现识别手写数字的大纲,具有一定的参考价值,感兴趣的小伙伴们可以参考一下2018-01-01
 这篇文章主要介绍了Python中使用print函数进行不换行打印问题,具有很好的参考价值,希望对大家有所帮助,如有错误或未考虑完全的地方,望不吝赐教2024-02-02
 这篇文章主要介绍了pythonr的数字处理模块知识(math),需要的朋友可以参考下2014-03-03
 这篇文章主要为大家详细介绍了python实现Virginia无密钥解密,具有一定的参考价值,感兴趣的小伙伴们可以参考一下2019-03-03
 这篇文章主要给大家介绍了如何基于python实现鼠标实时坐标监测,文章通过代码示例介绍的非常详细,对大家的学习或工作有一定的帮助,需要的朋友可以参考下2023-11-11
 信号(Signal)与槽(Slot)是Qt中的核心机制,也是在PyQt编程中对象之间进行通信的机制。这篇文章主要带大家了解一下信号(Signal)与槽(Slot)的使用,需要的可以参考一下2022-12-12
 下面小编就为大家带来一篇Python的语言类型(详解)。小编觉得挺不错的,现在就分享给大家,也给大家做个参考。一起跟随小编过来看看吧2017-06-06
 字符串是程序中最常见的数据类型。在Python中,可以使用三种方式定义字符串。单引号、双引号和三引号。2009-09-09
 这篇文章主要介绍了Django 开发环境与生产环境的区分详解,文中通过示例代码介绍的非常详细,对大家的学习或者工作具有一定的参考学习价值,需要的朋友们下面随着小编来一起学习学习吧2019-07-07


最新评论