
Java多线程基础
一、线程
什么是线程:
线程是进程的一个实体,是CPU调度和分派的基本单位,它是比进程更小的能独立运行的基本单位。
什么是多线程:
多线程指在单个程序中可以同时运行多个不同的线程执行不同的任务。
二、创建多线程的方式
多线程的创建方式有三种:Thread、Runnable、Callable
1、继承Thread类实现多线程
      Thread thread = new Thread() {
            @Override
            public void run() {
                super.run();
                while (true) {
                    try {
                        Thread.sleep(500);
                    } catch (InterruptedException e) {
                        e.printStackTrace();
                    }
                    System.out.println("1:" + Thread.currentThread().getName());
                    System.out.println("2:" + this.getName());
                }
            }
        };
        thread.start();
2、实现Runnable接口方式实现多线程
Thread thread1 = new Thread(new Runnable() {
            @Override
            public void run() {
                while (true) {
                    try {
                        Thread.sleep(500);
                    } catch (InterruptedException e) {
                        e.printStackTrace();
                    }
                    System.out.println("3:" + Thread.currentThread().getName());
                }
            }
        });
        thread1.start();
3、Callable接口创建线程
public class CallableTest {

    public static void main(String[] args) {
        System.out.println("当前线程是:" + Thread.currentThread());
        Callable myCallable = new Callable() {
            @Override
            public Integer call() throws Exception {
                int i = 0;
                for (; i < 10; i++) {

                }
                //当前线程
                System.out.println("当前线程是:" + Thread.currentThread()
                        + ":" + i);
                return i;
            }
        };
        FutureTask<Integer> fu = new FutureTask<Integer>(myCallable);
        Thread th = new Thread(fu, "callable thread");

        th.start();

        //得到返回值
        try {
            System.out.println("返回值是:" + fu.get());

        } catch (Exception e) {
            e.printStackTrace();
        }
    }
}
当前线程是:Thread[main,5,main]
当前线程是:Thread[callable thread,5,main]:10
返回值是:10
总结:
实现Runnable接口相比继承Thread类有如下优势:
- 可以避免由于Java的单继承特性而带来的局限;
- 增强程序的健壮性,代码能够被多个线程共享,代码与数据是独立的;
- 适合多个相同程序代码的线程区处理同一资源的情况。
实现Runnable接口和实现Callable接口的区别:
Runnable是自从java1.1就有了,而Callable是1.5之后才加上去的Callable规定的方法是call(),Runnable规定的方法是run()Callable的任务执行后可返回值,而Runnable的任务是不能返回值是(void)- call方法可以抛出异常,run方法不可以
- 运行Callable任务可以拿到一个Future对象,表示异步计算的结果。它提供了检查计算是否完成的方法,以等待计算的完成,并检索计算的结果。通过Future对象可以了解任务执行情况,可取消任务的执行,还可获取执行结果。
- 加入线程池运行,
Runnable使用ExecutorService的execute方法,Callable使用submit方法。
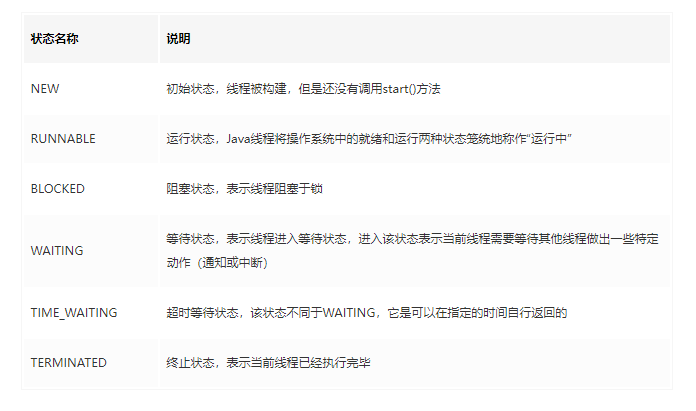
三、线程的生命周期与状态
四、线程的执行顺序
Join线程的运行顺序
原理:
1、定时器
import java.util.Timer;
import java.util.TimerTask;

public class TraditionalTimerTest {
    public static void main(String[] args) {

//         new Timer().schedule(new TimerTask() {
//             @Override
//             public void run() {
//
//                 System.out.println("bombing!");
//             }
//         },10000);

        class MyTimberTask extends TimerTask {
            @Override
            public void run() {

                System.out.println("bombing!");
                new Timer().schedule(new MyTimberTask(), 2000);
            }
        }


        new Timer().schedule(new MyTimberTask(), 2000);


        int count = 0;
        while (true) {
            System.out.println(count++);
            try {
                Thread.sleep(1000);
            } catch (InterruptedException e) {
                e.printStackTrace();
            }

        }
    }
}
0
1
bombing!
2
3
bombing!
4
5
bombing!
6
省略...
2、线程的互斥与同步通信
public class TraditionalThreadSynchronized {

    public static void main(String[] args) {

        new TraditionalThreadSynchronized().init();
    }

    private void init() {
        final Outputer outputer = new Outputer();

        new Thread(new Runnable() {
            @Override
            public void run() {

                while (true) {
                    try {
                        Thread.sleep(10);
                    } catch (InterruptedException e) {
                        e.printStackTrace();
                    }
                    outputer.output("kpioneer");

                }
            }
        }).start();

//        new Thread(new Runnable() {
//            @Override
//            public void run() {
//
//                while (true) {
//                    try {
//                        Thread.sleep(10);
//                    } catch (InterruptedException e) {
//                        e.printStackTrace();
//                    }
//                    outputer.output2("Tom");
//
//                }
//            }
//        }).start();

        new Thread(new Runnable() {
            @Override
            public void run() {

                while (true) {
                    try {
                        Thread.sleep(10);
                    } catch (InterruptedException e) {
                        e.printStackTrace();
                    }
                    outputer.output3("Jack");

                }
            }
        }).start();
    }

  static   class Outputer {

        public void output(String name) {

            int len = name.length();

            synchronized (Outputer.class) {

                for (int i = 0; i < len; i++) {
                    System.out.print(name.charAt(i));
                }
                System.out.println();
            }

        }

        public synchronized void output2(String name) {
            int len = name.length();

            for (int i = 0; i < len; i++) {
                System.out.print(name.charAt(i));
            }
            System.out.println();
        }

      public static synchronized void output3(String name) {
          int len = name.length();

          for (int i = 0; i < len; i++) {
              System.out.print(name.charAt(i));
          }
          System.out.println();
      }
    }
}
3、线程同步通信技术
子线程循环10次,接着主线程循环100,接着又回到子线程循环10次,接着再回到主线程有循环100,如此循环50次,请写出程序。
public class TraditionalThreadCommunication {
    public static void main(String[] args) {

        final Business business = new Business();
        new Thread(new Runnable() {
                    @Override
                    public void run() {
                        for (int i = 1; i <= 50; i++) {
                            business.sub(i);
                        }
                    }
                }
        ).start();
        for (int i = 1; i <= 50; i++) {
            business.main(i);
        }
    }

}

/**
 *要用到共同数据(包括同步锁)的若干方法应该归在同一个类身上,
 * 这种设计正好体现了高类聚和和程序的健壮性
 */
class Business {
    private boolean bShouldSub = true;
    public synchronized void sub(int i) {
        if(!bShouldSub) {

            try {
                this.wait();
            } catch (InterruptedException e) {
                e.printStackTrace();
            }
        }
        for (int j = 1; j <= 10; j++) {
            System.out.println("sub thread sequece of " + j + ",loop of " + i);

        }
        bShouldSub = false;
        this.notify();
    }

    public synchronized void main(int i) {
        if(bShouldSub) {
            try {
                this.wait();
            } catch (InterruptedException e) {
                e.printStackTrace();
            }
        }
        for (int j = 1; j <=100; j++) {
            System.out.println("main thread sequece of " + j + ",loop of " + i);

        }
        bShouldSub = true;
        this.notify();
    }
}
sub thread sequece of 1,loop of 1
sub thread sequece of 2,loop of 1
sub thread sequece of 3,loop of 1
sub thread sequece of 4,loop of 1
sub thread sequece of 5,loop of 1
sub thread sequece of 6,loop of 1
sub thread sequece of 7,loop of 1
sub thread sequece of 8,loop of 1
sub thread sequece of 9,loop of 1
sub thread sequece of 10,loop of 1
main thread sequece of 1,loop of 1
main thread sequece of 2,loop of 1
main thread sequece of 3,loop of 1
main thread sequece of 4,loop of 1
main thread sequece of 5,loop of 1
main thread sequece of 6,loop of 1
main thread sequece of 7,loop of 1
main thread sequece of 8,loop of 1
main thread sequece of 9,loop of 1
main thread sequece of 10,loop of 1
main thread sequece of 11,loop of 1
省略中间...
main thread sequece of 99,loop of 1
main thread sequece of 100,loop of 1
sub thread sequece of 1,loop of 2
sub thread sequece of 2,loop of 2
sub thread sequece of 3,loop of 2
sub thread sequece of 4,loop of 2
sub thread sequece of 5,loop of 2
sub thread sequece of 6,loop of 2
sub thread sequece of 7,loop of 2
sub thread sequece of 8,loop of 2
sub thread sequece of 9,loop of 2
sub thread sequece of 10,loop of 2
main thread sequece of 1,loop of 2
main thread sequece of 2,loop of 2
main thread sequece of 3,loop of 2
省略...
到此这篇关于Java多线程基础的文章就介绍到这了,更多相关Java多线程内容请搜索脚本之家以前的文章或继续浏览下面的相关文章希望大家以后多多支持脚本之家!
相关文章

Java Http请求方式之RestTemplate常用方法详解
这篇文章主要为大家介绍了Java Http请求方式之RestTemplate常用方法详解,有需要的朋友可以借鉴参考下,希望能够有所帮助,祝大家多多进步,早日升职加薪2022-09-09
Java中实现String.padLeft和String.padRight的示例
本篇文章主要介绍了Java中实现String.padLeft和String.padRight,小编觉得挺不错的,现在分享给大家,也给大家做个参考。一起跟随小编过来看看吧2017-09-09 大家都知道,java作为一门内容丰富的编程语言,其中涉及的范围是十分广阔的,下面这篇文章主要给大家介绍了关于java中构造方法及this关键字用法的相关资料,需要的朋友可以参考下2022-04-04
 这篇文章主要介绍了关于SpringBoot中的XA事务详解,事务管理可以确保数据的一致性和完整性,同时也可以避免数据丢失和冲突等问题。在分布式环境中,XA 事务是一种常用的事务管理方式,需要的朋友可以参考下2023-07-07
 这篇文章主要介绍了JavaWeb框架MVC设计思想详解的相关资料,非常不错,具有参考借鉴价值,需要的朋友可以参考下2016-07-07
 这篇文章主要介绍了Spring Boot2发布调用REST服务实现方法,文中通过示例代码介绍的非常详细,对大家的学习或者工作具有一定的参考学习价值,需要的朋友可以参考下2020-04-04
 这篇文章主要介绍了JAVA中使用FTPClient工具类上传下载的相关资料,java 使用FTP服务器上传文件、下载文件,需要的朋友可以参考下2017-08-08
 本篇文章主要介绍了java对图片进行压缩和resize调整的方法,具有一定的参考价值,感兴趣的小伙伴们可以参考一下2017-07-07
 这篇文章主要介绍了mybatis中<choose>标签的用法说明,具有很好的参考价值,希望对大家有所帮助。如有错误或未考虑完全的地方,望不吝赐教2022-06-06
为什么不建议使用Java自定义Object作为HashMap的key
这篇文章主要介绍了为什么不建议使用Java自定义Object作为HashMap的key,文章围绕主题展开详细的内容介绍,具有一定的参考价值,感兴趣的小伙伴可以参考一下2022-06-06


最新评论