
springboot+vue实现登录功能的最新方法整理
一、介绍
搜索了关于spring boot+vue的前后端分离实践项目很多,但是对于最基础登录功能的博客却是几年前的了。于是学习了好几个大神的文章后,自己通过实践解决了vue改版等众多问题后实现了登录功能。
二、环境工具
- vue2.0
- element-ui
- axios
- vue-router
- vuex
- Java
- spring-boot
- vscode
- idea
三、搭建后端spring-boot框架
1、选择Spring Initializr创建新项目
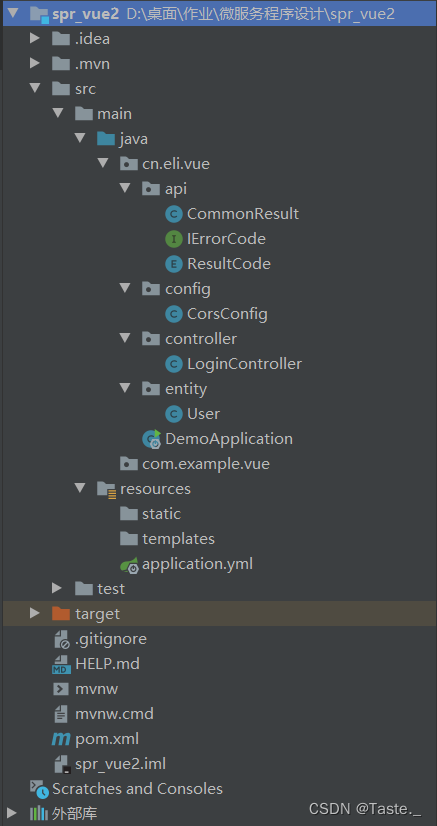
展现最终项目结构如下,方便下面步骤实现
2、CommonResult类
package cn.eli.vue.api;

public class CommonResult<T> {
    private long code;
    private String message;
    private T data;

    protected CommonResult() {
    }

    protected CommonResult(long code, String message, T data) {
        this.code = code;
        this.message = message;
        this.data = data;
    }

    /**
     * 成功返回结果
     *
     * @param data 获取的数据
     */
    public static <T> CommonResult<T> success(T data) {
        return new CommonResult<T>(ResultCode.SUCCESS.getCode(), ResultCode.SUCCESS.getMessage(), data);
    }

    /**
     * 成功返回结果
     *
     * @param data    获取的数据
     * @param message 提示信息
     */
    public static <T> CommonResult<T> success(T data, String message) {
        return new CommonResult<T>(ResultCode.SUCCESS.getCode(), message, data);
    }

    /**
     * 失败返回结果
     *
     * @param errorCode 错误码
     */
    public static <T> CommonResult<T> failed(IErrorCode errorCode) {
        return new CommonResult<T>(errorCode.getCode(), errorCode.getMessage(), null);
    }

    /**
     * 失败返回结果
     *
     * @param message 提示信息
     */
    public static <T> CommonResult<T> failed(String message) {
        return new CommonResult<T>(ResultCode.FAILED.getCode(), message, null);
    }

    /**
     * 失败返回结果
     */
    public static <T> CommonResult<T> failed() {
        return failed(ResultCode.FAILED);
    }

    /**
     * 参数验证失败返回结果
     */
    public static <T> CommonResult<T> validateFailed() {
        return failed(ResultCode.VALIDATE_FAILED);
    }

    /**
     * 参数验证失败返回结果
     *
     * @param message 提示信息
     */
    public static <T> CommonResult<T> validateFailed(String message) {
        return new CommonResult<T>(ResultCode.VALIDATE_FAILED.getCode(), message, null);
    }

    /**
     * 未登录返回结果
     */
    public static <T> CommonResult<T> unauthorized(T data) {
        return new CommonResult<T>(ResultCode.UNAUTHORIZED.getCode(), ResultCode.UNAUTHORIZED.getMessage(), data);
    }

    /**
     * 未授权返回结果
     */
    public static <T> CommonResult<T> forbidden(T data) {
        return new CommonResult<T>(ResultCode.FORBIDDEN.getCode(), ResultCode.FORBIDDEN.getMessage(), data);
    }

    public long getCode() {
        return code;
    }

    public void setCode(long code) {
        this.code = code;
    }

    public String getMessage() {
        return message;
    }

    public void setMessage(String message) {
        this.message = message;
    }

    public T getData() {
        return data;
    }

    public void setData(T data) {
        this.data = data;
    }
}
3、IErrorCode 接口
package cn.eli.vue.api;

public interface IErrorCode {
    long getCode();
    String getMessage();
4、ResultCode 枚举
package cn.eli.vue.api;

public enum ResultCode implements IErrorCode {
    SUCCESS(200, "操作成功"),
    FAILED(500, "操作失败"),
    VALIDATE_FAILED(404, "参数检验失败"),
    UNAUTHORIZED(401, "暂未登录或token已经过期"),
    FORBIDDEN(403, "没有相关权限");
    private long code;
    private String message;

    private ResultCode(long code, String message) {
        this.code = code;
        this.message = message;
    }

    public long getCode() {
        return code;
    }

    public String getMessage() {
        return message;
    }
}
5、User类
package cn.eli.vue.entity;

public class User {

    private int id;
    private String username;
    private String password;

    public int getId() {
        return id;
    }

    public void setId(int id) {
        this.id = id;
    }

    public String getUsername() {
        return username;
    }

    public void setUsername(String username) {
        this.username = username;
    }

    public String getPassword() {
        return password;
    }

    public void setPassword(String password) {
        this.password = password;
    }
}
6、LoginController类
package cn.eli.vue.controller;

import cn.eli.vue.api.CommonResult;
import cn.eli.vue.entity.User;
import org.springframework.web.bind.annotation.RequestBody;
import org.springframework.web.bind.annotation.RequestMapping;
import org.springframework.web.bind.annotation.RequestMethod;
import org.springframework.web.bind.annotation.RestController;

@RestController
public class LoginController {

    @RequestMapping(value = "/admin/login", method = RequestMethod.POST)
    public CommonResult login(@RequestBody User user) {
        if (user.getUsername().equals("test") && user.getPassword().equals("123456"))
            return CommonResult.success("登录成功");
        else
            return CommonResult.validateFailed();
    }
}
7、修改DemoApplication
package cn.eli.vue;

import org.springframework.boot.SpringApplication;
import org.springframework.boot.autoconfigure.SpringBootApplication;

@SpringBootApplication
public class DemoApplication {

    public static void main(String[] args) {
        SpringApplication.run(DemoApplication.class, args);
    }

}
8、更改端口号在application.yml
Vue前端位于8080端口,后端修改到8088,不要在同一端口:
server:
  port: 8088
9、不同端口需要解决跨域问题
Vue端口位于8080,需要访问8088端口服务器,需要修改CorsConfig 类,在后端处理即可。
package cn.eli.vue.config;
import org.springframework.context.annotation.Bean;
import org.springframework.context.annotation.Configuration;
import org.springframework.web.cors.CorsConfiguration;
import org.springframework.web.cors.UrlBasedCorsConfigurationSource;
import org.springframework.web.filter.CorsFilter;
@Configuration
public class CorsConfig {
private CorsConfiguration buildConfig() {
CorsConfiguration corsConfiguration = new CorsConfiguration();
corsConfiguration.addAllowedOrigin("*"); // 1
corsConfiguration.addAllowedHeader("*"); // 2
corsConfiguration.addAllowedMethod("*"); // 3
return corsConfiguration;
}
@Bean
public CorsFilter corsFilter() {
UrlBasedCorsConfigurationSource source = new UrlBasedCorsConfigurationSource();
source.registerCorsConfiguration("/**", buildConfig()); // 4
return new CorsFilter(source);
}
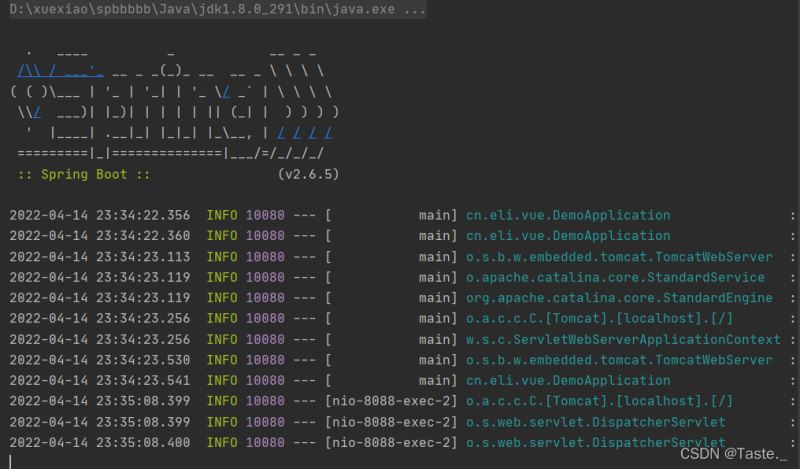
}到这里,springboot端的配置已经全部完成,运行可以成功启动。
四、搭建前端Vue框架
1、创建Vue项目
创建Vue项目可以使用电脑自带cmd,也可以使用gitbush,这里我通过vscode自带终端里面的gitbush进行创建。
vue create code1
(“code1”为vue项目名,可以自己设置)

(由于vue3对于以前的依赖和一些代码的不兼容,而且目前适用范围不是很广,这里我就继续选择vue2进行操作)

创建完成后,进入项目并运行,检查项目创建是否有误
cd code1
npm run serve
运行成功图如下:

浏览器进入已经运行的vue项目

上面为vue2的默认界面,可以成功进入代表创建项目成功,接下来便开始添加本次功能的依赖
2、添加项目依赖框架
这里可以继续使用gitbash通过代码进行添加,但是由于目前vue版本和依赖版本更新的有些乱,也因为我自己技术水平不够,代码添加的依赖经常不兼容跑错,于是直接使用Vue项目管理器的可视化编辑,大大提高依赖兼容成功性
2.1 使用Vue项目管理器添加依赖
进入code1项目后,使用vue ui 命令打开Vue项目管理器
vue ui

随即会跳转到浏览器,未跳转可以自行输入端口进入

在依赖里面搜索我们所需的四个依赖:
- element-ui,一个 element 风格的 UI 框架
- axios,用于网络请求
- Vuex,用于管理状态
- vue-router,用于实现两个 Vue 页面的跳转
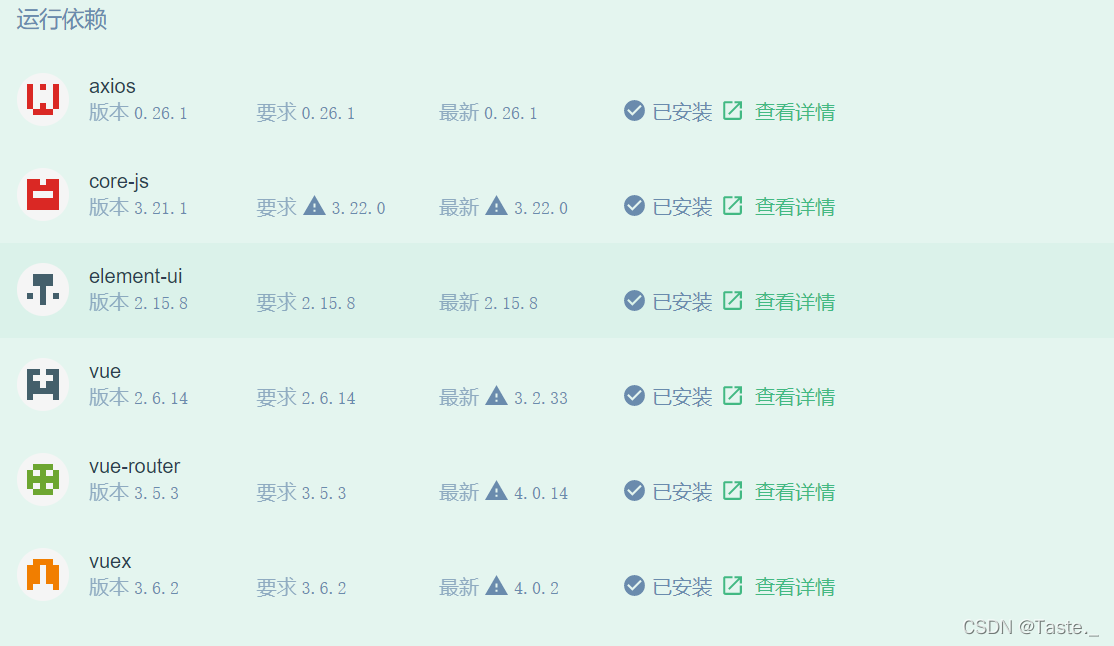
手动添加后一般都是适应当前vue版本的,不用担心兼容报错问题
2.2 使用命令代码添加依赖
进入code1项目后,按照下列命令依次添加依赖(由于本人学艺不精,命令添加始终无法成功运行element框架,有成功的大神希望可以评论或者私信指导一二,谢谢!)
vue add element
npm install axios
npm install vuex --save
npm install vue-router
3、测试运行项目
添加成功依赖后,输入命令npm run serve运行,出现如下图界面即为成功

这里先贴图一下最后的Vue目录架构:

4、编写view层面代码
4.1 登陆页面:login.vue
<template>
  <div>
    <el-card class="login-form-layout">
      <el-form
        autocomplete="on"
        :model="loginForm"
        ref="loginForm"
        label-position="left"
      >
        <div style="text-align: center">
          <svg-icon icon-class="login-mall" style="width: 56px;height: 56px;color: #409EFF"></svg-icon>
        </div>
        <h2 class="login-title color-main">mall-admin-web</h2>
        <el-form-item prop="username">
          <el-input
            name="username"
            type="text"
            v-model="loginForm.username"
            autocomplete="on"
            placeholder="请输入用户名"
          >
            <span slot="prefix">
              <svg-icon icon-class="user" class="color-main"></svg-icon>
            </span>
          </el-input>
        </el-form-item>
        <el-form-item prop="password">
          <el-input
            name="password"
            :type="pwdType"
            @keyup.enter.native="handleLogin"
            v-model="loginForm.password"
            autocomplete="on"
            placeholder="请输入密码"
          >
            <span slot="prefix">
              <svg-icon icon-class="password" class="color-main"></svg-icon>
            </span>
            <span slot="suffix" @click="showPwd">
              <svg-icon icon-class="eye" class="color-main"></svg-icon>
            </span>
          </el-input>
        </el-form-item>
        <el-form-item style="margin-bottom: 60px">
          <el-button
            style="width: 100%"
            type="primary"
            :loading="loading"
            @click.native.prevent="handleLogin"
          >登录</el-button>
        </el-form-item>
      </el-form>
    </el-card>
  </div>
</template>

<script>
export default {
  name: "login",
  data() {
    return {
      loginForm: {
        username: "admin",
        password: "123456"
      },
      loading: false,
      pwdType: "password",
    };
  },
  methods: {
    showPwd() {
      if (this.pwdType === "password") {
        this.pwdType = "";
      } else {
        this.pwdType = "password";
      }
    },
    handleLogin() {
      this.$refs.loginForm.validate(valid => {
        if (valid) {
          this.loading = true;
          this.$store
            .dispatch("Login", this.loginForm)
            .then(response => {
              this.loading = false;
              let code = response.data.code;
              if (code == 200) {
                this.$router.push({
                  path: "/success",
                  query: {data: response.data}
                });
              } else {
                this.$router.push({
                  path: "/error",
                  query: { message: response.data.message }
                });
              }
            })
            .catch(() => {
              this.loading = false;
            });
        } else {
          // eslint-disable-next-line no-console
          console.log("参数验证不合法!");
          return false;
        }
      });
    }
  }
};
</script>

<style scoped>
.login-form-layout {
  position: absolute;
  left: 0;
  right: 0;
  width: 360px;
  margin: 140px auto;
  border-top: 10px solid #409eff;
}

.login-title {
  text-align: center;
}

.login-center-layout {
  background: #409eff;
  width: auto;
  height: auto;
  max-width: 100%;
  max-height: 100%;
  margin-top: 200px;
}
</style>
4.2 登陆成功页面:success.vue
<template>
  <div>
    <h1>Welcome!{{msg}}, <br>操作信息: {{mes}},<br>状态码{{cod}}</h1>
  </div>
</template>
<script>
export default {
  data() {
    return {
      msg: this.$route.query.data.data,
      mes: this.$route.query.data.message,
      cod: this.$route.query.data.code
    };
  },
}
</script>
4.3 登陆失败页面:error.vue
<template>
  <div>
    <h1>登录错误:{{msg}}</h1>
  </div>
</template>
<script>
export default {
  data() {
    return {
      msg: null
    };
  },
  created() {
    this.msg = this.$route.query.message;
  }
};
</script>
5、设置路由统一管理页面
5.1 创建路由文件
建立的 router 文件夹下创建一个 index.js 文件,内容如下
import Vue from 'vue'
import VueRouter from 'vue-router'
Vue.use(VueRouter);
export const constantRouterMap = [
    { path: '/', component: () => import('@/views/login')},
    { path: '/success', component: () => import('@/views/success')},
    { path: '/error', component: () => import('@/views/error'), hidden: true }
]

export default new VueRouter({
    scrollBehavior: () => ({ y: 0 }),
    routes: constantRouterMap
})
5.2 将创建好的路由引入到项目中
在项目的 src 目录根节点下,找到 main.js,修改内容如下:
import Vue from 'vue'
import App from './App.vue'
import './plugins/element.js'
import router from './router'
Vue.config.productionTip = false

new Vue({
  render: h => h(App),
  router,
}).$mount('#app')
5.3 设置路由的出入口
路由还需要一个出入口,这个出入口用来告诉路由将路由的内容显示在这里。上面 main.js 配置的第一个 vue 显示页面为 App.vue ,因此我们修改 App.vue 内容如下:
<template>
  <div id="app">
    <router-view/>
  </div>
</template>

<script>
  export default {
    name: 'App'
  }
</script>
6、配置网络请求
6.1 封装请求工具
使用axios 这个网络请求构架进行 http 的请求,在 utils 包下封装一个请求工具类 request.js:
import axios from 'axios'
import baseUrl from '../api/baseUrl'
const service = axios.create({
  baseURL: baseUrl,
  timeout: 15000,
})
export default service
6.2 登录页面接口 API
在 api 文件夹下,创建一个登录API文件login.js:
import request from '@/utils/request'
export function login(username, password) {
  return request({
    url: '/admin/login',
    method: 'post',
    data: {
      username,
      password
    }
  })
}
6.3 封装 axios
使用 Vuex,先封装Vuex 中的module,在 store 文件夹下创建一个 modules 文件夹,在此文件夹下创建 user.js 文件:
import { login } from '@/api/login'

const user = {
  actions: {
    Login({ commit }, userInfo) {
      const username = userInfo.username.trim()
      return new Promise((resolve, reject) => {
        login(username, userInfo.password).then(response => {
          commit('')
          resolve(response)
        }).catch(error => {
          reject(error)
        })
      })
    },
  }
}
export default user
创建 Vuex,在 store 文件夹下创建一个 index.js 文件:
import Vue from 'vue'
import Vuex from 'vuex'

import user from './modules/user'

Vue.use(Vuex)

export default new Vuex.Store({
  state: {
  },
  getters: {
  },
  mutations: {
  },
  actions: {
  },
  modules: {
    user
  }
})
将 Vuex 引入项目,修改之前的 main.js 文件如下:
import Vue from 'vue'
import App from './App.vue'
import router from './router'
import store from './store'
import './plugins/element.js'

Vue.config.productionTip = false

new Vue({
  router,
  store,
  render: h => h(App)
}).$mount('#app')
五、实现登录功能
1、启动两端程序,进入locallhost:8080

2、输入账号密码
2.1 正确登录
点击登录,进入后还会显示登陆状态、操作信息和状态码,
注意:这里修改了账户名为:test

2.2 错误登录

总结
到此,就通过springboot+vue实现了最基础的登录功能。在这次学习中借鉴了Eli Shaw大神的文章,由于vue版本及其依赖更新换代比较快,springboot也有部分更新不可用的,以前的代码会有报错,这篇文章希望可以提供一些帮助,有很多不足和缺点问题也希望可以提出,十分感谢!
在Github上有这个功能完整的项目:mirrors / macrozheng / mall-admin-web · GitCode
到此这篇关于springboot+vue实现登录功能的文章就介绍到这了,更多相关springboot+vue登录功能内容请搜索脚本之家以前的文章或继续浏览下面的相关文章希望大家以后多多支持脚本之家!
相关文章
 链表(Linked list)是一种常见的基础数据结构,是一种线性表。Java的LinkedList(链表) 类似于 ArrayList,是一种常用的数据容器,本文就来简单讲讲它的使用吧2023-05-05
使用Spring扫描Mybatis的mapper接口的三种配置
这篇文章主要介绍了使用Spring扫描Mybatis的mapper接口的三种配置,具有很好的参考价值,希望对大家有所帮助。如有错误或未考虑完全的地方,望不吝赐教2021-08-08
Java利用apache ftp工具实现文件上传下载和删除功能
这篇文章主要为大家详细介绍了Java利用apache ftp工具实现文件上传下载、删除功能,具有一定的参考价值,感兴趣的小伙伴们可以参考一下2018-06-06 这篇文章主要介绍了Java如何实现压缩文件与解压缩zip文件问题,具有很好的参考价值,希望对大家有所帮助。如有错误或未考虑完全的地方,望不吝赐教2022-12-12
 这篇文章主要介绍了详解Java编程中的策略模式,以及用策略模式来分析源码等内容,需要的朋友可以参考下2015-08-08
Spring Boot 整合单机websocket的步骤 附github源码
websocket 是一个通信协议,通过单个 TCP 连接提供全双工通信,这篇文章主要介绍了Spring Boot 整合单机websocket的步骤(附github源码),需要的朋友可以参考下2021-10-10 大家应该都晓得实现过滤器需要实现 javax.servlet.Filter 接口,而拦截器会在处理指定请求之前和之后进行相关操作,配置拦截器需要两步,本文通过实例代码给大家介绍SpringBoot 过滤器和拦截器的相关知识,感兴趣的朋友一起看看吧2022-12-12
 这篇文章主要介绍了Java程序中的延迟加载功能使用,一定程度上有助于提升性能和降低内存使用率,需要的朋友可以参考下2015-07-07
 这篇文章主要介绍了java 对象的序列化和反序列化的相关资料,需要的朋友可以参考下2016-10-10
 除了一些算法之外,我们还有掌握一些常见的数据结构,比如数组、链表、栈、队列、树等结构,所以接下来就给大家详细讲解一下线性结构中的链表,需要的朋友可以参考下2023-07-07


最新评论