
Linux命令之systemctl用法详解
更新时间:2024年03月05日 11:05:48 作者:恒悦sunsite
Linux 服务管理两种方式service和systemctl,systemd是Linux系统最新的初始化系统(init),作用是提高系统的启动速度,尽可能启动较少的进程,尽可能更多进程并发启动,本文给大家详细讲解了Linux systemctl命令用法,需要的朋友可以参考下
一、systemctl命令简介
CentOS 5使用SysV init;CentOS 6使用Upstart,CentOS 7使用Systemd管理守护进程。centos7采用 systemd管理,服务独立的运行在内存中,服务响应速度快,但占用更多内存。独立服务的服务启动脚本都在目录 /usr/lib/systemd/system里。Systend的新特性:
- 系统引导时实现服务的并行启动;
- 按需激活进程;
- 系统实现快照;
- 基于依赖关系定义服务的控制逻辑;
systemctl可用于内省和控制“systemd”系统和服务管理器的状态。centos7.x系统环境下我们经常使用此命令启停服务,实际上此命令除了其他独立服务还有很多其他用途。
二、systemctl使用示例
1、查看命令帮助
[root@s153 system]# systemctl --help
systemctl [OPTIONS…] {COMMAND} …
2、启动服务
接下来的操作实例以管理xinetd服务为例。
[root@s153 system]# systemctl start xinetd
3、查看服务状态
[root@s153 system]# systemctl status xinetd
● xinetd.service - Xinetd A Powerful Replacement For Inetd
Loaded: loaded (/usr/lib/systemd/system/xinetd.service; enabled; vendor preset: enabled)
Active: active (running) since 三 2022-07-20 10:29:26 CST; 1min 53s ago
Process: 15831 ExecStart=/usr/sbin/xinetd -stayalive -pidfile /var/run/xinetd.pid $EXTRAOPTIONS (code=exited, status=0/SUCCESS)
Main PID: 15832 (xinetd)
CGroup: /system.slice/xinetd.service
└─15832 /usr/sbin/xinetd -stayalive -pidfile /var/run/xinetd.pid
4、停止服务
[root@s153 system]# systemctl stop xinetd
5、查看服务是否活跃
[root@s153 system]# systemctl is-active xinetd
inactive
[root@s153 system]# systemctl start xinetd
[root@s153 system]# systemctl is-active xinetd
active
6、重新加载服务配置
reload是在不重启服务的情况下重新加载配置文件。
[root@s153 system]# systemctl reload xinetd
7、重启服务
restart命令实际上是先stop,然后start。
[root@s153 system]# systemctl restart xinetd
8、列出所有可用单元
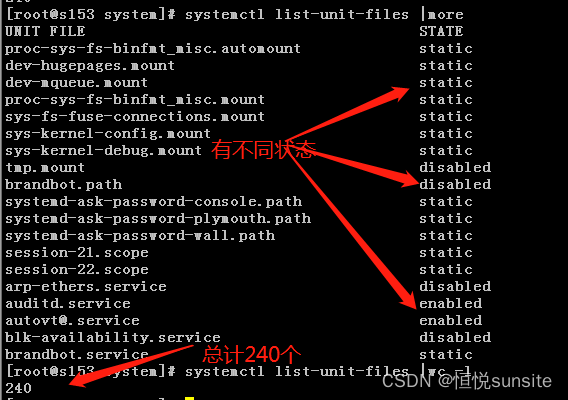
[root@s153 system]# systemctl list-unit-files
UNIT FILE STATE
proc-sys-fs-binfmt_misc.automount static
dev-hugepages.mount static
…
9、列出所有已加载单元
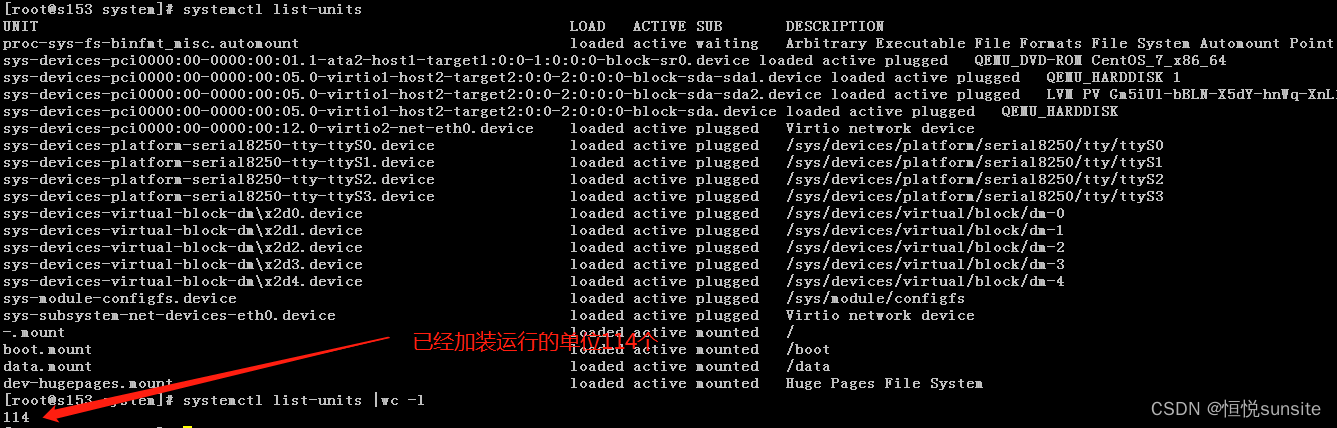
[root@s153 system]# systemctl list-units
UNIT LOAD ACTIVE SUB DESCRIPTION
proc-sys-fs-binfmt_misc.automount loaded active waiting Arbitrary Executable File Formats File System Automount Point
sys-devices-pci0000:00-0000:00:01.1-ata2-host1-target1:0:0-1:0:0:0-block-sr0.device loaded active plugged QEMU_DVD-ROM CentOS_7_x86_64
sys-devices-pci0000:00-0000:00:05.0-virtio1-host2-target2:0:0-2:0:0:0-block-sda-sda1.device loaded active plugged QEMU_HARDDISK 1
10、查看可用systemctl管理的所有服务
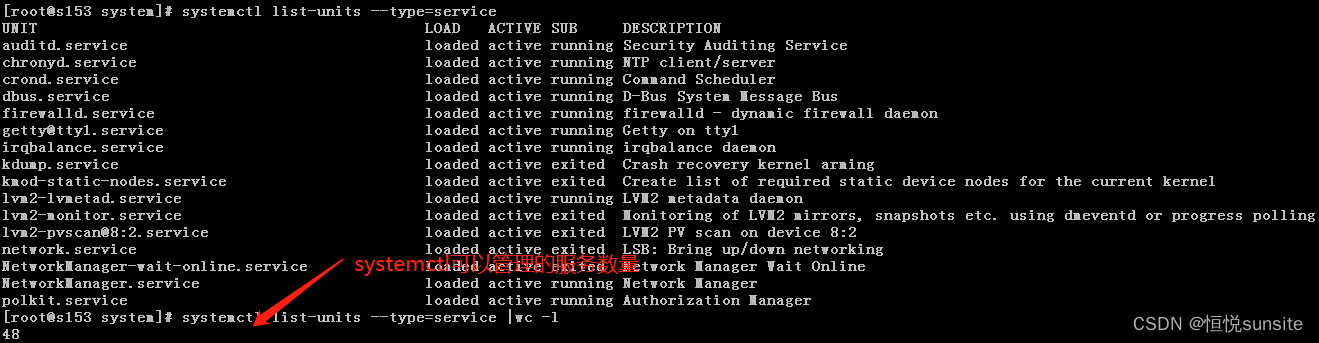
systemctl可用管理单元分很多种,日常工作中我们仅仅用于管理服务,unit的常见类型:
- Service unit: 文件扩展名.service, 用于定义系统服务;
- Target unit: 文件扩展名.target, 用于模拟实现"运行级别";
- Device unit: 文件扩展名.device, 用于定义内核识别的设备;
- Mount unit: 文件扩展名.mount, 用于定义文件系统的挂载点;
- Socket unit: 文件扩展名.socket, 用于标识进程间通信用到的socket文件;
- Snapshot unit: 文件扩展名.snapshot, 用于管理系统快照;
- Swap unit: 文件扩展名.swap, 用于标识swap设备;
- Automount unit: 文件扩展名.automount, 用于定义文件系统自动点设备;
- Path unit: 文件扩展名.path, 用于定义文件系统中的一文件或目录;
11、注销服务
服务被注销后该服务就无法通过systemctl进行启停管理。
[root@s153 system]# systemctl mask firewalld
Created symlink from /etc/systemd/system/firewalld.service to /dev/null.
[root@s153 system]# systemctl start firewalld
Failed to start firewalld.service: Unit is masked.
12、取消注销服务
[root@s153 system]# systemctl unmask firewalld
Removed symlink /etc/systemd/system/firewalld.service.
[root@s153 system]# systemctl start firewalld
13、设置服务开机自启动
[root@s153 system]# systemctl enable xinetd.service
Created symlink from /etc/systemd/system/multi-user.target.wants/xinetd.service to /usr/lib/systemd/system/xinetd.service.
14、取消服务开机自启动
[root@s153 system]# systemctl disable xinetd.service
Removed symlink /etc/systemd/system/multi-user.target.wants/xinetd.service.
15、查看机器信息
[root@s153 system]# systemctl list-machines
NAME STATE FAILED JOBS
s153 (host) running 0 0

1 machines listed.
16、查看系统环境变量
[root@s153 system]# systemctl show-environment
LANG=zh_CN.UTF-8
PATH=/usr/local/sbin:/usr/local/bin:/usr/sbin:/usr/bin
17、重新加载unit文件
如果手动修改了unit文件,可以使用此命令重新加载。
[root@s153 system]# systemctl daemon-reload
18、创建一个系统快照
[root@s153 system]# systemctl snapshot wuhs
wuhs.snapshot
19、删除指定快照
[root@s153 system]# systemctl delete wuhs
20、查看服务是否开机自启动
[root@s153 system]# systemctl is-enabled xinetd.service
enabled
21、杀死服务
[root@s153 system]# systemctl kill xinetd
[root@s153 system]# systemctl is-failed xinetd
inactive
22、进入救援模式
[root@s153 system]# systemctl rescue

Broadcast message from root@s153 on pts/1 (三 2022-07-20 13:08:30 CST):

The system is going down to rescue mode NOW!
#执行完命令后系统就进入了救援模式
#救援模式下切换到默认模式
[root@s153 ~]# systemctl default

23、关闭系统
[root@s153 ~]# systemctl poweroff
24、重启机器
[root@s153 ~]# systemctl reboot
25、系统睡眠
suspend暂停模式,类似window环境的睡眠模式,会将系统的状态数据保存到内存中,然后关闭掉大部分的系统硬件,当然,并没有实际关机。当用户按下唤醒机器的按钮,系统数据会重内存中回复,然后重新驱动被大部分关闭的硬件,就开始正常运作!唤醒的速度较快。
[root@s153 ~]# systemctl suspend
26、查看系统启动模式
[root@s153 boot]# systemctl get-default
multi-user.target
27、设置系统为图形界面启动
[root@s153 system]# systemctl set-default graphical.target
Removed symlink /etc/systemd/system/default.target.
Created symlink from /etc/systemd/system/default.target to /usr/lib/systemd/system/graphical.target.
三、systemctl参数说明
1、使用语法
用法:systemctl [OPTIONS…] {COMMAND} …
2 、参数说明
| 参数 | 参数说明 |
|---|---|
| start | 立刻启动后面接的unit |
| stop | 立刻关闭后面接的unit |
| restart | 立刻关闭后启动后面接的unit,亦即执行stop再start的意思 |
| reload | 不关闭后面接的unit的情况下,重载配置文件,让设定生效 |
| enable | 设定下次开机时,后面接的unit会被启动 |
| disable | 设定下次开机时,后面接的unit 不会被启动 |
| status | 目前后面接的这个unit 的状态,会列出是否正在执行、是否开机启动等信息。 |
| is-active | 目前有没有正在运行中 |
| is-enable | 开机时有没有预设要启用这个unit |
| kill | 不要被kill这个名字吓着了,它其实是向运行unit的进程发送信号 |
| show | 列出unit的配置。 |
| mask | 注销unit,注销后你就无法启动这个unit了 |
| unmask | 取消对unit的注销 |
| list-units | 依据unit列出目前有启动的unit。若加上–all才会列出没启动的。(等价于无参数) |
| list-unit-files | 列出所有以安装unit以及他们的开机启动状态(enabled、disabled、static、mask)。 |
| –type=TYPE | 就是unit type,主要有service,socket,target等 |
| get-default | 取得目前的 target |
| set-default | 设定后面接的 target 成为默认的操作模式 |
| isolate | 切换到后面接的模式 |
3、unit file结构
文件通常由三部分组成:
- [Unit]: 定义与Unit类型无关的通用选项;用于提供unit的描述信息,unit行为及依赖关系等。
- [Service]:与特定类型相关的专用选项;此处为Service类型。
- [Install]:定义由"systemctl enable"及"systemctl disable"命令在实现服务启用或禁用时用到的一些选项。
4、Unit段的常用选项
- Description:描述信息,意义性描述;
- After:定义unit的启动次序;表示当前unit应晚于哪些unit启动;其功能与Before相反;
- Requies:依赖到其它的units;强依赖,被依赖的units无法激活时,当前的unit即无法激活;
- Wants:依赖到其它的units;弱依赖;
- Confilcts:定义units 的冲突关系;
5、Service段的常用选项
- Type:用于定义影响ExecStart及相关参数的功能的unit进程类型;
类型有:simple、forking、oneshot、dbus、notify、idle。 - EnvironmentFile:环境配置文件;
- ExecStart:指明启动unit要运行的命令或脚本;ExecStart, ExecStartPost
- ExecStop:指明停止unit要运行的命令或脚本;
- Restart:
6、Install段的常用配置:
- Alias:
- RequiredBy:被哪些unit所依赖;
- WantBy:被哪些unit所依赖;
7、Unit文件样例
[root@s153 system]# cat chronyd.service
[Unit]
Description=NTP client/server
Documentation=man:chronyd(8) man:chrony.conf(5)
After=ntpdate.service sntp.service ntpd.service
Conflicts=ntpd.service systemd-timesyncd.service
ConditionCapability=CAP_SYS_TIME

[Service]
Type=forking
PIDFile=/var/run/chronyd.pid
EnvironmentFile=-/etc/sysconfig/chronyd
ExecStart=/usr/sbin/chronyd $OPTIONS
ExecStartPost=/usr/libexec/chrony-helper update-daemon
PrivateTmp=yes
ProtectHome=yes
ProtectSystem=full

[Install]
WantedBy=multi-user.target
以上就是Linux命令之systemctl用法详解的详细内容,更多关于Linux systemctl命令的资料请关注脚本之家其它相关文章!
相关文章
 执行Shell脚本时,可将所有输出(stdout+stderr)重定向到日志文件,方法包括直接重定向(> 2>&1)、追加模式(>>)、tee命令(屏幕+文件)、脚本内重定向(exec)及logger系统日志,推荐方法1或2,结合logrotate管理日志大小2025-07-07
 这篇文章主要给大家介绍了关于shell脚本退出的正确方式与最佳实践,shell是linux系统必备工具,在linux系统里打开终端或者使用ssh连接时都是使用命令语言作为交互支撑,需要的朋友可以参考下2023-07-07
 这篇文章主要介绍了Csh的基本语法,讲解了变量、数组、命令替换、命令行参数、IO重定向和管道等内容,需要的朋友可以参考下2014-11-11
 这篇文章主要介绍了Shell脚本实现的阳历转农历代码分享,本文是作者一个星期的工作成果,得来不易,需要的朋友可以参考下2014-09-09
 这篇文章主要介绍了Webshell基础知识深入讲解,有对于shell和对于服务器感兴趣的同学可以跟着小编一起来研究下2021-03-03
 这篇文章主要介绍了SHELL四则运算和比较 ,需要的朋友可以参考下2014-03-03
 这篇文章主要介绍了详解bash中的退出状态机制,文中通过示例代码介绍的非常详细,对大家的学习或者工作具有一定的参考学习价值,需要的朋友们下面随着小编来一起学习学习吧2020-04-04
使用Shell 脚本实现每隔100行插入一条记录且记录第一列包含行号其他列不变
本文通过实例代码给大家讲解了使用Shell 脚本实现每隔100行插入一条记录且记录第一列包含行号其他列不变的实现方法,非常不错,具有参考借鉴价值,需要的朋友参考下2016-12-12 在 Linux 系统管理中,进程的生命周期管理是维护系统稳定性和性能的关键环节,当某个进程不再需要运行,或者出现了异常行为时,我们需要使用 kill 命令来终止它,文将深入探讨 kill 命令的方方面面,从基础概念到高级应用,需要的朋友可以参考下2026-02-02
 这篇文章主要介绍了详解Shell if else语句的具体使用方法,文中通过示例代码介绍的非常详细,对大家的学习或者工作具有一定的参考学习价值,需要的朋友们下面随着小编来一起学习学习吧2021-03-03


最新评论