
vue使用js-audio-recorder实现录音功能
前言
最近项目中需要实现一个录音上传功能,用于语音评论可以上录音。

下载插件:
npm i js-audio-recorder
完整代码
<template>
  <div style="padding: 20px;">
    <h3>录音上传</h3>

    <div style="font-size:14px">
      <h3>录音时长:{{ recorder && recorder.duration.toFixed(4) }}</h3>
      <br />
      <el-button type="primary" @click="handleStart">开始录音</el-button>
      <el-button type="info" @click="handlePause">暂停录音</el-button>
      <el-button type="success" @click="handleResume">继续录音</el-button>
      <el-button type="warning" @click="handleStop">停止录音</el-button>
      <br />
      <br />
      <h3>
        播放时长:{{
          recorder &&
            (playTime > recorder.duration
              ? recorder.duration.toFixed(4)
              : playTime.toFixed(4))
        }}
      </h3>
      <br />
      <el-button type="primary" @click="handlePlay">播放录音</el-button>
      <el-button type="info" @click="handlePausePlay">暂停播放</el-button>
      <el-button type="success" @click="handleResumePlay">继续播放</el-button>
      <el-button type="warning" @click="handleStopPlay">停止播放</el-button>
      <el-button type="error" @click="handleDestroy">销毁录音</el-button>
      <el-button type="primary" @click="uploadRecord">上传</el-button>
    </div>
  </div>
</template>

<script>
import Recorder from 'js-audio-recorder'

export default {
  data() {
    return {
      recorder: null,
      playTime: 0,
      timer: null,
      src: null
    }
  },
  created() {
    this.recorder = new Recorder()
  },
  methods: {
    // 开始录音
    handleStart() {
      this.recorder = new Recorder()
      Recorder.getPermission().then(() => {
        console.log('开始录音')
        this.recorder.start() // 开始录音
      }, (error) => {
        this.$message({
          message: '请先允许该网页使用麦克风',
          type: 'info'
        })
        console.log(`${error.name} : ${error.message}`)
      })
    },
    handlePause() {
      console.log('暂停录音')
      this.recorder.pause() // 暂停录音
    },
    handleResume() {
      console.log('恢复录音')
      this.recorder.resume() // 恢复录音
    },
    handleStop() {
      console.log('停止录音')
      this.recorder.stop() // 停止录音
    },
    handlePlay() {
      console.log('播放录音')
      console.log(this.recorder)
      this.recorder.play() // 播放录音

      // 播放时长
      this.timer = setInterval(() => {
        try {
          this.playTime = this.recorder.getPlayTime()
        } catch (error) {
          this.timer = null
        }
      }, 100)
    },
    handlePausePlay() {
      console.log('暂停播放')
      this.recorder.pausePlay() // 暂停播放

      // 播放时长
      this.playTime = this.recorder.getPlayTime()
      this.time = null
    },
    handleResumePlay() {
      console.log('恢复播放')
      this.recorder.resumePlay() // 恢复播放

      // 播放时长
      this.timer = setInterval(() => {
        try {
          this.playTime = this.recorder.getPlayTime()
        } catch (error) {
          this.timer = null
        }
      }, 100)
    },
    handleStopPlay() {
      console.log('停止播放')
      this.recorder.stopPlay() // 停止播放

      // 播放时长
      this.playTime = this.recorder.getPlayTime()
      this.timer = null
    },
    handleDestroy() {
      console.log('销毁实例')
      this.recorder.destroy() // 毁实例
      this.timer = null
    },
    uploadRecord() {
      if (this.recorder == null || this.recorder.duration === 0) {
        this.$message({
          message: '请先录音',
          type: 'error'
        })
        return false
      }
      this.recorder.pause() // 暂停录音
      this.timer = null
      console.log('上传录音')// 上传录音

      const formData = new FormData()
      const blob = this.recorder.getWAVBlob()// 获取wav格式音频数据
      // 此处获取到blob对象后需要设置fileName满足当前项目上传需求,其它项目可直接传把blob作为file塞入formData
      const newbolb = new Blob([blob], { type: 'audio/wav' })
      const fileOfBlob = new File([newbolb], new Date().getTime() + '.wav')
      formData.append('file', fileOfBlob)
      const url = window.URL.createObjectURL(fileOfBlob)
      this.src = url
      // const axios = require('axios')
      // axios.post(url, formData).then(res => {
      //   console.log(res.data.data[0].url)
      // })
    }
  }
}
</script>
播放通过audio标签控制,可以上传到公司服务器获取线上地址,还可以通过blob对象获取到播放url
  const blob = this.recorder.getWAVBlob()
  this.url = window.URL.createObjectURL(blob)
注意事项
注意,调试环境这里会报错,所以开始解决报错问题:
报错:error:浏览器不支持getUserMedia !
其实这是因为浏览器不支持http:IP开头的路径,认为这个路径不安全
浏览器只支持file:,https:,http://localhost,
解决办法:
chrome浏览器
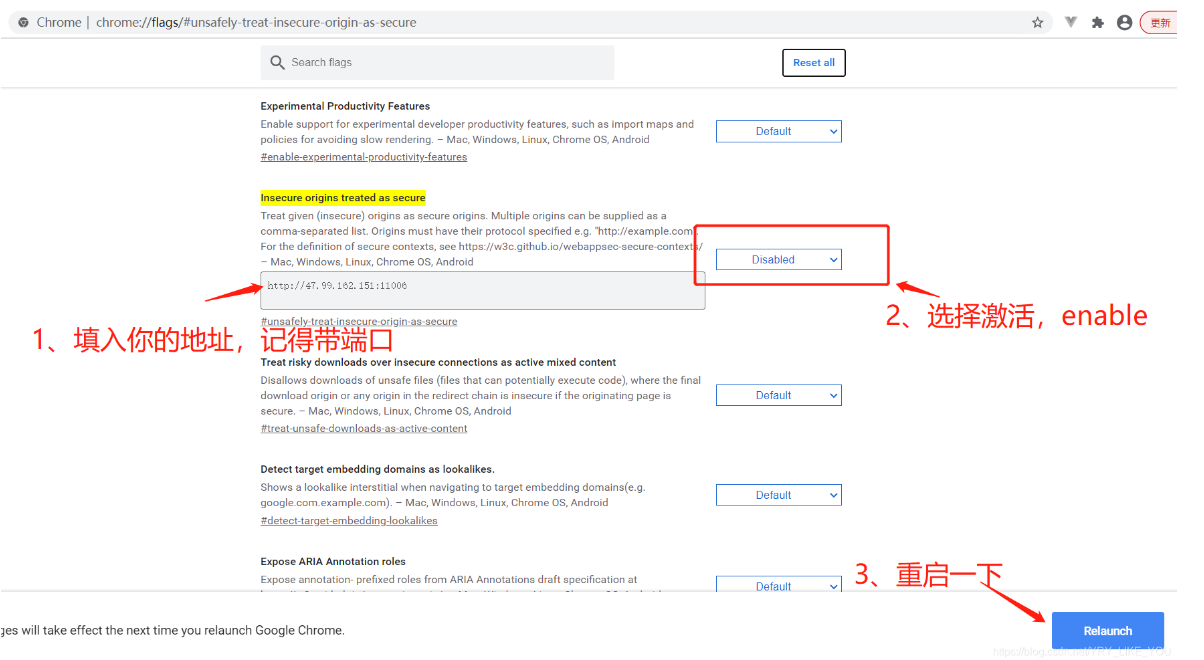
地址栏输入:chrome://flags/#unsafely-treat-insecure-origin-as-secure
输入你的本地网址,改为enabled,选择重启浏览器按钮【生产环境当中由于是使用域名进行访问,所以就不会报错。】
然后就OK了
总结
1.录音时长duration是recorder的属性,可以实时获取;但播放时长需要通过方法getPlayTime()获取,播放时不能实时改变,此处我用了个100ms延迟的定时器假装实时获取,如果有更好的办法,欢迎指教。
2.getWAVBlob()获取录音数据的方法获取的时blob对象,当前项目中需要验证fileName,所以需要把blob转成file,改变fileName上传。
3.官网提供的demo中还有波形图,可以参考。
官网地址:https://recorder-api.zhuyuntao.cn/
官网项目演示地址:https://recorder.zhuyuntao.cn/
更新
客户说录音文件太大,20s就有2M左右,需要压缩。
查看文档降低采样位数,采样率,单声道可以降低音频质量,测试20s大概只有200k左右,只需获取record对象时申明即可。
this.recorder = new Recorder({
                    sampleBits: 8, // 采样位数,支持 8 或 16,默认是16
                    sampleRate: 11025, // 采样率,支持 11025、16000、22050、24000、44100、48000,根据浏览器默认值,我的chrome是48000
                    numChannels: 1 // 声道,支持 1 或 2, 默认是1
                    // compiling: false,(0.x版本中生效,1.x增加中)  // 是否边录边转换,默认是false
                })
到此这篇关于vue使用js-audio-recorder实现录音功能的文章就介绍到这了,更多相关vue录音内容请搜索脚本之家以前的文章或继续浏览下面的相关文章希望大家以后多多支持脚本之家!
相关文章

ESLint在Vue3 + TypeScript中的配置与使用方法
在Vue项目中配置ESLint,可以确保代码风格的一致性和代码质量,这篇文章主要介绍了ESLint在Vue3+TypeScript中配置与使用方法的相关资料,文中通过代码介绍的非常详细,需要的朋友可以参考下2025-12-12
vue中v-for循环数组,在方法中splice删除数组元素踩坑记录
这篇文章主要介绍了vue中v-for循环数组,在方法中splice删除数组元素踩坑记录,具有很好的参考价值,希望对大家有所帮助。如有错误或未考虑完全的地方,望不吝赐教2023-06-06 这篇文章主要介绍了浅谈vue2 单页面如何设置网页title,小编觉得挺不错的,现在分享给大家,也给大家做个参考。一起跟随小编过来看看吧2017-11-11
 UniApp是一个跨平台的前端框架,它允许开发者使用一套代码构建同时运行在微信小程序、H5、iOS、Android等多个平台的应用,在UniApp中,上传图片通常涉及到使用其提供的File API或者第三方插件来进行操作,所以本文给大家介绍了Uniapp图片上传的两种实现方式2025-10-10
 在 Vue 3 中,覆盖组件样式的方法与 Vue 2 相似,但由于 Vue 3 更多地依赖于 CSS 的模块化,一些最佳实践可能会有所不同,下面就跟随小编一起来了解一下吧2024-04-04
 这篇文章主要为大家详细介绍了Vue.JS入门教程之事件监听,具有一定的参考价值,感兴趣的小伙伴们可以参考一下2016-12-12
 这篇文章主要介绍了详解vue中在父组件点击按钮触发子组件的事件,文中通过示例代码介绍的非常详细,对大家的学习或者工作具有一定的参考学习价值,需要的朋友们下面随着小编来一起学习学习吧2020-11-11
 这篇文章主要为大家详细介绍了vue实现图片滑动验证,文中示例代码介绍的非常详细,具有一定的参考价值,感兴趣的小伙伴们可以参考一下2022-03-03
 这篇文章主要介绍了Vue中的路由导航守卫导航解析流程,正如其名,vue-router 提供的导航守卫主要用来通过跳转或取消的方式守卫导航。这里有很多方式植入路由导航中:全局的,单个路由独享的,或者组件级的2023-04-04
vue 监听键盘回车事件详解 @keyup.enter || @keyup.enter.native
今天小编就为大家分享一篇vue 监听键盘回车事件详解 @keyup.enter || @keyup.enter.native,具有很好的参考价值,希望对大家有所帮助。一起跟随小编过来看看吧2018-08-08


最新评论